
MySQL复制
- 扩展方式: Scale Up(向上扩展) ,Scale Out(向外扩展)
- MySQL的扩展
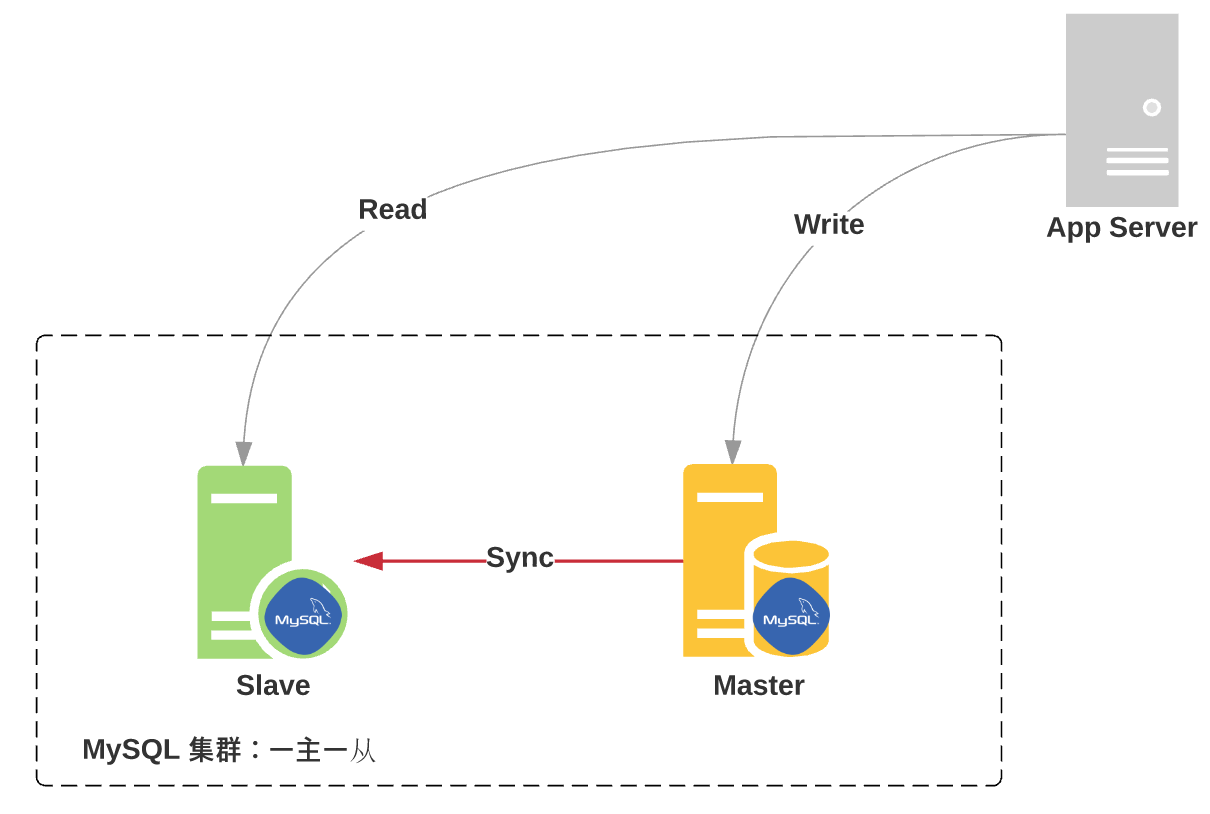
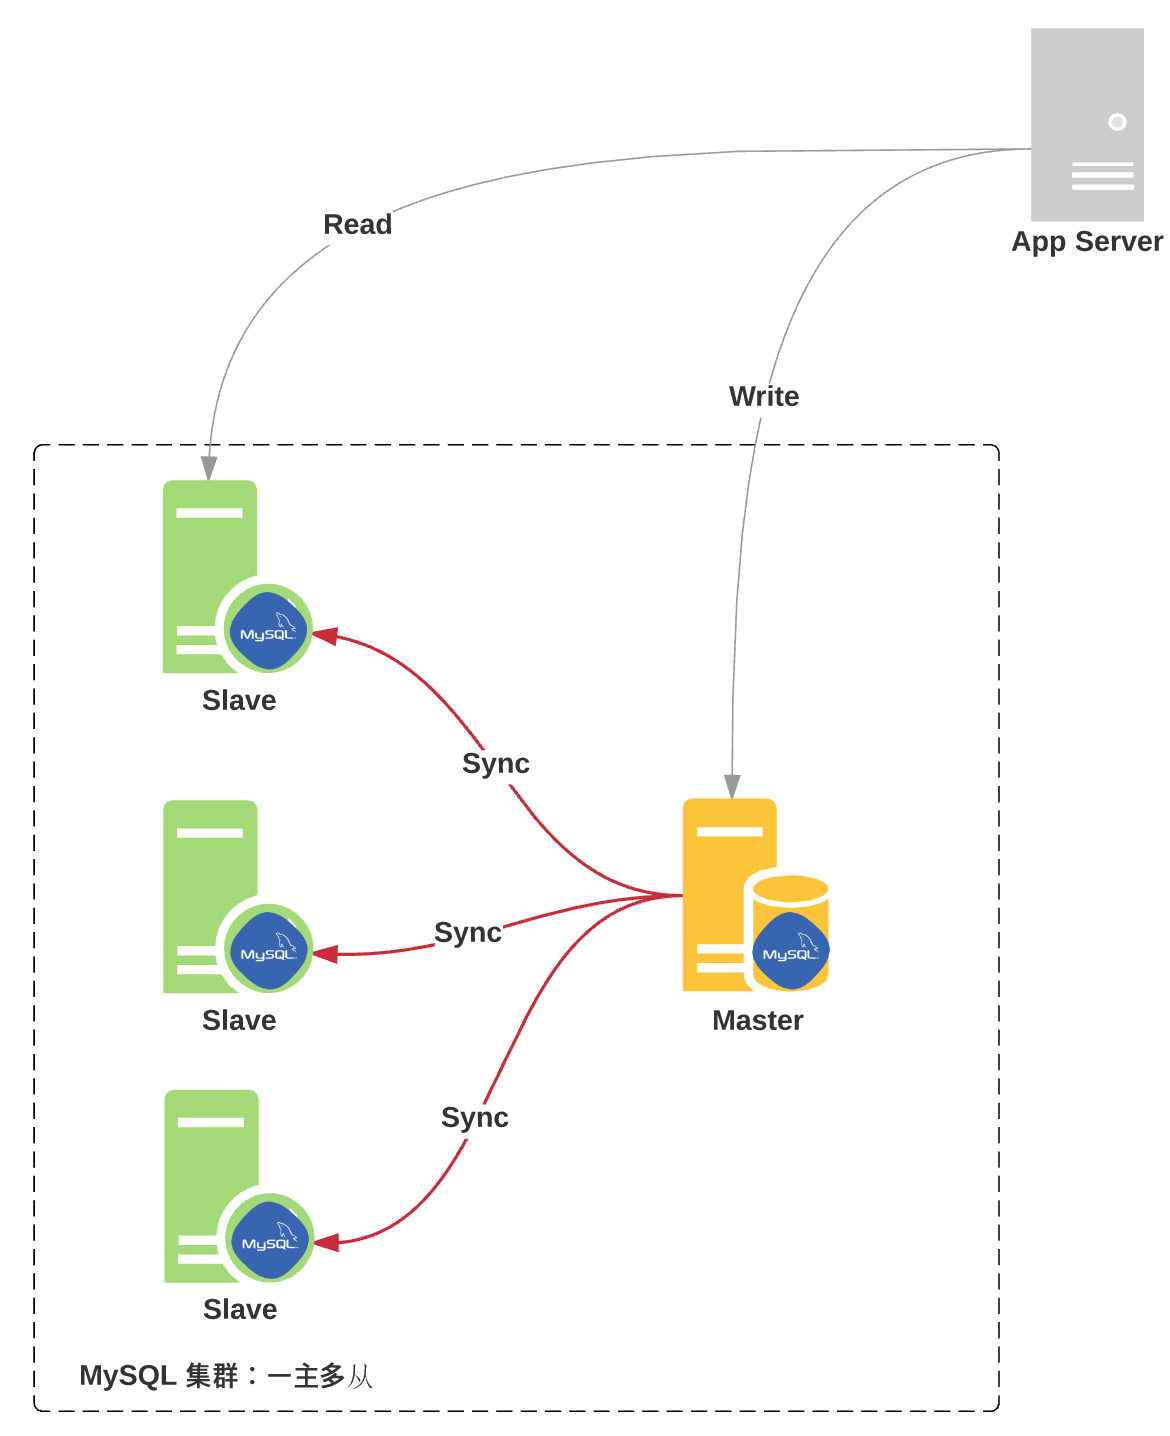
读写分离
复制:每个节点都有相同的数据集
向外扩展
二进制日志
单向 - 复制的功用:
数据分布
负载均衡读
备份
高可用和故障切换
MySQL升级测试 - 缺点:
用户访问从客户端到主服务器为并行写(支持事务,使用事务可以同时写),效率高;从主服务器复制到从服务器为串行写(二进制日志为累加写入,并不是同时进行,而是需要一个一个的写入从服务器),效率较低;这样一来主从同步就产生了很大的延迟
MySQL读写分离
-
读写分离应用:
mysql-proxy:Oracle,https://downloads.mysql.com/archives/proxy/
Atlas:Qihoo,https://github.com/Qihoo360/Atlas/blob/master/README_ZH.md
dbproxy:美团,https://github.com/Meituan-Dianping/DBProxy
Cetus:网易乐得,https://github.com/Lede-Inc/cetus
Amoeba:https://sourceforge.net/projects/amoeba/
Cobar:阿里巴巴,Amoeba的升级版
Mycat:基于Cobar, http://www.mycat.io/
ProxySQL:https://proxysql.com/ -
一主一从
- 一主多从
- 主从复制原理
主从复制机制:
异步复制
客户端向主服务器写入数据,主服务器向从服务器发起数据同步,只要从服务器数据发生改变,无论后续从服务器数据是否同步成功,主服务器都返回同步成功的结果给客户端
同步复制
客户端向主服务器写入数据,主服务器向从服务器发起数据同步,只有当从服务器数据同步成功后,主服务器才会返回同步成功结果给客户端
缺点:同步效率很低,不推荐这种做法
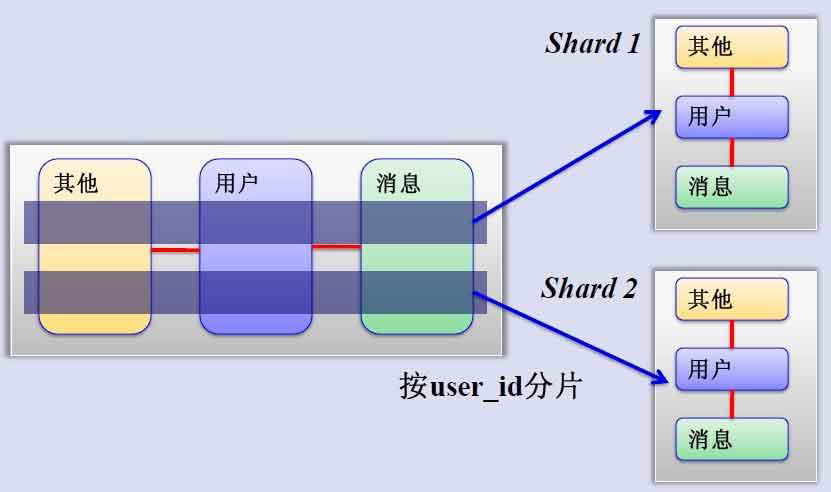
- MySQL垂直分区
把一个表拆分为多个表,不同的表存放在不同的数据库服务器上,减轻服务器压力,提升性能
缺点:无法进行多表查询
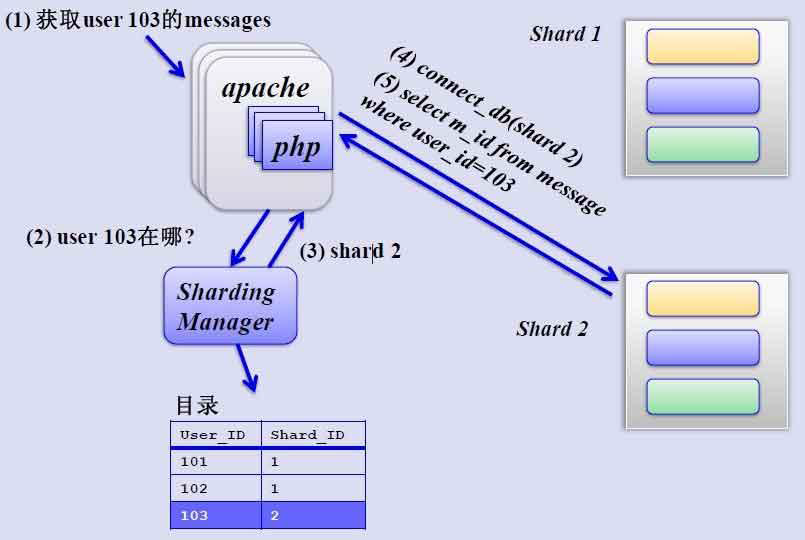
- MySQL水平分片(Sharding)
把同一个表横向切分为多片,根据需求按照步进方式(如:奇数行或偶数行)进行分片,存在不同服务器上
需要分片管理器
- 对应shard中查询相关数据
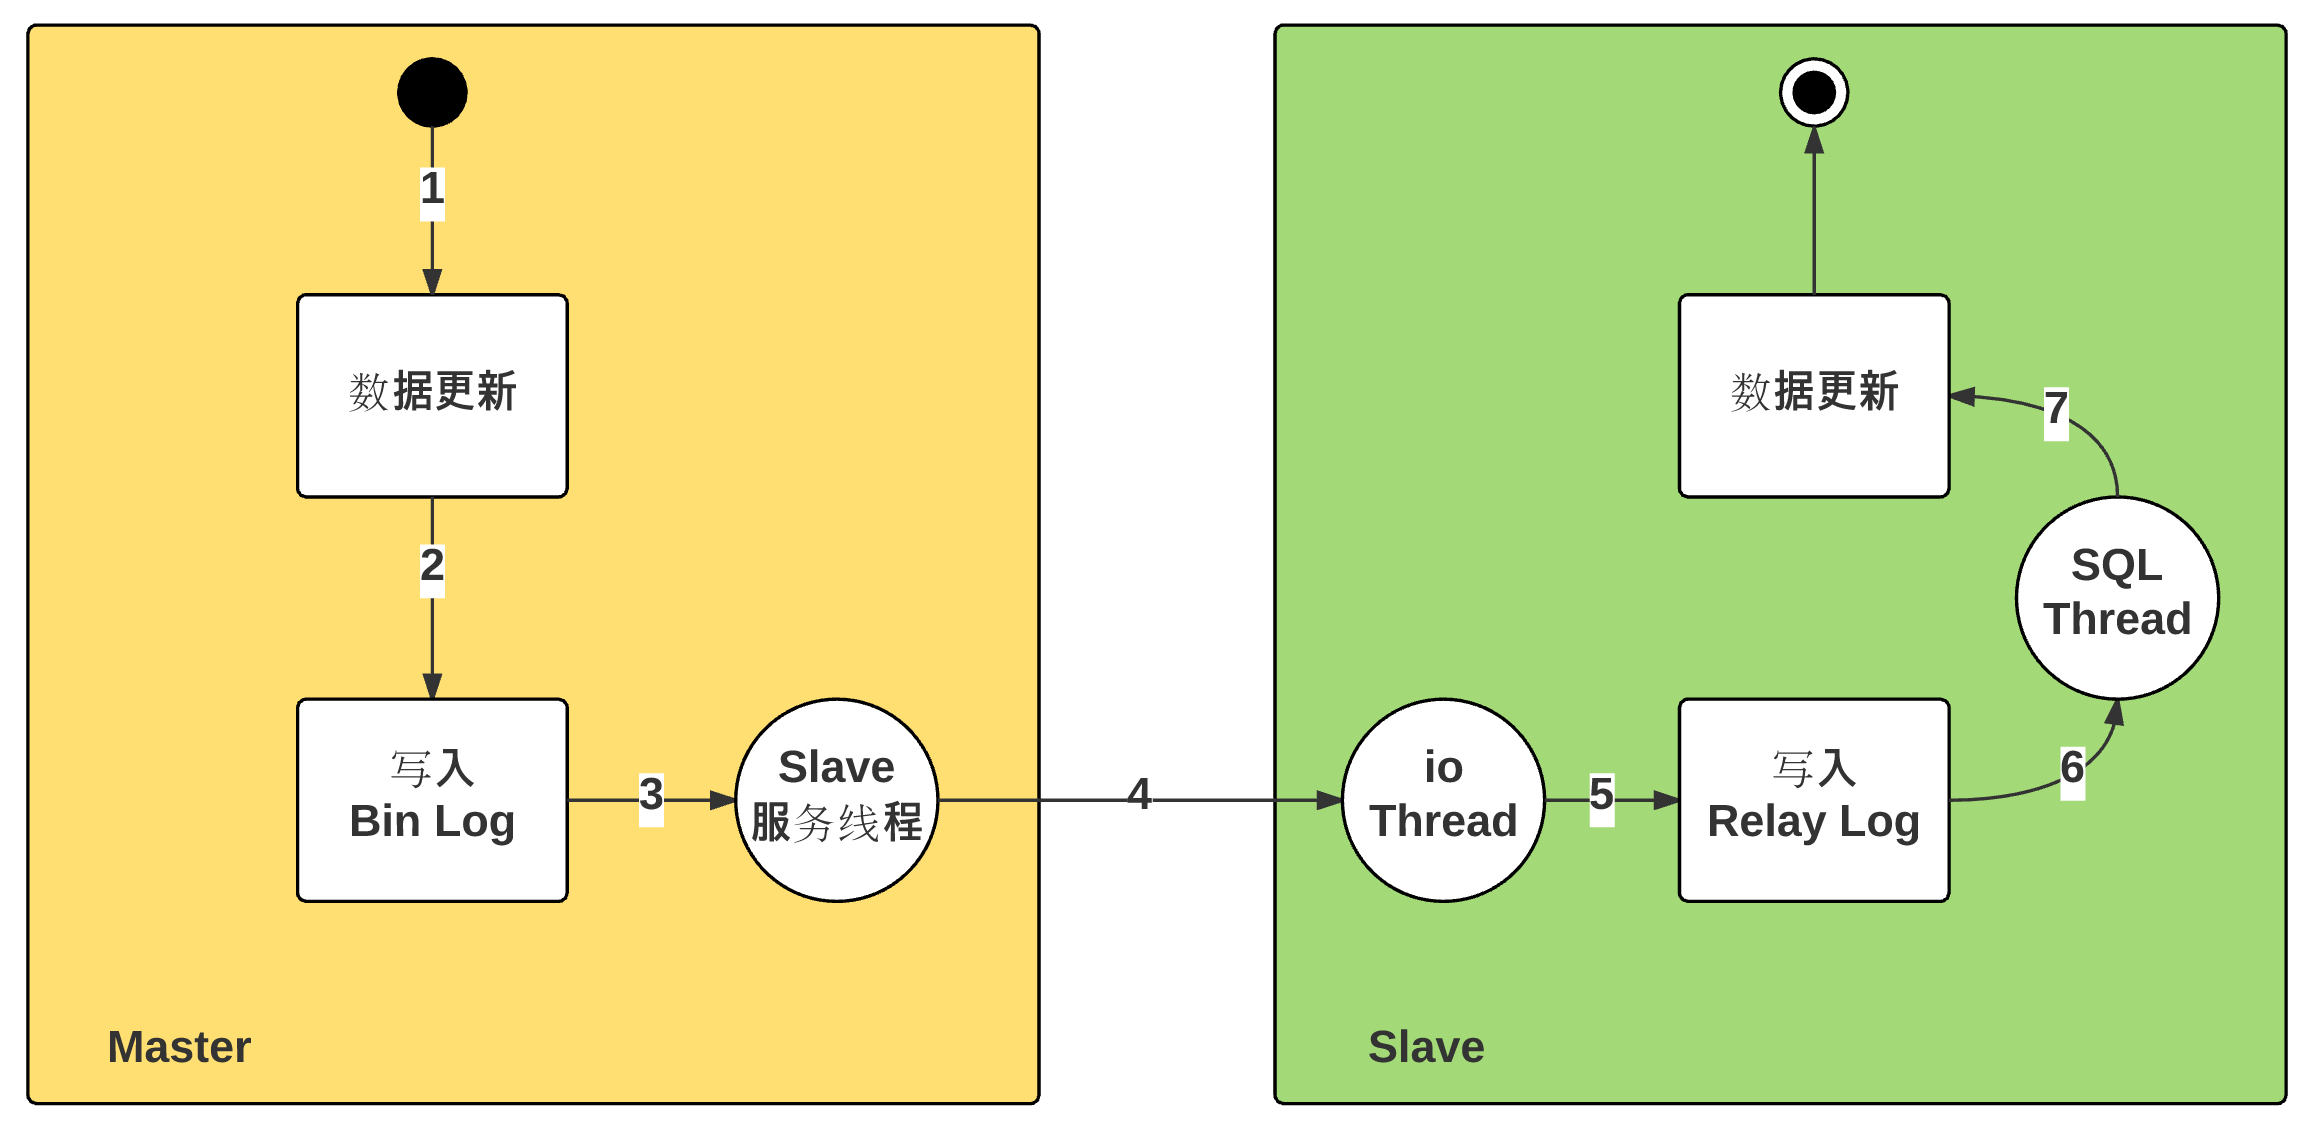
- 主从复制线程:
主节点:
dump Thread:为每个Slave的I/O Thread启动一个dump线程,用于向其发送binary log events
从节点:
I/O Thread:向Master请求二进制日志事件,并保存于中继日志中
SQL Thread:从中继日志中读取日志事件,在本地完成重放 - 跟复制功能相关的文件:
master.info:用于保存slave连接至master时的相关信息,例如账号、密码、服务器地址等
relay-log.info:保存在当前slave节点上已经复制的当前二进制日志和本地replay log日志的对应关系 - 主从复制特点:
异步复制
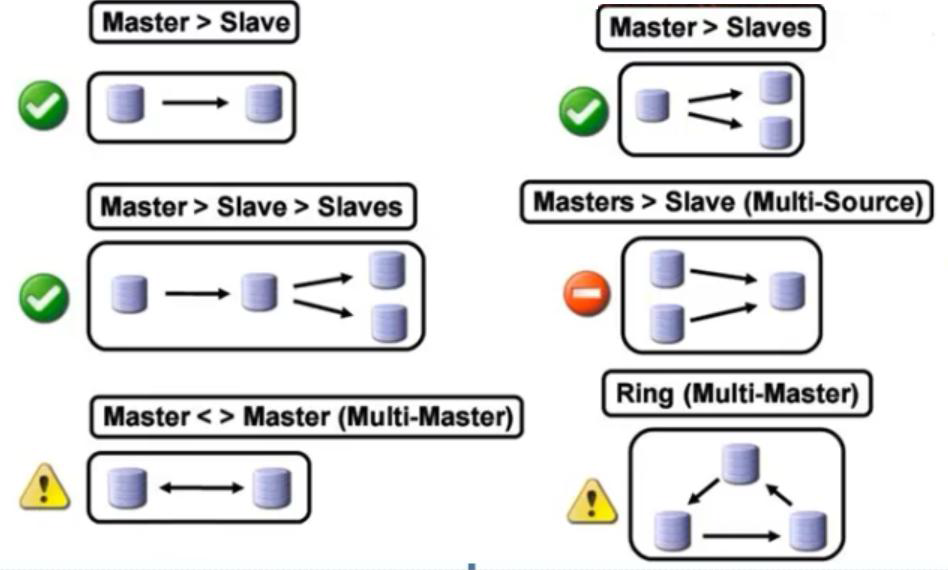
主从数据不一致比较常见 - 复制架构:
Master/Slave, Master/Master, 环状复制
一主多从
从服务器还可以再有从服务器
一从多主:适用于多个不同数据库 - 复制需要考虑二进制日志事件记录格式
STATEMENT(5.0之前)
ROW(5.1之后,推荐)
MIXED - MySQL复制模型
从服务器收到主服务器发来的二进制日志后,在执行过程中需要搞清楚事件是在本机发生的事件还是在别的主服务器上发生的事件
对于数据服务器来说,最终是把数据写入从服务器的数据库中,在写的时候需要分清楚对数据库的更新操作是来自于自身的更改还是来自于主服务器的更改,因此需要标识主服务器和从服务器的身份
这种标志称为server_id
- 主从配置过程:参看官网
https://mariadb.com/kb/en/library/setting-up-replication/
https://dev.mysql.com/doc/refman/5.5/en/replication-configuration.html - 主节点配置:
(1) 启用二进制日志
[mysqld]
log_bin
(2) 为当前节点设置一个全局惟一的ID号
[mysqld]
server_id=#
log-basename=master 可选项,设置datadir中日志名称,确保不依赖主机名
(3) 创建有复制权限的用户账号
GRANT REPLICATION SLAVE ON . TO 'repluser'@'HOST' IDENTIFIED BY 'replpass'; - 从节点配置:
(1) 启动中继日志
[mysqld]
server_id=# 为当前节点设置一个全局惟的ID号
relay_log=relay-log relay log的文件路径,默认值hostname-relay-bin
relay_log_index=relay-log.index 默认值hostname-relay-bin.index
(2) 使用有复制权限的用户账号连接至主服务器,并启动复制线程
mysql> CHANGE MASTER TO MASTER_HOST='host', MASTER_USER='repluser', MASTER_PASSWORD='replpass', MASTER_LOG_FILE='mysql-bin.xxxxx', MASTER_LOG_POS=#;
mysql> START SLAVE [IO_THREAD|SQL_THREAD];
示例:主从复制
实验环境:
    master主机:192.168.32.200
    slave01主机:192.168.32.201

主节点slave配置:
    配置文件:
        [root@master ~]# vim /etc/my.cnf
        [mysqld]
        server_id=1         #指定serverid
        innodb_file_per_table    #分表显示,可省略,建议添加
        log_bin             #开启二进制日志
        skip_name_resolve   #关闭ip地址反解,建议添加
    启动数据库
        systemctl start mariadb
    授权从服务器:
        [root@master ~]# mysql
        MariaDB [(none)]> show master status;    #查看二进制日志位置,便于确定日志复制位置
        +--------------------+----------+--------------+------------------+
        | File               | Position | Binlog_Do_DB | Binlog_Ignore_DB |
        +--------------------+----------+--------------+------------------+
        | mariadb-bin.000001 |      245 |              |                  |
        +--------------------+----------+--------------+------------------+
        注意:如果从此位置开始复制,将会把后续的创建账号的操作同步到从服务器,如果不需要从服务器有此操作,可以在授权从服务器权限后的位置开始同步
        把该操作同步到从服务器的好处是当主服务器出现故障,从服务器提升为主服务器时,其他从服务器可以使用该账号,而无需再次创建
        MariaDB [(none)]> grant replication slave on *.* to 'repluser'@'192.168.32.%' identified by 'centos';   #授权从服务器能够从主服务器同步数据库的权限
    导入数据库
        [root@master ~]# mysql < hellodb_innodb.sql   #导入数据库用于测试
        [root@master ~]# mysql
        MariaDB [(none)]> show master status;
        +--------------------+----------+--------------+------------------+
        | File               | Position | Binlog_Do_DB | Binlog_Ignore_DB |
        +--------------------+----------+--------------+------------------+
        | mariadb-bin.000001 |     7814 |              |                  |
        +--------------------+----------+--------------+------------------+

从节点slave01配置
    配置文件:
        [root@slave01 ~]# vim /etc/my.cnf
        [mysqld]
        server_id=2      #指定从服务器serverid
        relay_log=relay-log
        relay_log_index=relay-log.index
        innodb_file_per_table
        skip_name_resolve
    启动数据库
        systemctl start mariadb
    使用有复制权限的用户账号连接至主服务器,并启动复制线程
        MariaDB [(none)]> help change master to   #使用帮助查看具体复制命令,根据示例进行更改即可
        MariaDB [(none)]> change master to
    ->   MASTER_HOST='192.168.32.200',
    ->   MASTER_USER='repluser',
    ->   MASTER_PASSWORD='centos',
    ->   MASTER_PORT=3306,
    ->   MASTER_LOG_FILE='mariadb-bin.000001 ',
    ->   MASTER_LOG_POS=245;
        MariaDB [(none)]> show slave status\G  #查看从服务器状态
        MariaDB [(none)]> start slave;   #开始复制
        MariaDB [(none)]> show slave status\G
        *************************** 1. row ***************************
                       Slave_IO_State: Waiting for master to send event
                          Master_Host: 192.168.32.200
                          Master_User: repluser
                          Master_Port: 3306
                        Connect_Retry: 60
                      Master_Log_File: mariadb-bin.000001
                  Read_Master_Log_Pos: 7812           #读取主节点日志位置
                       Relay_Log_File: relay-log.000002
                        Relay_Log_Pos: 8098
                Relay_Master_Log_File: mariadb-bin.000001
                     Slave_IO_Running: Yes
                    Slave_SQL_Running: Yes
                      Replicate_Do_DB:
                  Replicate_Ignore_DB:
                   Replicate_Do_Table:
               Replicate_Ignore_Table:
              Replicate_Wild_Do_Table:
          Replicate_Wild_Ignore_Table:
                           Last_Errno: 0
                           Last_Error:
                         Skip_Counter: 0
                  Exec_Master_Log_Pos: 7812           #同步主节点日志位置
                      Relay_Log_Space: 8386
                      Until_Condition: None
                       Until_Log_File:
                        Until_Log_Pos: 0
                   Master_SSL_Allowed: No
                   Master_SSL_CA_File:
                   Master_SSL_CA_Path:
                      Master_SSL_Cert:
                    Master_SSL_Cipher:
                       Master_SSL_Key:
                Seconds_Behind_Master: 0
        Master_SSL_Verify_Server_Cert: No
                        Last_IO_Errno: 0
                        Last_IO_Error:
                       Last_SQL_Errno: 0
                       Last_SQL_Error:
          Replicate_Ignore_Server_Ids:
                     Master_Server_Id: 1
        1 row in set (0.00 sec)
        注意:在该状态中Read_Master_Log_Pos: 7812和Exec_Master_Log_Pos: 7812 有可能会不一致,这是因为主从复制可能存在延迟,处于正在复制过程中,当同步完成后,二者位置会变为一样

    查看数据库是否同步到从节点
        MariaDB [(none)]> use hellodb
        MariaDB [hellodb]> show tables;    #查看数据中的表是否同步
        +-------------------+
        | Tables_in_hellodb |
        +-------------------+
        | classes           |
        | coc               |
        | courses           |
        | scores            |
        | students          |
        | teachers          |
        | toc               |
        +-------------------+
        7 rows in set (0.00 sec)

        MariaDB [hellodb]> select user,host from mysql.user; #查看授权账号是否同步
        +----------+--------------+
        | user     | host         |
        +----------+--------------+
        | root     | 127.0.0.1    |
        | repluser | 192.168.32.% |
        | root     | ::1          |
        |          | centos7      |
        | root     | centos7      |
        |          | localhost    |
        | root     | localhost    |
        +----------+--------------+
        7 rows in set (0.00 sec)
    在主节点插入数据测试同步
        MariaDB [hellodb]> insert teachers values(5,'a',20,'M');
    查看日志信息
        MariaDB [hellodb]> show master status;
        +--------------------+----------+--------------+------------------+
        | File               | Position | Binlog_Do_DB | Binlog_Ignore_DB |
        +--------------------+----------+--------------+------------------+
        | mariadb-bin.000001 |     8012 |              |                  |
        +--------------------+----------+--------------+------------------+
        1 row in set (0.00 sec)
    在从节点查看同步信息
        MariaDB [hellodb]> show slave status\G
        *************************** 1. row ***************************
                       Slave_IO_State: Waiting for master to send event
                          Master_Host: 192.168.32.200
                          Master_User: repluser
                          Master_Port: 3306
                        Connect_Retry: 60
                      Master_Log_File: mariadb-bin.000001
                  Read_Master_Log_Pos: 8012
                       Relay_Log_File: relay-log.000002
                        Relay_Log_Pos: 8298
                Relay_Master_Log_File: mariadb-bin.000001
                     Slave_IO_Running: Yes
                    Slave_SQL_Running: Yes
                      Replicate_Do_DB:
                  Replicate_Ignore_DB:
                   Replicate_Do_Table:
               Replicate_Ignore_Table:
              Replicate_Wild_Do_Table:
          Replicate_Wild_Ignore_Table:
                           Last_Errno: 0
                           Last_Error:
                         Skip_Counter: 0
                  Exec_Master_Log_Pos: 8012
                      Relay_Log_Space: 8586
                      Until_Condition: None
                       Until_Log_File:
                        Until_Log_Pos: 0
                   Master_SSL_Allowed: No
                   Master_SSL_CA_File:
                   Master_SSL_CA_Path:
                      Master_SSL_Cert:
                    Master_SSL_Cipher:
                       Master_SSL_Key:
                Seconds_Behind_Master: 0
        Master_SSL_Verify_Server_Cert: No
                        Last_IO_Errno: 0
                        Last_IO_Error:
                       Last_SQL_Errno: 0
                       Last_SQL_Error:
          Replicate_Ignore_Server_Ids:
                     Master_Server_Id: 1
    查看相关日志文件内容
        [root@slave01 ~]# cd /var/lib/mysql
        [root@slave01 mysql]# ll     #查看生成的日志文件
        -rw-rw---- 1 mysql mysql       89 Dec 23 17:16 master.info
        -rw-rw---- 1 mysql mysql      245 Dec 23 17:16 relay-log.000001
        -rw-rw---- 1 mysql mysql       19 Dec 23 17:16 relay-log.index
        -rw-rw---- 1 mysql mysql       45 Dec 23 17:16 relay-log.info
        [root@slave01 mysql]# cat master.info    #记录授权信息
        18
        mariadb-bin.000001
        245
        192.168.32.200
        repluser
        centos
        3306
        60
        0

        0
        1800.000

        0
        [root@slave01 mysql]# cat relay-log.in
        relay-log.index  relay-log.info
        [root@slave01 mysql]# cat relay-log.info  #记录二进制日志位置信息
        ./relay-log.000001
        4
        mariadb-bin.000001
        245
        [root@slave01 mysql]# cat relay-log.index  #中继日志名称
./relay-log.000001- 如果主节点已经运行了一段时间,且有大量数据时,如何配置并启动slave节点
通过备份恢复数据至从服务器
复制起始位置为备份时,二进制日志文件及其POS
示例:
实验环境:
  master主机:192.168.32.200
  slave01主机:192.168.32.201
  新增slave02节点:192.168.32.202

    配置文件:
        [root@slave02 ~]# vim /etc/my.cnf
        [mysqld]
        server_id=3
        relay_log=relay-log
        relay_log_index=relay-log.index
        innodb_file_per_table
        skip_name_resolve

在主节点192.168.32.200上
    数据库完全备份:
        mysqldump -A -F --single-transaction --master-data=1 >all.sql
    复制到新增slave02节点上
        scp all.sql 192.168.32.202:/root/

在新增slave02节点上
    需要对all.sql中的语句进行修改,就可以同步到最新状态,而无需执行同步语句
        vim  all.sql
        CHANGE MASTER TO MASTER_LOG_FILE='mariadb-bin.000002', MASTER_LOG_POS=245;
    可以发现以上语句就是从节点进行同步时执行的sql语句,但是缺少授权的用户,密码以及主机名,
    只需把这三项信息添加进去后,然后把all.sql导入新增节点数据库即可把数据同步到最新状态
    不需要在完全备份的基础上进行同步操作
    更改后的语句为:
        CHANGE MASTER TO MASTER_HOST='192.168.32.200', MASTER_USER='repluser',MASTER_PASSWORD='centos',MASTER_PORT=3306,MASTER_LOG_FILE='mariadb-bin.000002', MASTER_LOG_POS=245;
    把all.sql导入slave02从节点数据库
        [root@slave02 ~]# systemctl start mariadb
        [root@slave02 ~]# mysql < all.sql
    启动主从同步
        MariaDB [(none)]> start slave;
    查看同步状态
        MariaDB [(none)]> show slave status\G

在主节点新增一条记录测试,是否能够同步
    在hellodb数据库teachers表添加一条记录
        MariaDB [hellodb]> insert teachers values(6,'b',30,'F');
在slave02节点上查看同步信息
        MariaDB [hellodb]> use  hellodb;
        MariaDB [hellodb]> select * from teachers;
        +-----+---------------+-----+--------+
        | TID | Name          | Age | Gender |
        +-----+---------------+-----+--------+
        |   1 | Song Jiang    |  45 | M      |
        |   2 | Zhang Sanfeng |  94 | M      |
        |   3 | Miejue Shitai |  77 | F      |
        |   4 | Lin Chaoying  |  93 | F      |
        |   5 | a             |  20 | M      |
        |   6 | b             |  30 | F      |
+-----+---------------+-----+--------+- 如果主服务器宕机,如何提升一个从服务器代替主服务器工作
提升数据库内容最新的从服务器为主服务器,丢失数据较少
如何确定哪个从服务器上的数据库内容最新
查看同步信息,即查看/var/lib/mysql/master.info
示例:
思路:清除从服务器上的信息,更改其他从服务器上主服务器的信息。另外,在配置过程中要禁止其他用户对数据库进行操作,要对数据库加锁

实验环境
    master主机:192.168.32.200    出现故障
    slave01主机:192.168.32.201   提升该从节点为主节点
    slave02主机:192.168.32.202

假设提升slave01节点192.168.32.201位主节点
    在主节点192.168.32.200:
        模拟主节点mariadb服务出现故障,关闭主服务器192.168.32.200的maridb服务
    在从节点slave01 192.168.32.201上
    查看同步状态
        MariaDB [(none)]> show slave status\G
        *************************** 1. row ***************************
                       Slave_IO_State: Reconnecting after a failed master event read
                          Master_Host: 192.168.32.200
                          Master_User: repluser
                          Master_Port: 3306
                        Connect_Retry: 60
                      Master_Log_File: mariadb-bin.000002
                  Read_Master_Log_Pos: 445
                       Relay_Log_File: relay-log.000006
                        Relay_Log_Pos: 531
                Relay_Master_Log_File: mariadb-bin.000002
                     Slave_IO_Running: Connecting
                    Slave_SQL_Running: Yes
                      Replicate_Do_DB:
                  Replicate_Ignore_DB:
                   Replicate_Do_Table:
               Replicate_Ignore_Table:
              Replicate_Wild_Do_Table:
          Replicate_Wild_Ignore_Table:
                           Last_Errno: 0
                           Last_Error:
                         Skip_Counter: 0
                  Exec_Master_Log_Pos: 445
                      Relay_Log_Space: 819
                      Until_Condition: None
                       Until_Log_File:
                        Until_Log_Pos: 0
                   Master_SSL_Allowed: No
                   Master_SSL_CA_File:
                   Master_SSL_CA_Path:
                      Master_SSL_Cert:
                    Master_SSL_Cipher:
                       Master_SSL_Key:
                Seconds_Behind_Master: NULL
        Master_SSL_Verify_Server_Cert: No
                        Last_IO_Errno: 2003
                        Last_IO_Error: error reconnecting to master 'repluser@192.168.32.200:3306' - retry-time: 60  retries: 86400  message: Can't connect to MySQL server on '192.168.32.200' (111)
                       Last_SQL_Errno: 0
                       Last_SQL_Error:
          Replicate_Ignore_Server_Ids:
                     Master_Server_Id: 1
        1 row in set (0.00 sec)
    报错提示无法连接主服务器

    在数据库中清除从服务器原有信息
        MariaDB [(none)]> stop slave;     #要先停止同步
        MariaDB [(none)]> reset slave all;   #清除从服务器的原有信息

    更改配置文件:启用二进制日志,删除中继日志,read_only选项
        vim /etc/my.cnf
        [mysqld]
        server_id=2
        log_bin
        innodb_file_per_table
        skip_name_resolve
    重启mariadb服务
        systemctl restart mariadb

    注意:此时要授权用户从服务器能够从本机同步数据,这是可以使用从原主服务器同步过来的已授权的账号,即repluser
        MariaDB [(none)]> select user,host from mysql.user;
        +----------+--------------+
        | user     | host         |
        +----------+--------------+
        | root     | 127.0.0.1    |
        | repluser | 192.168.32.% |
        | root     | ::1          |
        |          | centos7      |
        | root     | centos7      |
        |          | localhost    |
        | root     | localhost    |
        +----------+--------------+
此时,作为主节点的主备工作已经完成
    查看并记录位置信息
        MariaDB [(none)]> show master status;
        +--------------------+----------+--------------+------------------+
        | File               | Position | Binlog_Do_DB | Binlog_Ignore_DB |
        +--------------------+----------+--------------+------------------+
        | mariadb-bin.000001 |      245 |              |                  |
        +--------------------+----------+--------------+------------------+
        1 row in set (0.00 sec)

在slave02节点192.168.32.202上
    配置文件无需更改
        可以添加read_only选项
        [mysqld]
        server_id=3
        read_only=on     #从服务器设为只读,只对普通用户生效
        relay_log=relay-log
        relay_log_index=relay-log.index
        innodb_file_per_table
        skip_name_resolve
    如果配置文件没有更改,则无需重启服务,如果配置文件有更改则需要重启服务生效
        systemctl restart mariadb

    把从节点的主节点位置(ip)指向新的主节点
        MariaDB [hellodb]> stop slave;
        MariaDB [hellodb]> reset slave all;
        MariaDB [hellodb]> CHANGE MASTER TO
        MASTER_HOST='192.168.32.201',
        MASTER_USER='repluser',
        MASTER_PASSWORD='centos',
        MASTER_PORT=3306,
        MASTER_LOG_FILE='mariadb-bin.000001',
        MASTER_LOG_POS=245;
        MariaDB [hellodb]> start slave;
    查看同步状态
        MariaDB [hellodb]> show slave status\G
在新的主节点192.168.32.201上插入数据进行测试
    在hellodb数据库的teachers表中插入数据
        MariaDB [hellodb]> insert hellodb.teachers values(7,'c',35,'F');
    在slave02从节点查看teacher表内容
        MariaDB [none]> select * from hellodb.teachers;
        +-----+---------------+-----+--------+
        | TID | Name          | Age | Gender |
        +-----+---------------+-----+--------+
        |   1 | Song Jiang    |  45 | M      |
        |   2 | Zhang Sanfeng |  94 | M      |
        |   3 | Miejue Shitai |  77 | F      |
        |   4 | Lin Chaoying  |  93 | F      |
        |   5 | a             |  20 | M      |
        |   6 | b             |  30 | F      |
        |   7 | c             |  35 | F      |
        +-----+---------------+-----+--------+

此时,旧的主服务器再次启动后,将不会有从服务器从其同步信息,可以把此主节点变为从节点
    更改配置文件,增加中继日志,配置read_only选项,log_bin日志不删除也可以
        [mysqld]
        server_id=1
        innodb_file_per_table
        log_bin
        read_only=on
        relay_log=relay-log
        relay_log_index=relay-log.index
        innodb_file_per_table
        skip_name_resolve
    重启服务生效
        systemctl restart mariadb

    清除主节点原有相关信息
        [root@centos7 ~]# mysql
        MariaDB [(none)]> reset master;
    配置同步指令
        MariaDB [(none)]> CHANGE MASTER TO
        MASTER_HOST='192.168.32.201',
        MASTER_USER='repluser',
        MASTER_PASSWORD='centos',
        MASTER_PORT=3306,
        MASTER_LOG_FILE='mariadb-bin.000001',
        MASTER_LOG_POS=245;
    启动同步
        MariaDB [(none)]> start slave;
    查看同步信息
        MariaDB [(none)]> show slave status\G

    查看同步的数据
        MariaDB [(none)]> select * from hellodb.teachers;
        +-----+---------------+-----+--------+
        | TID | Name          | Age | Gender |
        +-----+---------------+-----+--------+
        |   1 | Song Jiang    |  45 | M      |
        |   2 | Zhang Sanfeng |  94 | M      |
        |   3 | Miejue Shitai |  77 | F      |
        |   4 | Lin Chaoying  |  93 | F      |
        |   5 | a             |  20 | M      |
        |   6 | b             |  30 | F      |
        |   7 | c             |  35 | F      |
+-----+---------------+-----+--------+- 主从复制:级联复制
用于减轻主服务器的压力
为了分担主服务器的压力,专门设置一个从服务器,主服务器只需向该从服务器写入数据,而该从服务器则用于向其他从服务器写入数据
结构:master --> slave --> slave1,slave2
示例:
实验环境
    master主机:192.168.32.201     主节点
    slave01主机:192.168.32.200    从节点
    slave02主机:192.168.32.202    从节点192.168.32.202下属的从

在中间slave服务器上添加以下选项
    vim /etc/my.cnf
    [mysqld]
    log_bin     #启动二进制日志
    log_slave_updates
重启mariadb服务生效
    systemctl restart mariadb

在主节点192.168.32.201上查看并记录二进制日志位置信息
    MariaDB [(none)]> show master status;
    +--------------------+----------+--------------+------------------+
    | File               | Position | Binlog_Do_DB | Binlog_Ignore_DB |
    +--------------------+----------+--------------+------------------+
    | mariadb-bin.000001 |      245 |              |                  |
    +--------------------+----------+--------------+------------------+

在slave02从节点上进行以下配置:
进入数据库进行相关同步配置
    [root@centos7 ~]# mysql
    MariaDB [(none)]> stop slave;
    MariaDB [(none)]> reset slave all;

    注意:如果从节点slave02服务器上数据库为空,则需要把主节点服务器的完全备份导入该服务器,把数据同步到与中间服务器slave01一致,然后再配置同步信息,这里数据已经一致,不再配置
    MariaDB [(none)]> CHANGE MASTER TO
    MASTER_HOST='192.168.32.200',
    MASTER_USER='repluser',
    MASTER_PASSWORD='centos',
    MASTER_PORT=3306,
    MASTER_LOG_FILE='mariadb-bin.000001',
    MASTER_LOG_POS=245;
    MariaDB [(none)]> show slave status\G

此时在主服务器192.168.32.201上添加数据,测试同步效果
    可以发现中间服务器的数据库发生改变,但是从的从却并没有收到数据进行同步
    原因:主服务器添加数据,生成二进制日志,发送给中间服务器,中间服务器拿到二进制日志后在本地执行一次生成数据写入本地数据库;
    但二进制日志只有对本地数据库进行直接的增删改操作才会生成,而中间数据库却是通过执行中继日志中的二进制日志进行的数据库更改操作,因此中间服务器并不会把更改操作写入本地二进制日志里,那么从的从slave02也不会同步中间服务器所做的更改

    解决方法:
    在中间服务器slave01 192.168.32.200上配置文件中添加选项:
        [mysqld]
        log_slave_updates
    重启服务器生效
        systemctl restart mariadb
    注意:虽然已经添加该选项,但是之前添加的第八条记录将会丢失

    测试:再次在主服务器上插入数据进行测试
    主服务器192.168.32.201上
    MariaDB [(none)]> insert hellodb.teachers values(9,'3',25,'F');
    MariaDB [(none)]> insert hellodb.teachers values(10,'f',33,'F');

    在从的从节点192.168.32.202上查看同步效果
        MariaDB [(none)]> select * from hellodb.teachers;
        +-----+---------------+-----+--------+
        | TID | Name          | Age | Gender |
        +-----+---------------+-----+--------+
        |   1 | Song Jiang    |  45 | M      |
        |   2 | Zhang Sanfeng |  94 | M      |
        |   3 | Miejue Shitai |  77 | F      |
        |   4 | Lin Chaoying  |  93 | F      |
        |   5 | a             |  20 | M      |
        |   6 | b             |  30 | F      |
        |   7 | c             |  35 | M      |
        |   9 | 3             |  25 | F      |
        |  10 | f             |  33 | F      |
+-----+---------------+-----+--------+- 复制架构中应该注意的问题:
1、限制从服务器为只读
在从服务器上设置read_only=ON
注意:此限制对拥有SUPER权限的用户均无效
阻止所有用户, 包括主服务器复制的更新
mysql> FLUSH TABLES WITH READ LOCK;
2、RESET SLAVE
在从服务器清除master.info ,relay-log.info, relay log ,开始新的relay log ,注意:需要先STOP SLAVE
RESET SLAVE ALL 清除所有从服务器上设置的主服务器同步信息如:PORT, HOST, USER和 PASSWORD 等
3、sql_slave_skip_counter = N 从服务器忽略几个主服务器的复制事件,global变量
示例:
以root身份为例:
先在中间从服务器192.168.32.200上添加一条新记录,
    insert hellodb.teachers values(11,'g',33,'F');
然后主服务器192.168.32.201上也添加一条新纪录
    insert hellodb.teachers values(11,'g',33,'F');
此时主服务器上添加记录的id号与从服务器上添加记录的id号产生冲突,导致从服务器无法从主服务器上同步新产生的记录
    MariaDB [(none)]> show slave status\G
    *************************** 1. row ***************************
                   Slave_IO_State: Waiting for master to send event
                      Master_Host: 192.168.32.201
                      Master_User: repluser
                      Master_Port: 3306
                    Connect_Retry: 60
                  Master_Log_File: mariadb-bin.000003
              Read_Master_Log_Pos: 1023
                   Relay_Log_File: relay-log.000004
                    Relay_Log_Pos: 920
            Relay_Master_Log_File: mariadb-bin.000003
                 Slave_IO_Running: Yes
                Slave_SQL_Running: No
                  Replicate_Do_DB:
              Replicate_Ignore_DB:
               Replicate_Do_Table:
           Replicate_Ignore_Table:
          Replicate_Wild_Do_Table:
      Replicate_Wild_Ignore_Table:
                       Last_Errno: 1062
                       Last_Error: Error 'Duplicate entry '11' for key 'PRIMARY'' on query. Default database: ''. Query: 'insert hellodb.teachers values(11,'g',33,'F')'
                     Skip_Counter: 0
              Exec_Master_Log_Pos: 828
                  Relay_Log_Space: 1403
                  Until_Condition: None
                   Until_Log_File:
                    Until_Log_Pos: 0
               Master_SSL_Allowed: No
               Master_SSL_CA_File:
               Master_SSL_CA_Path:
                  Master_SSL_Cert:
                Master_SSL_Cipher:
                   Master_SSL_Key:
            Seconds_Behind_Master: NULL
    Master_SSL_Verify_Server_Cert: No
                    Last_IO_Errno: 0
                    Last_IO_Error:
                   Last_SQL_Errno: 1062
                   Last_SQL_Error: Error 'Duplicate entry '11' for key 'PRIMARY'' on query. Default database: ''. Query: 'insert hellodb.teachers values(11,'g',33,'F')'
      Replicate_Ignore_Server_Ids:
                 Master_Server_Id: 2
    1 row in set (0.00 sec
而且主服务器上后续新增的记录也无法复制到从服务器上
    在主服务器上再次添加一条新纪录
    MariaDB [(none)]> insert hellodb.teachers values(12,'h',36,'F');
    Query OK, 1 row affected (0.07 sec)

    MariaDB [(none)]> select * from hellodb.teachers;
    +-----+---------------+-----+--------+
    | TID | Name          | Age | Gender |
    +-----+---------------+-----+--------+
    |   1 | Song Jiang    |  45 | M      |
    |   2 | Zhang Sanfeng |  94 | M      |
    |   3 | Miejue Shitai |  77 | F      |
    |   4 | Lin Chaoying  |  93 | F      |
    |   5 | a             |  20 | M      |
    |   6 | b             |  30 | F      |
    |   7 | c             |  35 | M      |
    |   8 | d             |  30 | F      |
    |   9 | 3             |  25 | F      |
    |  10 | f             |  33 | F      |
    |  11 | g             |  33 | F      |
    |  12 | h             |  36 | F      |
    +-----+---------------+-----+--------+
    在中间从服务器上查看,发现并没有把第12条信息同步过来
    MariaDB [(none)]> select * from hellodb.teachers;
    +-----+---------------+-----+--------+
    | TID | Name          | Age | Gender |
    +-----+---------------+-----+--------+
    |   1 | Song Jiang    |  45 | M      |
    |   2 | Zhang Sanfeng |  94 | M      |
    |   3 | Miejue Shitai |  77 | F      |
    |   4 | Lin Chaoying  |  93 | F      |
    |   5 | a             |  20 | M      |
    |   6 | b             |  30 | F      |
    |   7 | c             |  35 | M      |
    |   8 | d             |  30 | F      |
    |   9 | 3             |  25 | F      |
    |  10 | f             |  33 | F      |
    |  11 | g             |  33 | F      |
    +-----+---------------+-----+--------+

解决方法:
    在从服务器上:
    MariaDB [(none)]> stop slave;
    MariaDB [(none)]> set global sql_slave_skip_counter = 1 ;  #注意1为自定义数值,可以根据需要进行设置
    MariaDB [(none)]> start slave;
查看同步状态
    MariaDB [(none)]> show slave status\G
    *************************** 1. row ***************************
                   Slave_IO_State: Waiting for master to send event
                      Master_Host: 192.168.32.201
                      Master_User: repluser
                      Master_Port: 3306
                    Connect_Retry: 60
                  Master_Log_File: mariadb-bin.000003
              Read_Master_Log_Pos: 1218
                   Relay_Log_File: relay-log.000005
                    Relay_Log_Pos: 531
            Relay_Master_Log_File: mariadb-bin.000003
                 Slave_IO_Running: Yes
                Slave_SQL_Running: Yes
                  Replicate_Do_DB:
              Replicate_Ignore_DB:
               Replicate_Do_Table:
           Replicate_Ignore_Table:
          Replicate_Wild_Do_Table:
      Replicate_Wild_Ignore_Table:
                       Last_Errno: 0
                       Last_Error:
                     Skip_Counter: 0
              Exec_Master_Log_Pos: 1218
                  Relay_Log_Space: 1884
                  Until_Condition: None
                   Until_Log_File:
                    Until_Log_Pos: 0
               Master_SSL_Allowed: No
               Master_SSL_CA_File:
               Master_SSL_CA_Path:
                  Master_SSL_Cert:
                Master_SSL_Cipher:
                   Master_SSL_Key:
            Seconds_Behind_Master: 0
    Master_SSL_Verify_Server_Cert: No
                    Last_IO_Errno: 0
                    Last_IO_Error:
                   Last_SQL_Errno: 0
                   Last_SQL_Error:
      Replicate_Ignore_Server_Ids:
                 Master_Server_Id: 2
查看主服务器信息是否同步过来:
    MariaDB [(none)]> select * from hellodb.teachers;
    +-----+---------------+-----+--------+
    | TID | Name          | Age | Gender |
    +-----+---------------+-----+--------+
    |   1 | Song Jiang    |  45 | M      |
    |   2 | Zhang Sanfeng |  94 | M      |
    |   3 | Miejue Shitai |  77 | F      |
    |   4 | Lin Chaoying  |  93 | F      |
    |   5 | a             |  20 | M      |
    |   6 | b             |  30 | F      |
    |   7 | c             |  35 | M      |
    |   8 | d             |  30 | F      |
    |   9 | 3             |  25 | F      |
    |  10 | f             |  33 | F      |
    |  11 | g             |  33 | F      |
    |  12 | h             |  36 | F      |
    +-----+---------------+-----+--------+

在主服务器192.168.32.201上再次插入新数据进行测试
    insert hellodb.teachers values(13,'i',40,'F');

在中间从服务器192.168.32.200上查看同步状态
    MariaDB [(none)]> select * from hellodb.teachers;
    +-----+---------------+-----+--------+
    | TID | Name          | Age | Gender |
    +-----+---------------+-----+--------+
    |   1 | Song Jiang    |  45 | M      |
    |   2 | Zhang Sanfeng |  94 | M      |
    |   3 | Miejue Shitai |  77 | F      |
    |   4 | Lin Chaoying  |  93 | F      |
    |   5 | a             |  20 | M      |
    |   6 | b             |  30 | F      |
    |   7 | c             |  35 | M      |
    |   8 | d             |  30 | F      |
    |   9 | 3             |  25 | F      |
    |  10 | f             |  33 | F      |
    |  11 | g             |  33 | F      |
    |  12 | h             |  36 | F      |
    |  13 | i             |  40 | F      |
    +-----+---------------+-----+--------+

查看从的从节点192.168.32.202上同步信息状态
    MariaDB [(none)]> select * from hellodb.teachers;
    +-----+---------------+-----+--------+
    | TID | Name          | Age | Gender |
    +-----+---------------+-----+--------+
    |   1 | Song Jiang    |  45 | M      |
    |   2 | Zhang Sanfeng |  94 | M      |
    |   3 | Miejue Shitai |  77 | F      |
    |   4 | Lin Chaoying  |  93 | F      |
    |   5 | a             |  20 | M      |
    |   6 | b             |  30 | F      |
    |   7 | c             |  35 | M      |
    |   9 | 3             |  25 | F      |
    |  10 | f             |  33 | F      |
    |  11 | g             |  33 | F      |
    |  12 | h             |  36 | F      |
    |  13 | i             |  40 | F      |
    +-----+---------------+-----+--------+
4、如何保证主从复制的事务安全
参看https://mariadb.com/kb/en/library/server-system-variables/
在master节点启用参数:
sync_binlog=1 每次写后立即同步二进制日志到磁盘,性能差
如果用到的为InnoDB存储引擎:
innodb_flush_log_at_trx_commit=1 每次事务提交立即同步日志写磁盘
innodb_support_xa=ON 默认值,分布式事务MariaDB10.3.0废除
sync_master_info=# #次事件后master.info同步到磁盘
在slave节点启用服务器选项:
skip_slave_start=ON 不自动启动slave
在slave节点启用参数:
sync_relay_log=# #次写后同步relay log到磁盘
sync_relay_log_info=# #次事务后同步relay-log.info到磁盘
主主复制
- 主主复制:互为主从
容易产生的问题:数据不一致;因此慎用
考虑要点:自动增长id
配置一个节点使用奇数id
auto_increment_offset=1 开始点
auto_increment_increment=2 增长幅度
另一个节点使用偶数id
auto_increment_offset=2
auto_increment_increment=2 - 主主复制的配置步骤:
(1) 各节点使用一个惟一server_id
(2) 都启动binary log和relay log
(3) 创建拥有复制权限的用户账号
(4) 定义自动增长id字段的数值范围各为奇偶
(5) 均把对方指定为主节点,并启动复制线程
示例:
实验环境:
master1主机:192.168.32.201
master2主机:192.168.32.200

初始化实验环境:(实验需要,真实环境此步骤可省略)
在两台主机上执行以下命令:
    systemctl stop mariadb
    rm -rf /var/lib/mysql/*

在主机192.168.32.200上添加以下选项
    [root@centos7 ~]# vim /etc/my.cnf
    [mysqld]
    server_id=1
    innodb_file_per_table
    log_bin
    skip_name_resolve
    auto_increment_offset=1
    auto_increment_increment=2
启动服务
    systemctl start mariadb

在主机192.168.32.201上添加以下选项
    [root@centos7 ~]# vim /etc/my.cnf
    [mysqld]
    server_id=2
    log_bin
    innodb_file_per_table
    skip_name_resolve
    auto_increment_offset=2
    auto_increment_increment=2
启动服务
    systemctl start mariadb

先建立单项主从复制
以192.168.32.200为主
    在主机192.168.32.200上
        [root@centos7 ~]# mysql
        MariaDB [(none)]> show master status;
        +--------------------+----------+--------------+------------------+
        | File               | Position | Binlog_Do_DB | Binlog_Ignore_DB |
        +--------------------+----------+--------------+------------------+
        | mariadb-bin.000001 |      245 |              |                  |
        +--------------------+----------+--------------+------------------+
        MariaDB [(none)]> grant replication slave on *.* to 'repluser'@'192.168.32.%' identified by 'centos';
    在主机192.168.32.201主机上
        MariaDB [(none)]> CHANGE MASTER TO
          MASTER_HOST='192.168.32.200',
          MASTER_USER='repluser',
          MASTER_PASSWORD='centos',
          MASTER_PORT=3306,
          MASTER_LOG_FILE='mariadb-bin.000001',
          MASTER_LOG_POS=245;
        MariaDB [(none)]> start slave;
        MariaDB [(none)]> show slave status\G
        *************************** 1. row ***************************
                       Slave_IO_State: Waiting for master to send event
                          Master_Host: 192.168.32.200
                          Master_User: repluser
                          Master_Port: 3306
                        Connect_Retry: 60
                      Master_Log_File: mariadb-bin.000001
                  Read_Master_Log_Pos: 407
                       Relay_Log_File: mariadb-relay-bin.000002
                        Relay_Log_Pos: 693
                Relay_Master_Log_File: mariadb-bin.000001
                     Slave_IO_Running: Yes
                    Slave_SQL_Running: Yes
                      Replicate_Do_DB:
                  Replicate_Ignore_DB:
                   Replicate_Do_Table:
               Replicate_Ignore_Table:
              Replicate_Wild_Do_Table:
          Replicate_Wild_Ignore_Table:
                           Last_Errno: 0
                           Last_Error:
                         Skip_Counter: 0
                  Exec_Master_Log_Pos: 407
                      Relay_Log_Space: 989
                      Until_Condition: None
                       Until_Log_File:
                        Until_Log_Pos: 0
                   Master_SSL_Allowed: No
                   Master_SSL_CA_File:
                   Master_SSL_CA_Path:
                      Master_SSL_Cert:
                    Master_SSL_Cipher:
                       Master_SSL_Key:
                Seconds_Behind_Master: 0
        Master_SSL_Verify_Server_Cert: No
                        Last_IO_Errno: 0
                        Last_IO_Error:
                       Last_SQL_Errno: 0
                       Last_SQL_Error:
          Replicate_Ignore_Server_Ids:
                     Master_Server_Id: 1
    此时,单项主从已经建立,只需要再次建立以192.168.32.201为主的主从关系即可
    由于授权账户已经同步过来,而且配置文件已经准备完毕,因此只需在192.168.32.200主机数据库中建立以192.168.32.201为主的同步信息即可
    在主机192.168.32.200主机上
        MariaDB [(none)]> CHANGE MASTER TO
          MASTER_HOST='192.168.32.201',
          MASTER_USER='repluser',
          MASTER_PASSWORD='centos',
          MASTER_PORT=3306,
          MASTER_LOG_FILE='mariadb-bin.000001',
          MASTER_LOG_POS=245;
        MariaDB [(none)]> start slave;
        MariaDB [(none)]> show slave status\G
        *************************** 1. row ***************************
                       Slave_IO_State: Waiting for master to send event
                          Master_Host: 192.168.32.201
                          Master_User: repluser
                          Master_Port: 3306
                        Connect_Retry: 60
                      Master_Log_File: mariadb-bin.000001
                  Read_Master_Log_Pos: 245
                       Relay_Log_File: mariadb-relay-bin.000002
                        Relay_Log_Pos: 531
                Relay_Master_Log_File: mariadb-bin.000001
                     Slave_IO_Running: Yes
                    Slave_SQL_Running: Yes
                      Replicate_Do_DB:
                  Replicate_Ignore_DB:
                   Replicate_Do_Table:
               Replicate_Ignore_Table:
              Replicate_Wild_Do_Table:
          Replicate_Wild_Ignore_Table:
                           Last_Errno: 0
                           Last_Error:
                         Skip_Counter: 0
                  Exec_Master_Log_Pos: 245
                      Relay_Log_Space: 827
                      Until_Condition: None
                       Until_Log_File:
                        Until_Log_Pos: 0
                   Master_SSL_Allowed: No
                   Master_SSL_CA_File:
                   Master_SSL_CA_Path:
                      Master_SSL_Cert:
                    Master_SSL_Cipher:
                       Master_SSL_Key:
                Seconds_Behind_Master: 0
        Master_SSL_Verify_Server_Cert: No
                        Last_IO_Errno: 0
                        Last_IO_Error:
                       Last_SQL_Errno: 0
                       Last_SQL_Error:
          Replicate_Ignore_Server_Ids:
                     Master_Server_Id: 2
    此时,主主复制已经成功建立
建立新表进行测试:
    导入测试数据库
        [root@centos7 ~]# mysql < hellodb_innodb.sql
    在数据库中建立新表
        MariaDB [(none)]> use hellodb
        MariaDB [hellodb]> create table test (id int auto_increment primary key,name char(20));
    插入数据进行测试:
    在主机192.168.32.200上插入数据,以奇数递增
        MariaDB [hellodb]> insert test (name)values('a'),('b');
        Query OK, 2 rows affected (0.00 sec)
        Records: 2  Duplicates: 0  Warnings: 0

        MariaDB [hellodb]> select * from test;
        +----+------+
        | id | name |
        +----+------+
        |  1 | a    |
        |  3 | b    |
        +----+------+
        2 rows in set (0.00 sec)
    在主机192.168.32.201上插入数据,以偶数递增
        MariaDB [hellodb]> insert test (name)values('c'),('d');
        Query OK, 2 rows affected (0.01 sec)
        Records: 2  Duplicates: 0  Warnings: 0

        MariaDB [hellodb]> select * from test;
        +----+------+
        | id | name |
        +----+------+
        |  1 | a    |
        |  3 | b    |
        |  4 | c    |
        |  6 | d    |
        +----+------+
        4 rows in set (0.00 sec)
    这样一来就避免了id的相互冲突
半同步复制
- 默认情况下,MySQL的复制功能是异步的,异步复制可以提供最佳的性能,主库把binlog日志发送给从库即结束,并不验证从库是否接收完毕。这意味着当主服务器或从服务器端发生故障时,有可能从服务器没有接收到主服务器发送过来的binlog日志,这就会造成主服务器和从服务器的数据不一致,甚至在恢复时造成数据的丢失
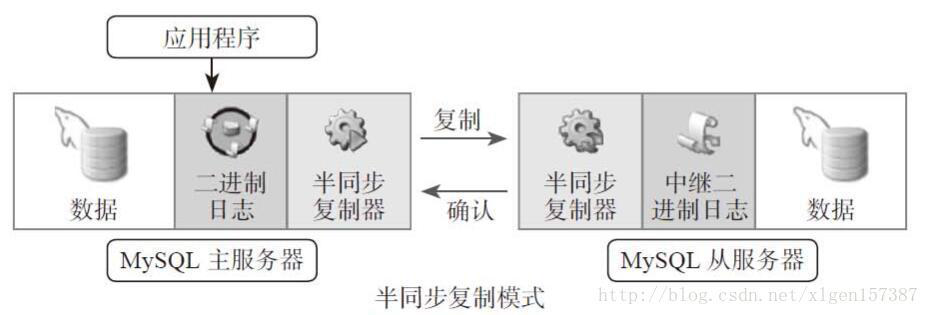
- 半同步复制实现:
配置步骤如下:
主服务器配置:
mysql> INSTALL PLUGIN rpl_semi_sync_master SONAME 'semisync_master.so';
mysql>SET GLOBAL rpl_semi_sync_master_enabled=1;
mysql>SET GLOBAL rpl_semi_sync_master_timeout = 1000;超时长为1s
mysql>SHOW GLOBAL VARIABLES LIKE '%semi%';
mysql>SHOW GLOBAL STATUS LIKE '%semi%‘;
从服务器配置:
mysql> INSTALL PLUGIN rpl_semi_sync_slave SONAME 'semisync_slave.so';
mysql> SET GLOBAL rpl_semi_sync_slave_enabled=1;
示例:
实验环境:一主两从
master主机:192.168.32.200
slave01主机:192.168.32.201
slave02主机:192.168.32.202

初始化环境:
    停止mariadb服务
        systemctl stop mariadb
    删除库文件
        rm -rf /var/lib/mysql/*

准备配置文件,配置主从同步
    主服务器192.168.32.200
        [root@centos7 ~]# vim /etc/my.cnf
        [mysqld]
        server_id=1
        innodb_file_per_table
        log_bin
        skip_name_resolve
    启动mariadb服务
        systemctl start mariadb
    创建授权账号
        MariaDB [(none)]> mysql
        MariaDB [(none)]> show master logs;
        +--------------------+-----------+
        | Log_name           | File_size |
        +--------------------+-----------+
        | mariadb-bin.000001 |       402 |
        +--------------------+-----------+
        MariaDB [(none)]> grant replication slave on *.* to 'repluser'@'192.168.32.%' identified by 'centos';

    从服务器slave01 192.168.32.201
        [root@centos7 ~]# vim /etc/my.cnf
        [mysqld]
        server_id=2
        innodb_file_per_table
        skip_name_resolve
    启动mariadb服务
        systemctl start mariadb
    配置从服务器同步信息
        [root@centos7 ~]# mysql
        MariaDB [(none)]> CHANGE MASTER TO
        MASTER_HOST='192.168.32.200',
        MASTER_USER='repluser',
        MASTER_PASSWORD='centos',
        MASTER_PORT=3306,
        MASTER_LOG_FILE='mariadb-bin.000001',
        MASTER_LOG_POS=245;
        MariaDB [(none)]> start slave;
        MariaDB [(none)]> show slave status\G

    从服务器slave01 192.168.32.202
        [root@centos7 ~]# vim /etc/my.cnf
        [mysqld]
        server_id=3
        innodb_file_per_table
        skip_name_resolve
    启动mariadb服务
        systemctl start mariadb
    配置从服务器同步信息
        [root@centos7 ~]# mysql
        MariaDB [(none)]> CHANGE MASTER TO
        MASTER_HOST='192.168.32.200',
        MASTER_USER='repluser',
        MASTER_PASSWORD='centos',
        MASTER_PORT=3306,
        MASTER_LOG_FILE='mariadb-bin.000001',
        MASTER_LOG_POS=245;
        MariaDB [(none)]> start slave;
        MariaDB [(none)]> show slave status\G

配置半同步复制
    在mysql数据库中执行以下命令查看已存在的插件
    show plugins    查看已安装的插件

    主服务器192.168.32.200上配置:
        MariaDB [(none)]> INSTALL PLUGIN rpl_semi_sync_master SONAME 'semisync_master.so';
        #安装主服务器半同步复制插件
        MariaDB [(none)]> SET GLOBAL rpl_semi_sync_master_enabled=1;
        #注意:在生产环境中要把rpl_semi_sync_master_enabled=1写入/etc/my.cnf配置文件后重启服务才能永久生效,建议写入配置文件
        MariaDB [(none)]> SET GLOBAL rpl_semi_sync_master_timeout = 1000;
        #设置超时时长
        MariaDB [(none)]> SHOW GLOBAL VARIABLES LIKE '%semi%';
        #查看半同步复制相关变量
        MariaDB [(none)]> SHOW GLOBAL STATUS LIKE '%semi%';
        #查看和半同步相关的状态变量

    从服务器192.168.32.201和192.168.32.202上进行以下配置:
        MariaDB [(none)]> INSTALL PLUGIN rpl_semi_sync_slave SONAME 'semisync_slave.so';
        #安装从服务器半同步复制插件
        MariaDB [(none)]> SET GLOBAL rpl_semi_sync_slave_enabled=1;
        #注意:在生产环境中要把rpl_semi_sync_master_enabled=1写入/etc/my.cnf配置文件后重启服务才能永久生效,建议写入配置文件
    注意:此时,需要重启从服务器的两个同步线程
        MariaDB [(none)]> stop slave;
        MariaDB [(none)]> start slave;
    查看插件是否启用
        MariaDB [(none)]> SHOW GLOBAL STATUS LIKE '%semi%';
        +----------------------------+-------+
        | Variable_name              | Value |
        +----------------------------+-------+
        | Rpl_semi_sync_slave_status | ON    |
        +----------------------------+-------+

测试:是否能够同步
    导入测试数据库
        [root@centos7 ~]# mysql < hellodb_innodb.sql
        [root@centos7 ~]# mysql
        MariaDB [(none)]> use hellodb
        MariaDB [hellodb]> insert teachers values(5,'a',30,'M');
    在从服务器192.168.32.201上查看同步状态
        MariaDB [(none)]> select * from hellodb.teachers;
        +-----+---------------+-----+--------+
        | TID | Name          | Age | Gender |
        +-----+---------------+-----+--------+
        |   1 | Song Jiang    |  45 | M      |
        |   2 | Zhang Sanfeng |  94 | M      |
        |   3 | Miejue Shitai |  77 | F      |
        |   4 | Lin Chaoying  |  93 | F      |
        |   5 | a             |  30 | M      |
        +-----+---------------+-----+--------+
验证半同步:
    1.同步成功
    2.等待超时

    关闭从服务器slave01,等待一个超时时长
    在从服务器slave01 192.168.32.201上
        systemctl stop mariadb
    在主服务器192.168.32.200上插入新的数据进行测试
        MariaDB [hellodb]> insert teachers values(6,'b',30,'F');
        Query OK, 1 row affected (1.00 sec)
        注意:可以看到等待时间为1秒,1秒就是之前设置过的超时时长,即SET GLOBAL rpl_semi_sync_master_timeout = 1000;该时间单位默认为毫秒。另外,超时时长默认为10s,可以通过该选项进行设置
    在从服务器上,重启mariadb服务,发现数据会继续同步到从服务器上
        [root@centos7 ~]# systemctl start mariadb
        [root@centos7 ~]# mysql
        MariaDB [(none)]> select * from hellodb.teachers;
        +-----+---------------+-----+--------+
        | TID | Name          | Age | Gender |
        +-----+---------------+-----+--------+
        |   1 | Song Jiang    |  45 | M      |
        |   2 | Zhang Sanfeng |  94 | M      |
        |   3 | Miejue Shitai |  77 | F      |
        |   4 | Lin Chaoying  |  93 | F      |
        |   5 | a             |  30 | M      |
        |   6 | b             |  30 | F      |
        +-----+---------------+-----+--------+
    注意:由于重启mariadb服务,因此半同步插件状态会变为OFF状态,因此需要重新启用半同步插件,即SET GLOBAL rpl_semi_sync_slave_enabled=1

    在主服务器上查看半同步插件状态
        MariaDB [(none)]> SHOW GLOBAL STATUS LIKE '%semi%';
        +--------------------------------------------+-------+
        | Variable_name                              | Value |
        +--------------------------------------------+-------+
        | Rpl_semi_sync_master_clients               | 2     |
        | Rpl_semi_sync_master_net_avg_wait_time     | 493   |
        | Rpl_semi_sync_master_net_wait_time         | 18247 |
        | Rpl_semi_sync_master_net_waits             | 37    |
        | Rpl_semi_sync_master_no_times              | 1     |
        | Rpl_semi_sync_master_no_tx                 | 1     |
        | Rpl_semi_sync_master_status                | ON    |
        | Rpl_semi_sync_master_timefunc_failures     | 0     |
        | Rpl_semi_sync_master_tx_avg_wait_time      | 656   |
        | Rpl_semi_sync_master_tx_wait_time          | 21015 |
        | Rpl_semi_sync_master_tx_waits              | 32    |
        | Rpl_semi_sync_master_wait_pos_backtraverse | 0     |
        | Rpl_semi_sync_master_wait_sessions         | 0     |
        | Rpl_semi_sync_master_yes_tx                | 36    |
        +--------------------------------------------+-------+

    注意:此时两个从服务器已经同步成功,即使其中一台服务器出现故障,主服务器同步也会立即返回同步成功,如果两台从服务器都出现故障,主服务器将会在一个超时时长之后返回同步成功

    在生产中,可以把一主多从和半同步结合起来
即master ---> slave(半同步) ---> slave1,slave2,slave3- 复制过滤器:
让从节点仅复制指定的数据库,或指定数据库的指定表 - 两种实现方式:
(1) 服务器选项:主服务器仅向二进制日志中记录与特定数据库相关的事件
注意:此项和binlog_format相关
参看:https://mariadb.com/kb/en/library/mysqld-options/#-binlog-ignore-db
binlog_do_db = 数据库白名单列表,多个数据库需多行实现
binlog_ignore_db = 数据库黑名单列表
问题:基于二进制还原将无法实现;不建议使用
(2) 从服务器SQL_THREAD在replay中继日志中的事件时,仅读取与特定数据库(特定表)相关的事件并应用于本地
问题:会造成网络及磁盘IO浪费 - 从服务器上的复制过滤器相关变量
replicate_do_db= 指定复制库的白名单
replicate_ignore_db= 指定复制库黑名单
replicate_do_table= 指定复制表的白名单
replicate_ignore_table= 指定复制表的黑名单
replicate_wild_do_table= foo%.bar% 支持通配符
replicate_wild_ignore_table=
示例:
实验环境:半同步复制,一主两从
    master主机:192.168.32.200
    slave01主机:192.168.32.201
    slave02主机:192.168.32.202

在主服务器192.168.32.200中test数据库中创建新表t1,并插入数据用于测试
    MariaDB [(none)]> use test
    MariaDB [test]> create table ta(id int);
    MariaDB [test]> insert t1 values(1);
    MariaDB [test]> select * from t1;
    +------+
    | id   |
    +------+
    |    1 |
    +------+

在从服务器192.168.32.201和192.168.32.202上设置复制库的白名单
    MariaDB [(none)]> stop slave;
    MariaDB [(none)]> set global replicate_do_db=hellodb;
    MariaDB [(none)]> start slave;
    MariaDB [(none)]> show variables like 'replicate_do_db';
    +-----------------+---------+
    | Variable_name   | Value   |
    +-----------------+---------+
    | replicate_do_db | hellodb |
    +-----------------+---------+
    注意:此时白名单为hellodb,说明只复制hellodb数据库的更改,不复制其他数据库的更改
测试:
    在主服务器192.168.32.200上hellodb数据库teachers表中插入数据
    MariaDB [hellodb]> use hellodb    #注意设置数据库白名单以后,必须要先切换到该数据库以后插入数据才可以同步到从服务器,否则修改的信息将不会被复制到从服务器,如数据库白名单为hellodb,则必须先切换到hellodb数据库,然后才能插入新数据
    MariaDB [hellodb]> insert hellodb.teachers values(8,'d',25,'M');
    在从服务器上查看是否能够同步
    MariaDB [(none)]> select * from hellodb.teachers;
    +-----+---------------+-----+--------+
    | TID | Name          | Age | Gender |
    +-----+---------------+-----+--------+
    |   1 | Song Jiang    |  45 | M      |
    |   2 | Zhang Sanfeng |  94 | M      |
    |   3 | Miejue Shitai |  77 | F      |
    |   4 | Lin Chaoying  |  93 | F      |
    |   5 | a             |  30 | M      |
    |   6 | b             |  30 | F      |
    |   7 | c             |  25 | M      |
    +-----+---------------+-----+--------+

    在主服务器192.168.32.200上test数据库t1表中插入数据
    MariaDB [test]> use test;   #注意要先切换数据库,才能插入数据
    MariaDB [test]> insert t1 values(3);
    在从服务器上查看是否同步,发现第三条信息并没有同步过来,说明设置生效
    MariaDB [(none)]> select * from test.t1;
      +------+
      | id   |
      +------+
      |    1 |
      |    2 |
      +------+
MySQL复制加密
- 基于SSL复制:
在默认的主从复制过程或远程连接到MySQL/MariaDB所有的链接通信中的数据都是明文的,外网里访问数据或则复制,存在安全隐患。通过SSL/TLS加密的方式进行复制的方法,来进一步提高数据的安全性 - 配置实现:
参看:https://mariadb.com/kb/en/library/replication-with-secure-connections/
主服务器开启SSL:[mysqld] 加一行ssl
主服务器配置证书和私钥;并且创建一个要求必须使用SSL连接的复制账号
从服务器使用CHANGER MASTER TO 命令时指明ssl相关选项
具体配置信息:
Master服务器配置
    [mysqld]
    log-bin
    server_id=1
    ssl
    ssl-ca=/etc/my.cnf.d/ssl/cacert.pem
    ssl-cert=/etc/my.cnf.d/ssl/master.crt
    ssl-key=/etc/my.cnf.d/ssl/master.key
Slave服务器配置
    mysql>
    CHANGE MASTER TO
    MASTER_HOST='MASTERIP',
    MASTER_USER='rep',
    MASTER_PASSWORD='centos',
    MASTER_LOG_FILE='mariadb-bin.000001',
    MASTER_LOG_POS=245,
    MASTER_SSL=1,
    MASTER_SSL_CA = '/etc/my.cnf.d/ssl/cacert.pem',
    MASTER_SSL_CERT = '/etc/my.cnf.d/ssl/slave.crt',
    MASTER_SSL_KEY = '/etc/my.cnf.d/ssl/slave.key';
示例:
初始化实验环境(这里做实验需要此设置,实际中无需此步骤)
    主服务器192.168.32.200
        在配置文件中中删除binlog_do_db=hellodb选项
    重启服务
        systemctl restart mariadb

实验环境:这里以一主一从为例
master主机:192.168.32.200
slave主机:192.168.32.201
CA主机:192.168.32.202

一般情况下,需要CA主机生成自签名证书,主从服务器生成私钥和证书申请,然后传递给CA主机,CA主机根据其私钥和证书申请颁发证书给主从服务器
这里为了方便实验,在CA主机生成私钥和证书直接传递给主从服务器使用即可

生成证书:
    创建存放证书的目录
        mkdir -p /etc/my.cnf.d/ssl
    创建CA的私钥和自签名证书
        cd /etc/my.cnf.d/ssl
        [root@slave02 ssl]# openssl genrsa 2048 > cakey.pem
        [root@slave02 ssl]# openssl req -new -x509 -key cakey.pem -out cacert.pem -days 3650
        You are about to be asked to enter information that will be incorporated
        into your certificate request.
        What you are about to enter is what is called a Distinguished Name or a DN.
        There are quite a few fields but you can leave some blank
        For some fields there will be a default value,
        If you enter '.', the field will be left blank.
        -----
        Country Name (2 letter code) [XX]:CN
        State or Province Name (full name) []:beijing
        Locality Name (eg, city) [Default City]:beijing
        Organization Name (eg, company) [Default Company Ltd]:magedu
        Organizational Unit Name (eg, section) []:opt
        Common Name (eg, your name or your server's hostname) []:ca.magedu.com
        Email Address []:

创建主服务器的私钥和证书
    生成主服务器私钥并创建证书申请
        [root@slave02 ssl]# req -newkey rsa:1024 -days 100 -nodes -keyout master.key > master.csr
        Generating a 1024 bit RSA private key
        ..............................++++++
        ......++++++
        writing new private key to 'master.key'
        -----
        You are about to be asked to enter information that will be incorporated
        into your certificate request.
        What you are about to enter is what is called a Distinguished Name or a DN.
        There are quite a few fields but you can leave some blank
        For some fields there will be a default value,
        If you enter '.', the field will be left blank.
        -----
        Country Name (2 letter code) [XX]:CN
        State or Province Name (full name) []:beijing
        Locality Name (eg, city) [Default City]:beijing
        Organization Name (eg, company) [Default Company Ltd]:magedu
        Organizational Unit Name (eg, section) []:opt
        Common Name (eg, your name or your server's hostname) []:master.magedu.com
        Email Address []:

        Please enter the following 'extra' attributes
        to be sent with your certificate request
        A challenge password []:
        An optional company name []:
    颁发主服务器证书
        [root@slave02 ssl]# openssl x509 -req -in master.csr -days 100 -CA cacert.pem -CAkey cakey.pem -set_serial 01 > master.crt
        Signature ok
        subject=/C=CN/ST=beijing/L=beijing/O=magedu/OU=opt/CN=master.magedu.com
        Getting CA Private Key

创建从服务器的私钥和证书
    生成从服务器私钥并创建证书申请
        [root@slave02 ssl]# openssl req -newkey rsa:1024 -days 100 -nodes -keyout slave.key > slave.csr
        Generating a 1024 bit RSA private key
        ............++++++
        .++++++
        writing new private key to 'slave.key'
        -----
        You are about to be asked to enter information that will be incorporated
        into your certificate request.
        What you are about to enter is what is called a Distinguished Name or a DN.
        There are quite a few fields but you can leave some blank
        For some fields there will be a default value,
        If you enter '.', the field will be left blank.
        -----
        Country Name (2 letter code) [XX]:CN
        State or Province Name (full name) []:beijing
        Locality Name (eg, city) [Default City]:beijing
        Organization Name (eg, company) [Default Company Ltd]:magedu
        Organizational Unit Name (eg, section) []:opt
        Common Name (eg, your name or your server's hostname) []:slave.magedu.com
        Email Address []:

        Please enter the following 'extra' attributes
        to be sent with your certificate request
        A challenge password []:
        An optional company name []:
    颁发从服务器证书
        [root@slave02 ssl]# openssl x509 -req -in slave.csr -days 100 -CA cacert.pem -CAkey cakey.pem -set_serial 02 > slave.crt
        Signature ok
        subject=/C=CN/ST=beijing/L=beijing/O=magedu/OU=opt/CN=slave.magedu.com
        Getting CA Private Key

    查看所有证书文件
        [root@slave02 ssl]# ll
        total 32
        -rw-r--r-- 1 root root 1322 Dec 25 15:25 cacert.pem
        -rw-r--r-- 1 root root 1675 Dec 25 15:24 cakey.pem
        -rw-r--r-- 1 root root 1021 Dec 25 15:35 master.crt
        -rw-r--r-- 1 root root  655 Dec 25 15:30 master.csr
        -rw-r--r-- 1 root root  912 Dec 25 15:30 master.key
        -rw-r--r-- 1 root root 1017 Dec 25 15:38 slave.crt
        -rw-r--r-- 1 root root  655 Dec 25 15:37 slave.csr
        -rw-r--r-- 1 root root  916 Dec 25 15:37 slave.key
    把主从复制加密所需的证书复制到对应服务器上即可
        注意:在主从服务器上创建对应的存放证书的目录,即/etc/my.cnf.d/ssl
        scp cacert.pem master.crt master.key 192.168.32.200:/etc/my.cnf.d/ssl/
        scp cacert.pem slave.crt slave.key 192.168.32.201:/etc/my.cnf.d/ssl/

主从服务器配置:
    主服务器配置文件添加以下几项:
        vim /etc/my.cnf
        [mysqld]
        ssl
        ssl-ca=/etc/my.cnf.d/ssl/cacert.pem
        ssl-cert=/etc/my.cnf.d/ssl/master.crt
        ssl-key=/etc/my.cnf.d/ssl/master.key
    重启服务生效
        systemctl  restart mariadb
    进入数据库查看相关变量是否已经启用
        [root@centos7 ~]# mysql
        MariaDB [(none)]> show variables like '%ssl%';
        +---------------+------------------------------+
        | Variable_name | Value                        |
        +---------------+------------------------------+
        | have_openssl  | YES                          |
        | have_ssl      | YES                          |
        | ssl_ca        | /etc/my.cnf.d/ssl/cacert.pem |
        | ssl_capath    |                              |
        | ssl_cert      | /etc/my.cnf.d/ssl/master.crt |
        | ssl_cipher    |                              |
        | ssl_key       | /etc/my.cnf.d/ssl/master.key |
        +---------------+------------------------------+
    创建强制加密的账号
        MariaDB [(none)]> grant replication slave on *.* to 'ssluser'@'192.168.32.%' identified by 'centos' require ssl;
        注意:由于主从复制仍然存在,因此该账号会被同步到从服务器上
    查看并记录二进制日志位置
        MariaDB [(none)]> show master logs;
        +--------------------+-----------+
        | Log_name           | File_size |
        +--------------------+-----------+
        | mariadb-bin.000001 |     10832 |
        | mariadb-bin.000002 |       464 |
        | mariadb-bin.000003 |       264 |
        | mariadb-bin.000004 |       413 |
        +--------------------+-----------+

    测试:通过加密账号同步数据
        在从服务器192.168.32.201上进行测试,通过证书连接主服务器数据库
            cd /etc/my.cnf.d/ssl
            mysql --ssl-ca=cacert.pem --ssl-cert=slave.crt --ssl-key=slave.key -ussluser -pcentos -h192.168.32.200
            注意:ssluser如果不使用证书则无法连接主服务器数据库,说明该账号必须强制加密连接

从服务器配置:
    进入数据库进行同步相关配置
        [root@centos7 ssl]# mysql
        MariaDB [(none)]> stop slave;
        MariaDB [(none)]> reset slave all;
        MariaDB [(none)]> CHANGE MASTER TO
          MASTER_HOST='192.168.32.200',
          MASTER_USER='ssluser',
          MASTER_PASSWORD='centos',
          MASTER_LOG_FILE='mariadb-bin.000004',
          MASTER_LOG_POS=413,
          MASTER_SSL=1,
          MASTER_SSL_CA = '/etc/my.cnf.d/ssl/cacert.pem',
          MASTER_SSL_CERT = '/etc/my.cnf.d/ssl/slave.crt',
          MASTER_SSL_KEY = '/etc/my.cnf.d/ssl/slave.key';
        MariaDB [(none)]> start slave;
    查看同步状态信息
        MariaDB [(none)]> show slave status\G

    测试:在主服务器插入数据,并使用抓包工具抓包测试能否抓取到相关内容
        MariaDB [(none)]> use test
        MariaDB [test]> insert t1 values(5);
复制的监控和维护
- (1) 清理日志
PURGE { BINARY | MASTER } LOGS { TO 'log_name' | BEFORE datetime_expr }
RESET MASTER
RESET SLAVE - (2) 复制监控
SHOW MASTER STATUS
SHOW BINLOG EVENTS
SHOW BINARY LOGS
SHOW SLAVE STATUS
SHOW PROCESSLIST - (3) 从服务器是否落后于主服务
Seconds_Behind_Master: 0 - (4) 如何确定主从节点数据是否一致
percona-tools - (5) 数据不一致如何修复
删除从数据库,重新复制
使用Proxysql实现mysql读写分离
具体实验步骤如下:
- 思路:先配置完成主从复制,在读写分离节点配置Proxysql
- 实验环境:
读写分离节点:192.168.32.203
master主机:192.168.32.200
slave01主机:192.168.32.201
slave02:192.168.32.202
示例:
主从复制配置:
主节点配置:
    master主机:192.168.32.200配置:
      更改mysql配置文件
        vim /etc/my.cnf
        [mysqld]
        datadir=/var/lib/mysql
        socket=/var/lib/mysql/mysql.sock
        innodb_file_per_table
        skip_name_resolve
        server_id=1
        log_bin
      启动mysql服务
        systemctl start mariadb
      授权从节点能够访问主节点
        MariaDB [(none)]> grant replication slave on *.* to 'repluser'@'192.168.32.%' identified by 'centos';
      查看主节点日志位置
        MariaDB [(none)]> show master status;
        +--------------------+----------+--------------+------------------+
        | File               | Position | Binlog_Do_DB | Binlog_Ignore_DB |
        +--------------------+----------+--------------+------------------+
        | mariadb-bin.000001 |      402 |              |                  |
        +--------------------+----------+--------------+------------------+
    slave01主机:192.168.32.201配置:
      更改配置文件
        vim /etc/my.cnf
        [mysqld]
        datadir=/var/lib/mysql
        socket=/var/lib/mysql/mysql.sock
        innodb_file_per_table
        skip_name_resolve
        server_id=2
        relay_log=relay_log
        relay_log_index=relay-log.index
      指定从节点的主节点位置和日志信息
        CHANGE MASTER TO
        MASTER_HOST='192.168.32.200',
        MASTER_USER='repluser',
        MASTER_PASSWORD='centos',
        MASTER_PORT=3306,
        MASTER_LOG_FILE='mariadb-bin.000001',
        MASTER_LOG_POS=402;
      启动主从复制并查看主从复制创泰
        start slave;
        show slave status\G

    slave02主机:192.168.32.202配置:
      更改配置文件
        vim /etc/my.cnf
        [mysqld]
        datadir=/var/lib/mysql
        socket=/var/lib/mysql/mysql.sock
        innodb_file_per_table
        skip_name_resolve
        server_id=3              #注意server_id必须唯一
        relay_log=relay_log
        relay_log_index=relay-log.index
      指定从节点的主节点位置和日志信息
        CHANGE MASTER TO
        MASTER_HOST='192.168.32.200',
        MASTER_USER='repluser',
        MASTER_PASSWORD='centos',
        MASTER_PORT=3306,
        MASTER_LOG_FILE='mariadb-bin.000001',
        MASTER_LOG_POS=402;
      启动主从复制并查看主从复制创泰
        start slave;
        show slave status\G
读写分离节点配置
读写分离节点:192.168.32.203配置:
  思路:配置读写分离,主节点只负责写操作,读操作全部调度到从节点上
  注意:在配置前一定要在从节点配置文件中添加read-only选项,否则
  proxysql节点无法判断该节点充当的角色
    从节点192.16.32.201
      vim /etc/my.cnf
      [mysqld]
      datadir=/var/lib/mysql
      socket=/var/lib/mysql/mysql.sock
      innodb_file_per_table
      skip_name_resolve
      server_id=2              #注意server_id必须唯一
      relay_log=relay_log
      relay_log_index=relay-log.index
      read-only             #注意读写分离时从节点必须添加该选项
    从节点192.16.32.202
      vim /etc/my.cnf
      [mysqld]
      datadir=/var/lib/mysql
      socket=/var/lib/mysql/mysql.sock
      innodb_file_per_table
      skip_name_resolve
      server_id=3             #注意server_id必须唯一
      relay_log=relay_log
      relay_log_index=relay-log.index
      read-only             #注意读写分离时从节点必须添加该选项

proxysql的安装:
  使用官方提供的yum源直接安装即可
    vim /etc/yum.repos.d/proxysql.repo
    [proxysql_repo]
    name= ProxySQL YUM repository
    baseurl=http://repo.proxysql.com/ProxySQL/proxysql-1.4.x/centos/\$releasever
    gpgcheck=1
    gpgkey=http://repo.proxysql.com/ProxySQL/repo_pub_key
  使用yum安装proxysql
    yum -y install proxysql
  启动服务
    service proxysql start
  默认监听端口
    6032 proxysql的配置端口
    6033:ProxySQL对外提供服务的端口
  使用mysql客户端连接到ProxySQL的管理接口6032,默认管理员用户和密码都是admin:
    mysql -uadmin -padmin -P6032 -h127.0.0.1
    MySQL [(none)]> status           #查看连接状态信息
    --------------
    mysql  Ver 15.1 Distrib 5.5.60-MariaDB, for Linux (x86_64) using readline 5.1

    Connection id:          1
    Current database:       admin
    Current user:           admin
    SSL:                    Not in use
    Current pager:          stdout
    Using outfile:          ''
    Using delimiter:        ;
    Server:                 MySQL
    Server version:         5.5.30 (ProxySQL Admin Module)
    Protocol version:       10
    Connection:             127.0.0.1 via TCP/IP
    Server characterset:    utf8
    Db     characterset:    utf8
    Client characterset:    utf8
    Conn.  characterset:    utf8
    TCP port:               6032
    Uptime:                 12 min 15 sec

  查看数据库信息
    MySQL [(none)]> show databases;
    +-----+---------------+-------------------------------------+
    | seq | name          | file                                |
    +-----+---------------+-------------------------------------+
    | 0   | main          |                                     |
    | 2   | disk          | /var/lib/proxysql/proxysql.db       |
    | 3   | stats         |                                     |
    | 4   | monitor       |                                     |
    | 5   | stats_history | /var/lib/proxysql/proxysql_stats.db |
    +-----+---------------+-------------------------------------+
    5 rows in set (0.00 sec)

    MySQL [(none)]> use main;
    Reading table information for completion of table and column names
    You can turn off this feature to get a quicker startup with -A

    Database changed
    MySQL [main]> show tables;
    +--------------------------------------------+
    | tables                                     |
    +--------------------------------------------+
    | global_variables                           |
    | mysql_collations                           |
    | mysql_group_replication_hostgroups         |
    | mysql_query_rules                          |
    | mysql_query_rules_fast_routing             |
    | mysql_replication_hostgroups               |
    | mysql_servers                              |
    | mysql_users                                |
    | proxysql_servers                           |
    | runtime_checksums_values                   |
    | runtime_global_variables                   |
    | runtime_mysql_group_replication_hostgroups |
    | runtime_mysql_query_rules                  |
    | runtime_mysql_query_rules_fast_routing     |
    | runtime_mysql_replication_hostgroups       |
    | runtime_mysql_servers                      |
    | runtime_mysql_users                        |
    | runtime_proxysql_servers                   |
    | runtime_scheduler                          |
    | scheduler                                  |
    +--------------------------------------------+
    20 rows in set (0.00 sec)
  说明:在main和monitor数据库中的表, runtime_开头的是运行时的配置,不能修改,只能修改非runtime_表,修改后必须执行LOAD (数据库名) TO RUNTIME才能加载到RUNTIME生效,执行save (数据库名) to disk将配置持久化保存到磁盘

  为了让proxysql能够调度三台主从节点服务器,需要把三台主从节点的ip地址加入proxysql的mysql_servers表中
    MySQL > select * from mysql_servers;  #查看表的内容,为空
    MySQL > insert into mysql_servers(hostgroup_id,hostname,port) values(10,'192.168.32.200',3306);
    MySQL > insert into mysql_servers(hostgroup_id,hostname,port) values(10,'192.168.32.201',3306);
    MySQL > insert into mysql_servers(hostgroup_id,hostname,port) values(10,'192.168.32.202',3306);   #hostgroup_id是指把服务器进行分组,分为读组和写组便于区分主节点和从节点进行读写调度;如果没有进行分组,则会根据从节点配置文件中的read-only选项来判断主从节点进行读写调度
    MySQL [main]> select * from mysql_servers\G       #查看表的内容
    *************************** 1. row ***************************
           hostgroup_id: 10
               hostname: 192.168.32.200
                   port: 3306
                 status: ONLINE   #online说明加入成功
                 weight: 1
            compression: 0
        max_connections: 1000
    max_replication_lag: 0
                use_ssl: 0
         max_latency_ms: 0
                comment:
    *************************** 2. row ***************************
           hostgroup_id: 10
               hostname: 192.168.32.201
                   port: 3306
                 status: ONLINE
                 weight: 1
            compression: 0
        max_connections: 1000
    max_replication_lag: 0
                use_ssl: 0
         max_latency_ms: 0
                comment:
    *************************** 3. row ***************************
           hostgroup_id: 10
               hostname: 192.168.32.202
                   port: 3306
                 status: ONLINE
                 weight: 1
            compression: 0
        max_connections: 1000
    max_replication_lag: 0
                use_ssl: 0
         max_latency_ms: 0
                comment:
    3 rows in set (0.00 sec)
    MySQL > load mysql servers to runtime;   #注意表名中不带下划线
    MySQL > save mysql servers to disk;   #保存到硬盘

添加监控后端节点的用户。ProxySQL通过每个节点的read_only值来自动调整它们是属于读组还是写组
  在master节点192.168.32.200上执行:
    mysql> grant replication client on *.* to monitor@'192.168.32.%' identified by 'centos';   #由于做了主从复制,因此该账号会自动被复制到从节点上
  在ProxySQL节点192.168.32.203上配置监控
    MySQL [(none)]> set mysql-monitor_username='monitor';  #如果为监控账号为自定义账号,则需要更改此选项,因为默认监控账号即为monitor,如果监控账号为monitor,则无需修改
    MySQL [(none)]> set mysql-monitor_password='centos';   #更改监控账号的密码,该选项来自于main数据库的global_variables表,该表中的该账号的默认密码为monitor,因此要更改该密码为自定义密码
  加载到RUNTIME,并保存到disk
    MySQL [(none)]> load mysql variables to runtime;
    MySQL [(none)]> save mysql variables to disk;

监控模块的指标保存在monitor库的log表中
  查看监控连接是否正常的 (对connect指标的监控):(如果connect_error的结果为NULL则表示正常)
    MySQL [(none)]> select * from mysql_server_connect_log;
  查看监控心跳信息 (对ping指标的监控):
    MySQL [(none)]>  select * from mysql_server_ping_log;
  查看read_only和replication_lag的监控日志
    MySQL [(none)]>  select * from mysql_server_read_only_log;
    MySQL [(none)]>  select * from mysql_server_replication_lag_log;

设置分组信息
  需要修改的是main库中的mysql_replication_hostgroups表,该表有3个字段:writer_hostgroup,reader_hostgroup,comment, 指定写组的id为10,读组的id为20
    MySQL [(none)]> insert into mysql_replication_hostgroups values(10,20,"test");
  将mysql_replication_hostgroups表的修改加载到RUNTIME生效
    MySQL [(none)]> load mysql servers to runtime;
    MySQL [(none)]> save mysql servers to disk;
  Monitor模块监控后端的read_only值,按照read_only的值将节点自动移动到读/写组
    MySQL [(none)]> select hostgroup_id,hostname,port,status,weight from mysql_servers;
    +--------------+----------------+------+--------+--------+
    | hostgroup_id | hostname       | port | status | weight |
    +--------------+----------------+------+--------+--------+
    | 10           | 192.168.32.200 | 3306 | ONLINE | 1      |
    | 20           | 192.168.32.201 | 3306 | ONLINE | 1      |
    | 20           | 192.168.32.202 | 3306 | ONLINE | 1      |
    +--------------+----------------+------+--------+--------+
  上表中,可以看到已经自动进行分组,从节点201和202为从节点负责读操作,200为主节点负责写操作

配置发送SQL语句的用户
  在master主节点上创建访问数据库的用户
    grant all on *.* to sqluser@'192.168.32.%' identified by 'centos';    #由于配置了主从复制,在从节点也存在该账户
  在ProxySQL读写分离节点192.168.32.203上进行配置,将用户sqluser添加到mysql_users表中,监控该用户,对该用户的访问进行读写调度。default_hostgroup默认组设置为写组10,当读写分离的路由规则不符合时,会访问默认组的数据库,即主节点
    insert into mysql_users(username,password,default_hostgroup) values('sqluser','centos',10);
    load mysql users to runtime;
    save mysql users to disk;
  使用sqluser用户测试是否能路由到默认的10写组实现读、写数据
  注意:此时要另外打开一个窗口进行数据库连接测试,防止与使用mysql -uadmin -padmin -P6032 -h127.0.0.1命令连接的数据库进行的相关操作混淆
    mysql -usqluser -pcentos -P6033 -h127.0.0.1         #测试连接数据库
    MySQL [(none)]> select @@server_id;    #查看mysql服务器的server_id
    +-------------+
    | @@server_id |
    +-------------+
    |           1 |
    +-------------+
  注意:此时对数据库做的操作都是在master节点上进行,因此还需要定义调度策略
  创建测试数据库和表查看效果
    MySQL [(none)]> use testdb;
    MySQL [testdb]> create table t(id int);

配置路由调度规则,实现读写分离
  在读写分离节点192.168.32.203上配置,注意:此时要在mysql -uadmin -padmin -P6032 -h127.0.0.1命令连接的窗口进行配置
  与规则有关的表:mysql_query_rules和mysql_query_rules_fast_routing,后者是前者的扩展表,1.4.7之后支持
  插入路由规则:将select语句分离到20的读组,select语句中有一个特殊语句SELECT...FOR UPDATE它会申请写锁,应路由到10的写组
    insert into mysql_query_rules
  (rule_id,active,match_digest,destination_hostgroup,apply)VALUES
  (1,1,'^SELECT.*FOR UPDATE$',10,1),(2,1,'^SELECT',20,1);    #注意:SELECT.*FOR UPDATE虽然以select命令开头,但属于写操作,属于分组10。其他以select开头的命令都属于读(查询)操作,因此属于分组20。
    load mysql query rules to runtime;
    save mysql query rules to disk;
  注意:因ProxySQL根据rule_id顺序进行规则匹配,select ... for update规则的rule_id必须要小于普通的select规则的rule_id
  查看路由规则表
    MySQL [(none)]> select * from mysql_query_rules\G
验证
  测试读操作是否路由给20的读组,server_id为2或3,说明在从节点,也就是读组。
    [root@centos7 ~]# mysql -usqluser -pcentos -P6033 -h127.0.0.1 -e 'select @@server_id'
    +-------------+
    | @@server_id |
    +-------------+
    |           2 |
    +-------------+
    [root@centos7 ~]# mysql -usqluser -pcentos -P6033 -h127.0.0.1 -e 'select @@server_id'
    +-------------+
    | @@server_id |
    +-------------+
    |           3 |
    +-------------+
  测试写操作,以事务方式进行测试,server_id为1,说明在主节点,也就是写组
    [root@centos7 ~]# mysql -usqluser -pcentos -P6033 -h127.0.0.1 -e 'begin;select @@server_id;commit;'
    +-------------+
    | @@server_id |
    +-------------+
    |           1 |
    +-------------+
    mysql -usqluser -pcentos -P6033 -h127.0.0.1 -e 'insert testdb.t values (1)'
    mysql -usqluser -pcentos -P6033 -h127.0.0.1 -e 'select id from testdb.t'
  路由的信息:查询stats库中的stats_mysql_query_digest表
    SELECT hostgroup hg,sum_time, count_star, digest_text FROM stats_mysql_query_digest ORDER BY sum_time DESC;
文章评论