
本章概述
- yaml文件介绍
- 通过yaml文件实现nginx+tomcat的访问
6.1 yaml文件介绍
yaml文件是k8s集群的重中之重,集群部署完成后,要想实现业务容器化,要通过yaml文件拉起容器。
示例:
人员名单:
  张三:
  年龄: 18 #
  职业: Linux运维工程师
  爱好:
    - 看书
    - 学习
    - 加班
  李四:
  年龄: 20
  职业: Java开发工程师 # 这是职业
  爱好:
    - 开源技术
    - 微服务
    - 分布式存储
特点:
大小写敏感
使用缩进表示层级关系
缩进时不允许使用Tab键,只允许使用空格
缩进的空格数目不重要,只要相同层级的元素左侧对齐即可
使用”#” 表示注释,从这个字符一直到行尾,都会被解析器忽略
比json更适用于配置文件
yaml文件主要特性:
k8s中的yaml文件以及其他场景的yaml文件,大部分都是以下类型:
上下级关系
列表
键值对(也称为maps,即key:value 格式的键值对数据)
命令:
kubectl api-versions    #查看api版本
kubectl api-resources    #查看api资源
kubectl explain  <资源类型>  查看yaml文件字段,用于参考
对于不知道具体意思的字段,可以去k8s官网进行查询
官网查询地址为:https://kubernetes.io/zh/docs/home/
示例:
# cat nginx.yaml
kind: Deployment  #类型,是deployment控制器,kubectl explain  Deployment
apiVersion: extensions/v1beta1  #API版本,# kubectl explain  Deployment.apiVersion
metadata: #pod的元数据信息,kubectl explain  Deployment.metadata
  labels: #自定义pod的标签,# kubectl explain  Deployment.metadata.labels
    app: linux66-nginx-deployment-label #标签名称为app值为linux66-nginx-deployment-label,后面会用到此标签
  name: linux66-nginx-deployment #pod的名称
  namespace: linux66 #pod的namespace,默认是defaule
spec: #定义deployment中容器的详细信息,kubectl explain  Deployment.spec
  replicas: 1 #创建出的pod的副本数,即多少个pod,默认值为1
  selector: #定义标签选择器
    matchLabels: #定义匹配的标签,必须要设置
      app: linux66-nginx-selector #匹配的目标标签,
  template: #定义模板,必须定义,模板是起到描述要创建的pod的作用
    metadata: #定义模板元数据
      labels: #定义模板label,Deployment.spec.template.metadata.labels
        app: linux66-nginx-selector #定义标签,等于Deployment.spec.selector.matchLabels
    spec: #定义pod信息
      containers:#定义pod中容器列表,可以多个至少一个,pod不能动态增减容器
      - name: linux66-nginx-container #容器名称
        image: harbor.magedu.net/linux66/nginx-web1:v1 #镜像地址
        #command: ["/apps/tomcat/bin/run_tomcat.sh"] #容器启动执行的命令或脚本
        #imagePullPolicy: IfNotPresent  #如果本地有镜像,就使用本地镜像,如果没有就根据指定的镜像去下载镜像
        imagePullPolicy: Always #拉取镜像策略,每次重建容器,无论本地有没有镜像,都会重新下载镜像
        ports: #定义容器端口列表
        - containerPort: 80 #定义一个端口
          protocol: TCP #端口协议
          name: http #端口名称
        - containerPort: 443 #定义一个端口
          protocol: TCP #端口协议
          name: https #端口名称
        env: #配置环境变量
        - name: "password" #变量名称。必须要用引号引起来
          value: "123456" #当前变量的值
        - name: "age" #另一个变量名称
          value: "18" #另一个变量的值
        resources: #对资源的请求设置和限制设置
          limits: #资源限制设置,上限
            cpu: 500m  #cpu的限制,单位为core数,可以写0.5或者500m等CPU压缩值
            memory: 2Gi #内存限制,单位可以为Mib/Gib,将用于docker run --memory参数
          requests: #资源请求的设置
            cpu: 200m #cpu请求数,容器启动的初始可用数量,可以写0.5或者500m等CPU压缩值
            memory: 512Mi #内存请求大小,容器启动的初始可用数量,用于调度pod时候使用

---
kind: Service #类型为service
apiVersion: v1 #service API版本, service.apiVersion
metadata: #定义service元数据,service.metadata
  labels: #自定义标签,service.metadata.labels
    app: linux66-nginx #定义service标签的内容
  name: linux66-nginx-spec #定义service的名称,此名称会被DNS解析
  namespace: linux66 #该service隶属于的namespaces名称,即把service创建到哪个namespace里面
spec: #定义service的详细信息,service.spec
  type: NodePort #service的类型,定义服务的访问方式,默认为ClusterIP, service.spec.type
  ports: #定义访问端口, service.spec.ports
  - name: http #定义一个端口名称
    port: 80 #service 80端口
    protocol: TCP #协议类型
    targetPort: 80 #目标pod的端口
nodePort: 30001 #node节点暴露的端口,是部署k8s时指定的端口范围内的端口
#请求转发过程:请求先转发给node,然后由node转发给service,由service转发给pod
  - name: https #SSL 端口
    port: 443 #service 443端口
    protocol: TCP #端口协议
    targetPort: 443 #目标pod端口
    nodePort: 30043 #node节点暴露的SSL端口,是部署k8s时指定的端口范围内的端口
  selector: #service的标签选择器,定义要访问的目标pod
    app: linux66-nginx #将流量路到选择的pod上,须等于Deployment.spec.selector.matchLabels
生产环境各类资源分配推荐:
nginx #静态服务器 :2C/2G或1C/1G
java #动态服务: 2C/2G或2C/4G
php  2C/2G
go/python  1C/2G 或1C/1G
job/cronjob   0.3/512Mi
elasticsearch   4C/12G
mysql          4C/8G
注意:service和pod要在同一个namespace,否则容器网络会有问题
如何查看service和pod是否在同一个namespace
通过命令查看namespace 和endpoints的容器是否匹配,每个service至少有一个容器在处理请求,如果namespace下没有容器,则说明容器和service不在同一个namespace
kubectl get endpoint -n default
6.2 通过yaml文件实现nginx+tomcat的访问
注意:一般更改配置都是通过更改yaml文件重新打镜像实现,在以下操作步骤中为了方便做实现,修改tomcat和nginx配置均通过进入容器修改完成,一般不会是用这种方式来该配置,需要注意。
架构:
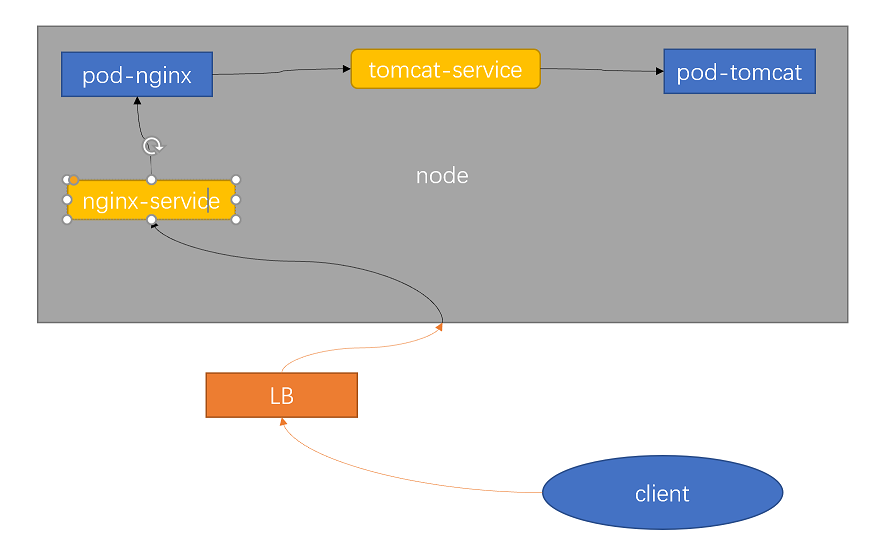
说明:
(1)客户端访问流量经过CDN、WAF等到达负载均衡LB
(2)LB将流量转发给k8s集群的pod
(3)pod会先将流量转发给nginx前端的service,由service转发给nginx
(4)nginx通过解析,把静态文件的请求直接返回,动态文件的请求,转发给tomcat前端的service(nginx配置文件中配置了转发规则)
(5)最后由service把请求转发给tomcat处理
6.2.1 通过yaml文件创建tomcat
在master节点172.31.7.101上
cd /root/yaml/
vim tomcat.yaml
kind: Deployment
#apiVersion: extensions/v1beta1
apiVersion: apps/v1
metadata:
  labels:
    app: linux66-tomcat-app1-deployment-label
  name: linux66-tomcat-app1-deployment
  namespace: linux66
spec:
  replicas: 1
  selector:
    matchLabels:
      app: linux66-tomcat-app1-selector
  template:
    metadata:
      labels:
        app: linux66-tomcat-app1-selector
    spec:
      containers:
      - name: linux66-tomcat-app1-container
        image: tomcat:7.0.94-alpine
        #command: ["/apps/tomcat/bin/run_tomcat.sh"]
        #imagePullPolicy: IfNotPresent
        imagePullPolicy: Always
        ports:
        - containerPort: 8080
          protocol: TCP
          name: http
        env:
        - name: "password"
          value: "123456"
        - name: "age"
          value: "18"
        resources:
          limits:
            cpu: 1
            memory: "512Mi"
          requests:
            cpu: 500m
            memory: "512Mi"
---
kind: Service
apiVersion: v1
metadata:
  labels:
    app: linux66-tomcat-app1-service-label
  name: linux66-tomcat-app1-service
  namespace: linux66
spec:
  #type: NodePort
  ports:
  - name: http
    port: 80
    protocol: TCP
    targetPort: 8080
    #nodePort: 40003
  selector:
    app: linux66-tomcat-app1-selector
执行创建命令
kubectl apply -f tomcat.yaml
查看pod容器
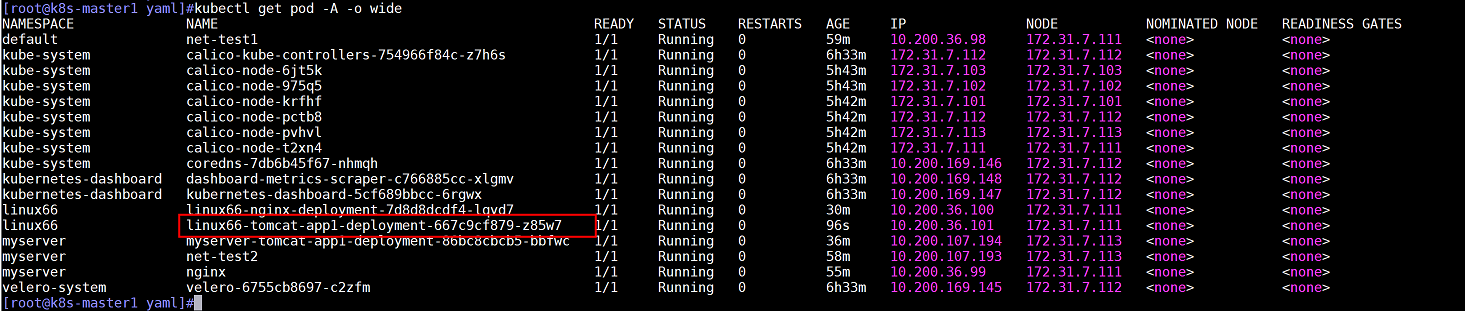
容器创建成功后,进入容器创建测试文件模拟应用代码
kubectl exec -it linux66-tomcat-app1-deployment-667c9cf879-z85w7 -n linux66 bash
cd /usr/local/tomcat/webapps/
mkdir login
echo "<h1> tomcat test web page </h1>" > login/index.jsp
6.2.2 通过yaml文件创建nginx
在master节点172.31.7.101上
cd /root/yaml/
vim nginx.yaml
kind: Deployment
#apiVersion: extensions/v1beta1
apiVersion: apps/v1
metadata:
  labels:
    app: linux66-nginx-deployment-label
  name: linux66-nginx-deployment
  namespace: linux66
spec:
  replicas: 1
  selector:
    matchLabels:
      app: linux66-nginx-selector
  template:
    metadata:
      labels:
        app: linux66-nginx-selector
    spec:
      containers:
      - name: linux66-nginx-container
        image: nginx
        #command: ["/apps/tomcat/bin/run_tomcat.sh"]
        #imagePullPolicy: IfNotPresent
        imagePullPolicy: Always
        ports:
        - containerPort: 80
          protocol: TCP
          name: http
        - containerPort: 443
          protocol: TCP
          name: https
        env:
        - name: "password"
          value: "123456"
        - name: "age"
          value: "18"
#        resources:
#          limits:
#            cpu: 2
#            memory: 2Gi
#          requests:
#            cpu: 500m
#            memory: 1Gi

---
kind: Service
apiVersion: v1
metadata:
  labels:
    app: linux66-nginx-service-label
  name: linux66-nginx-service
  namespace: linux66
spec:
  type: NodePort
  ports:
  - name: http
    port: 80
    protocol: TCP
    targetPort: 80
    nodePort: 30006
  - name: https
    port: 443
    protocol: TCP
    targetPort: 443
    nodePort: 30443
  selector:
    app: linux66-nginx-selector
由于yaml文件中使用的namespace是linux66,集群中不存在该namespace,需要创建
kubectl create namespace linux66
通过yaml创建nginx
kubectl apply -f nginx.yaml
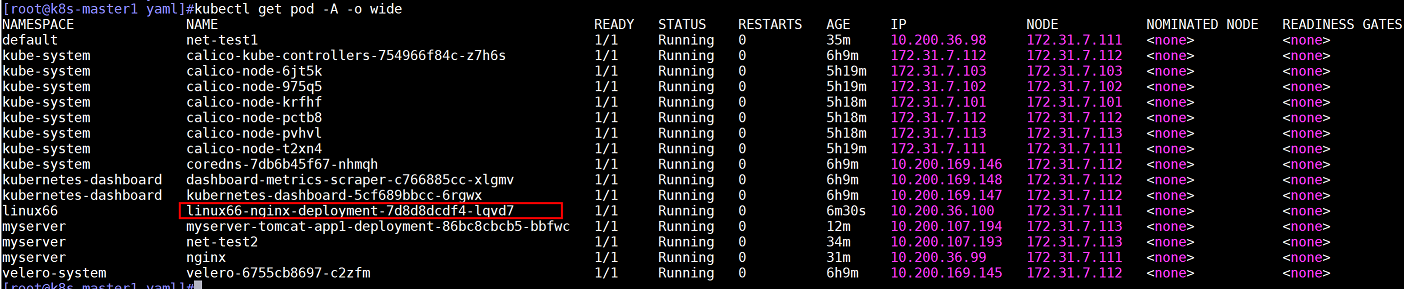
查看容器端口监听

进入nginx容器, 先进行联通测试:
通过curl命令对tomcat的service发起请求(请求service,service会把请求转发给tomcat),请求tomcat容器中配置的index.jsp文件,查看是否有返回
获取tomcat的service
kubectl get svc -n linux66

在nginx容器中进行curl测试
kubectl exec -it linux66-nginx-deployment-7d8d8dcdf4-lqvd7 -n linux66 bash
curl linux66-tomcat-app1-service/login/index.jsp #tomcat的service名称会自动解析为ip

在nginx容器中更改/etc/nginx/conf.d/default.conf,配置转发规则:凡是访问/login的都转发给tomcat(linux66-tomcat-app1-service.linux66.svc.magedu.local(这里是全称))
配置文件如下:(注意:新增location前有注释)
server {
    listen       80;
    listen  [::]:80;
    server_name  localhost;

    #access_log  /var/log/nginx/host.access.log  main;

    location / {
        root   /usr/share/nginx/html;
        index  index.html index.htm;
    }
    #以下为新增配置
    location /login {
        proxy_pass http://linux66-tomcat-app1-service.linux66.svc.magedu.local;
    }

    #error_page  404              /404.html;

    # redirect server error pages to the static page /50x.html
    #
    error_page   500 502 503 504  /50x.html;
    location = /50x.html {
        root   /usr/share/nginx/html;
    }

    # proxy the PHP scripts to Apache listening on 127.0.0.1:80
    #
    #location ~ \.php$ {
    #    proxy_pass   http://127.0.0.1;
    #}

    # pass the PHP scripts to FastCGI server listening on 127.0.0.1:9000
    #
    #location ~ \.php$ {
    #    root           html;
    #    fastcgi_pass   127.0.0.1:9000;
    #    fastcgi_index  index.php;
    #    fastcgi_param  SCRIPT_FILENAME  /scripts$fastcgi_script_name;
    #    include        fastcgi_params;
    #}

    # deny access to .htaccess files, if Apache's document root
    # concurs with nginx's one
    #
    #location ~ /\.ht {
    #    deny  all;
    #}
}
注意:由于nginx容器不支持vim命令,可在容器外将配置文件修改好之后,复制到容器内
更改完成后,在nginx容器内重载服务
nginx -s reload

这样nginx+tomcat的配置就完成了。
6.2.3 访问测试
在宿主机访问nginx,即172.31.7.111,这里显示的是nginx的默认页面

在宿主机访问tomcat,加上访问呢路径,即172.31.7.111:30006/login/index.jsp

一般情况下,不会使用30006端口来访问业务,因此在nginx前端还会有负载均衡器,这里使用haproxy(172.31.7.109)节点上的haproxy模拟负载均衡器
在haproxy1节点(172.31.7.109)的haproxy配置文件最下方添加以下配置
vim /etc/haproxy/haproxy.cfg
listen magedu-linux66-nginx-80
    bind 172.31.7.189:80
    mode tcp
    server node1 172.31.7.111:30006 check inter 3s fall 3 rise 1
    server node2 172.31.7.112:30006 check inter 3s fall 3 rise 1
重新加载haproxy
systemctl reload haproxy
查看本机是否监听172.31.7.189的80端口
ss -ntlp

此时,可以通过访问VIP地址(172.31.7.189/login/index.jsp)访问nginx

一般情况下,网站都是通过域名访问,此时只需要申请域名并和vip地址绑定,即可通过域名访问nginx,这里我在本地hosts文件中通过把172.31.7.189和www.nginxtest.com域名绑定进行测试
windows系统hosts文件路径:C:\Windows\System32\drivers\etc
修改完成后,在浏览器访问www.nginxtest.com/login/index.jsp
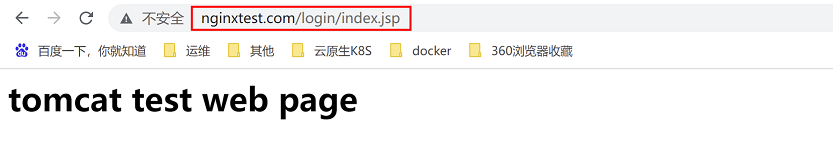
这样就完成了一个相对简单的站点配置。

文章评论