
本章概述
- 安装alertmanager
- 邮件告警
- 钉钉告警
- 企业微信通知
- 消息分类发送
- 自定义消息模板
- 告警抑制和静默
- alertmanager高可用
- PrometheusAlert
前言
prometheus 触发一条告警的过程:
prometheus--->触发阈值--->超出持续时间--->alertmanager--->分组|抑制|静默--->媒体类型--->邮件|钉钉|微信等。
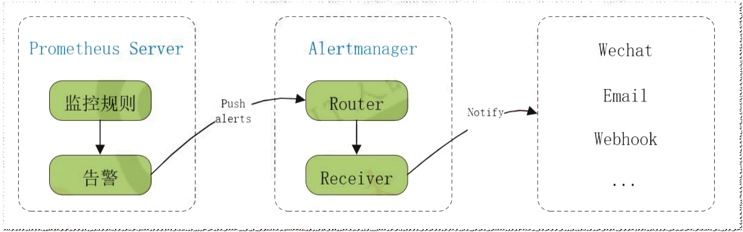
名词介绍:
分组(group): 将类似性质的警报合并为单个通知,比如网络通知、主机通知、服务通知。
静默(silences): 是一种简单的特定时间静音的机制,例如:服务器要升级维护可以先设置这个时间段告警静默。
抑制(inhibition): 当警报发出后,停止重复发送由此警报引发的其他警报即合并一个故障引起的多个报警事件,可以消除冗余告警。如:服务器磁盘使用率超过60%为橙色告警,超过80%为红色告警,当服务器磁盘使用率超过80%触发红色告警后,橙色告警就不会再发出。
8.1 安装alertmanager
在172.31.7.202上安装altermanager
1、下载altermanager
mkdir -p /apps
wget https://github.com/prometheus/alertmanager/releases/download/v0.24.0/alertmanager-0.24.0.linux-amd64.tar.gz
2、解压并做软链接
tar -xvf alertmanager-0.24.0.linux-amd64.tar.gz
ln -sv /apps/alertmanager-0.24.0.linux-amd64 /apps/alertmanager
3、创建service文件
vim /etc/systemd/system/alertmanager.service
[Unit]
Description=Prometheus alertmanager
After=network.target

[Service]
ExecStart=/apps/alertmanager/alertmanager --config.file=/apps/alertmanager/alertmanager.yml

[Install]
WantedBy=multi-user.target
4、启动alertmanager并设置为开机自启动
systemctl daemon-reload && systemctl restart alertmanager && systemctl enable alertmanager
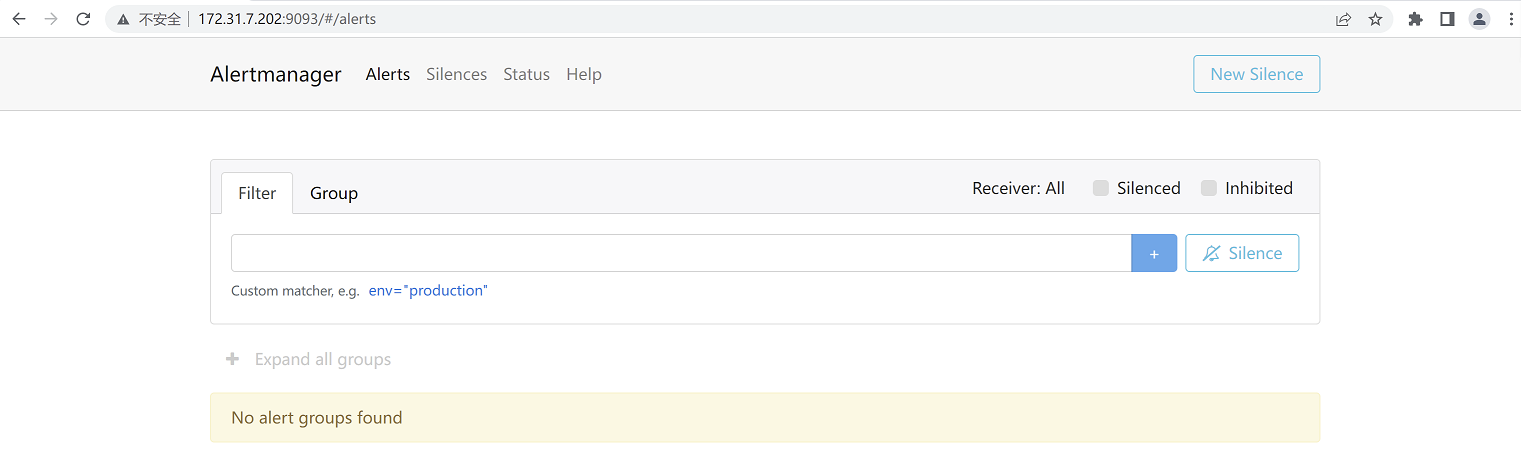
5、访问web页面
浏览器访问:http://172.31.7.202:9093
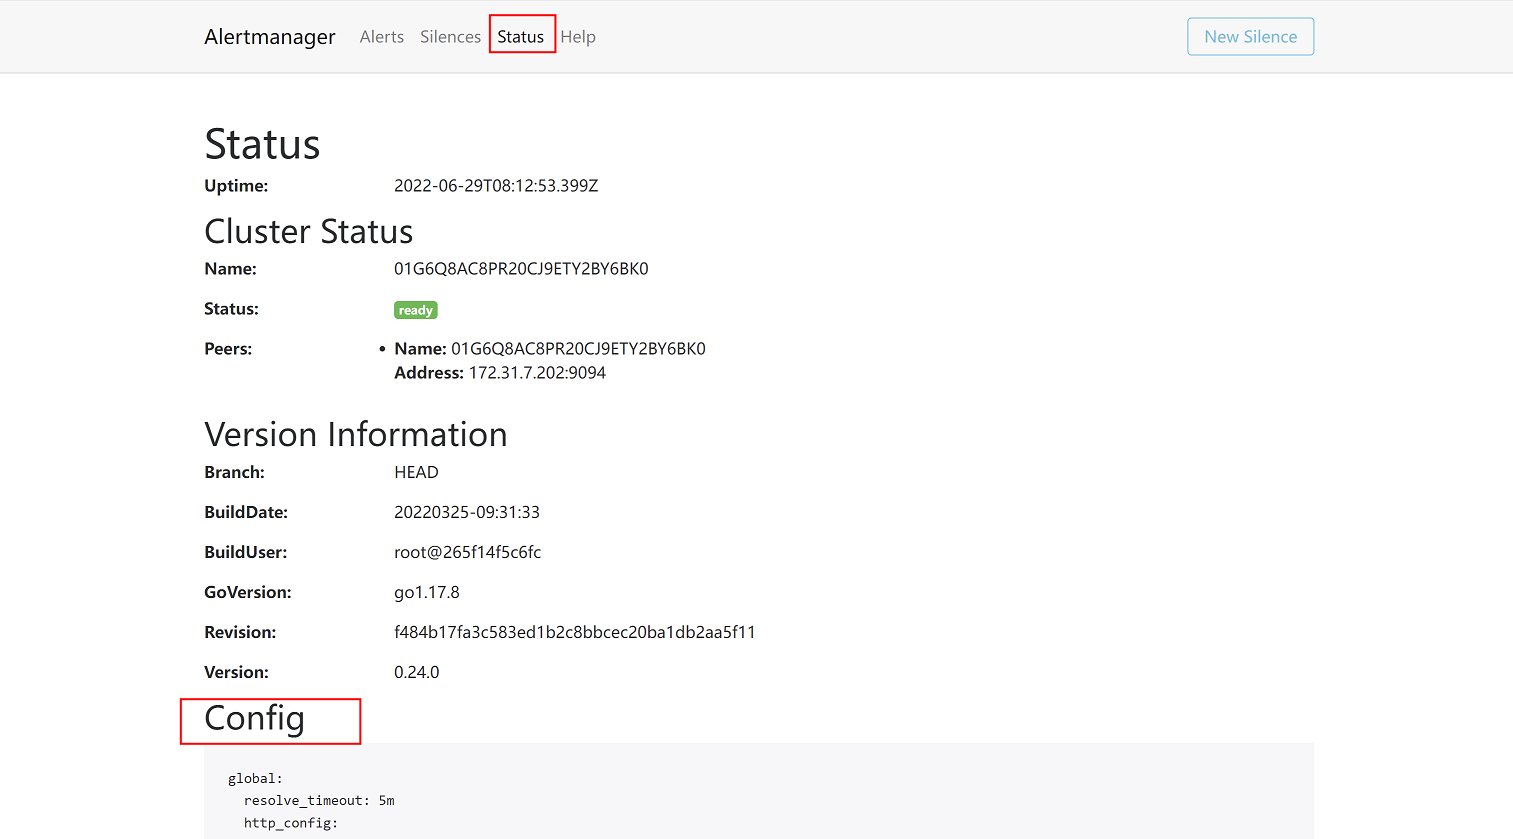
查看配置:
8.2 邮件告警
官方配置文档:https://prometheus.io/docs/alerting/configuration/
8.2.1 alertermanager 配置文件解析
1、/apps/alertmanager/alertmanager.yml配置文件解析:
(1)global配置
global:
#QQ邮箱告警通知配置
smtp_from:       #发件人邮箱地址
smtp_smarthost:     #邮箱 smtp 地址。
smtp_auth_username:   #发件人的登陆用户名,默认和发件人地址一致。
smtp_auth_password:   #发件人的登陆密码,有时候是授权码。
smtp_require_tls:      #是否需要 tls 协议。默认是 true。

#微信告警通知配置
wechart_api_url:      #企业微信 API 地址。
wechart_api_secret:  #企业微信 API secret
wechat_api_corp_id:   #企业微信 corp id 信息。

resolve_timeout: 60s   #当一个告警在 Alertmanager 持续多长时间未接收到新告警后旧标记告警状态为resolved(已解决/已恢复)。
(2)route路由配置
route:  #配置路由信息,通过路由信息把告警发给对应的接收者
  group_by: ['alertname']   #通过 alertname 的值对告警进行分类,- alert: 物理节点 cpu 使用率
  group_wait: 30s     #一组告警第一次发送之前等待的延迟时间,即产生告警后延迟 30 秒钟将组内新产生的消息一起合并发送(一般设置为 0 秒 ~ 几分钟)。即接收到第一次的告警之后不会立即发送出去,而是等待一段时间后再发送出去,这个等待时间就是需要设置的值,这里为30秒。
  group_interval: 5m   #一组已发送过初始通知的告警接收到新告警后,下次发送通知前等待的延迟时间(一般设置为 5 分钟或更多)。即已经发送过第一次告警,在发送到第二次及以后的告警通知时会延迟一段时间再发送出去,这个延迟时间就是需要设置的值,这里为5分钟。
  repeat_interval: 1h   #一条成功发送的告警,在最终发送通知之前等待的时间(通常设置为 3 小时或更长时间)。即告警通知在最终发送出去之前要等待的时长,这里为1小时,注意:一般情况下这个等待时间不要设置太久,一般设置为5分钟即可
  receiver: 'web.hook'   #指定告警信息接收者为web.hook,后续配置中会在receivers配置字段定义接收者名称,进而将消息发送给对应的接收者
示例:
#group_wait: 10s #第一次产生告警,等待 10s,组内有告警就一起发出,没有其它告警就单独发出。
#group_interval: 2m #第二次产生告警,先等待 2 分钟,2 分钟后还没有恢复就进入 repeat_interval。
#repeat_interval: 5m #在最终发送消息前再等待 5 分钟,5 分钟后还没有恢复就发送第二次告警。
总结:根据以上示例,一条告警产生后,如果是第一次发送,总延迟时间为10s+2m+5m,即第一条告警会在等待7分钟10秒后发出,而第二条及以后的告警通知,会在等待7分钟后发出
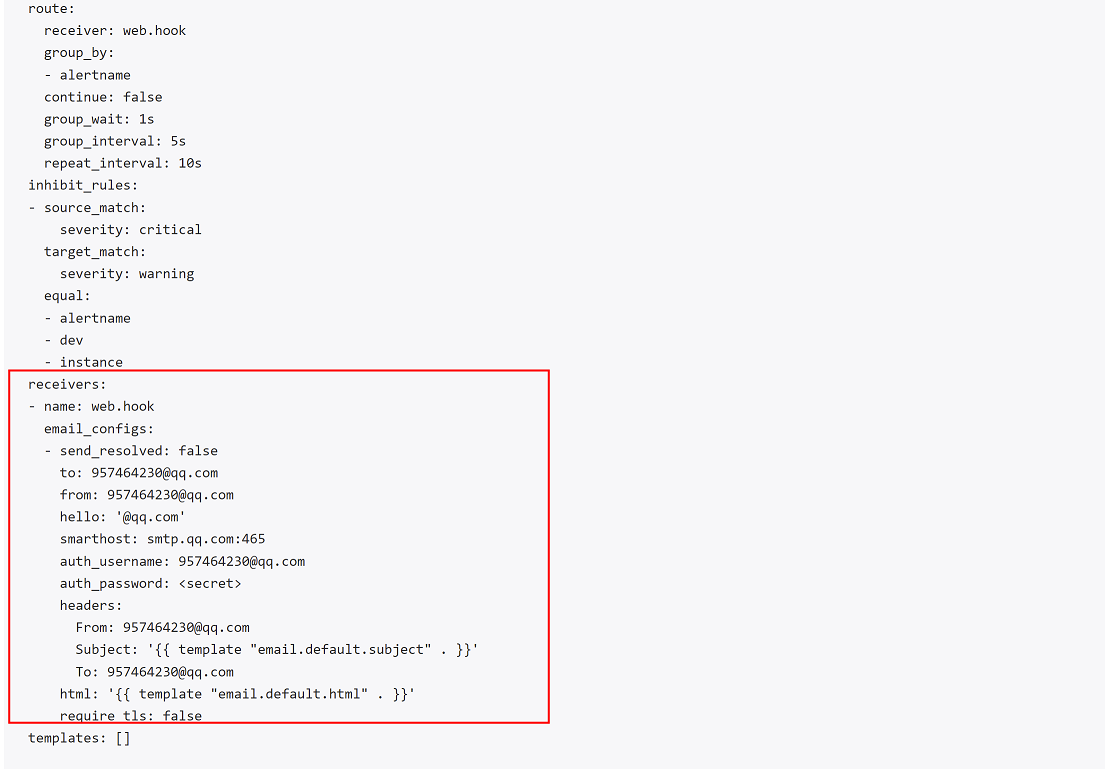
(3)receivers接收者配置:
receivers:        #定义告警接收者
  - name: 'web.hook'          #定义告警接收者名称,alertmanager会通过该名称发送告警信息,可通过列表配置多个告警接收者
    webhook_configs:
      - url: 'http://127.0.0.1:5001/'
  - name: 'email'      #这里使用邮箱接收告警,调用时需要写的receiver名称为email
    email_configs:
      - to: '1509708480@qq.com'            #配置接收告警的邮箱
(4)抑制规则配置
inhibit_rules:
  - source_match:    #源匹配级别,当匹配成功发出通知,但是其它'alertname', 'dev', 'instance'产生的warning 级别的告警通知将被抑制
      severity: 'critical'    #报警的事件级别为严重级别
    target_match:
      severity: 'warning'   #匹配目标为新产生的目标告警为'warning' 将被抑制
equal: ['alertname', 'dev', 'instance']
注意:这段配置是指,如果告警级别匹配为critical严重级别,则warning警告级别的告警会被抑制(即只发送严重级别的告警,warning级别的告警不再发出)
8.2.2 配置alertmanager并启动
1、修改配置文件
vim /apps/alertmanager/alertmanager.yml
global:
  resolve_timeout: 1m
  smtp_smarthost: 'smtp.qq.com:465'
  smtp_from: '957464230@qq.com'         #定义邮件发送者
  smtp_auth_username: '957464230@qq.com'
  smtp_auth_password: 'ebahmhiwxwxobcdb'      #配置邮箱授权码
  smtp_hello: '@qq.com'
  smtp_require_tls: false

route:
  group_by: ['alertname']
  group_wait: 1s
  group_interval: 5s
  repeat_interval: 10s
  receiver: 'web.hook'
receivers:
  - name: 'web.hook'      #这里不使用webhook接收告警,而是使用邮箱接收告警
    #webhook_configs:
      #- url: 'http://127.0.0.1:5001/'
    email_configs:
      - to: '1509708480@qq.com'            #配置接收告警的邮箱
inhibit_rules:
  - source_match:
      severity: 'critical'
    target_match:
      severity: 'warning'
equal: ['alertname', 'dev', 'instance']
注意:为了便于演示,以上配置中的告警延迟时间(红色字体部分)设置的较短,在实际环境中要根据需求来进行设置
2、重启服务
systemctl restart alertmanager
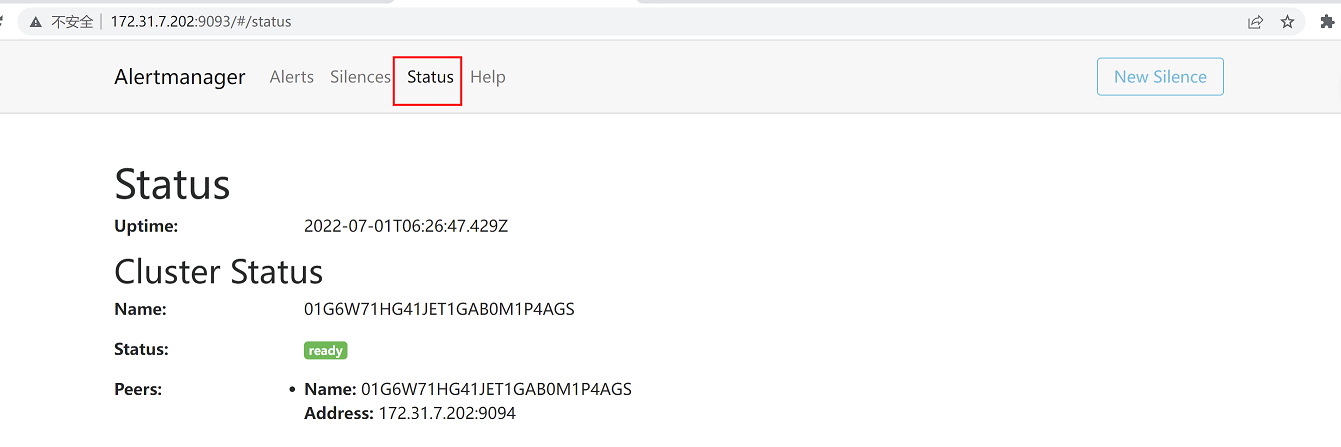
3、查看控制台页面status是否存在已经修改的配置
此时,alertmanager会根据匹配规则发出告警信息,但是触发告警的规则还需要在prometheus上配置,由prometheus来判断是否触发告警
8.2.3 配置prometheus报警规则
在prometheus配置文件中可以通过调用文件来匹配报警规则
在172.31.7.201上执行以下命令
1、创建保存报警规则的目录
mkdir -p /apps/prometheus/rules/
2、创建报警规则文件
vim /apps/prometheus/rules/prometheus_rule.yaml
prometheus_rule.yaml
groups:
- name: alertmanager_pod.rules #pod告警规则
rules:
- alert: Pod_all_cpu_usage #pod cpu使用率告警规则
expr: (sum by(name)(rate(container_cpu_usage_seconds_total{image!=""}[5m]))*100) > 1
for: 2m
labels:
severity: critical
service: pods
annotations:
description: 容器 {{ $labels.name }} CPU 资源利用率大于 10% , (current value is {{ $value }})
summary: Dev CPU 负载告警
- alert: Pod_all_memory_usage #pod内存使用率告警规则
#expr: sort_desc(avg by(name)(irate(container_memory_usage_bytes{name!=""}[5m]))*100) > 10 #内存大于 10%
expr: sort_desc(avg by(name)(irate(node_memory_MemFree_bytes {name!=""}[5m]))) > 2*1024*1024*1024 #内存大于 2G,注意:取出的数据单位是字节,要以G为单位显示,需要进行转换
for: 2m
labels:
severity: critical
annotations:
description: 容 器 {{ $labels.name }} Memory 资 源 利 用 率 大 于 2G , (current value is{{ $value }})
summary: Dev Memory 负载告警
- alert: Pod_all_network_receive_usage
expr: sum by(name)(irate(container_network_receive_bytes_total{container_name="POD"}[1m])) > 1
for: 2m
labels:
severity: critical
annotations:
description: 容器 {{ $labels.name }} network_receive 资源利用率大于 50M , (current value is{{ $value }})
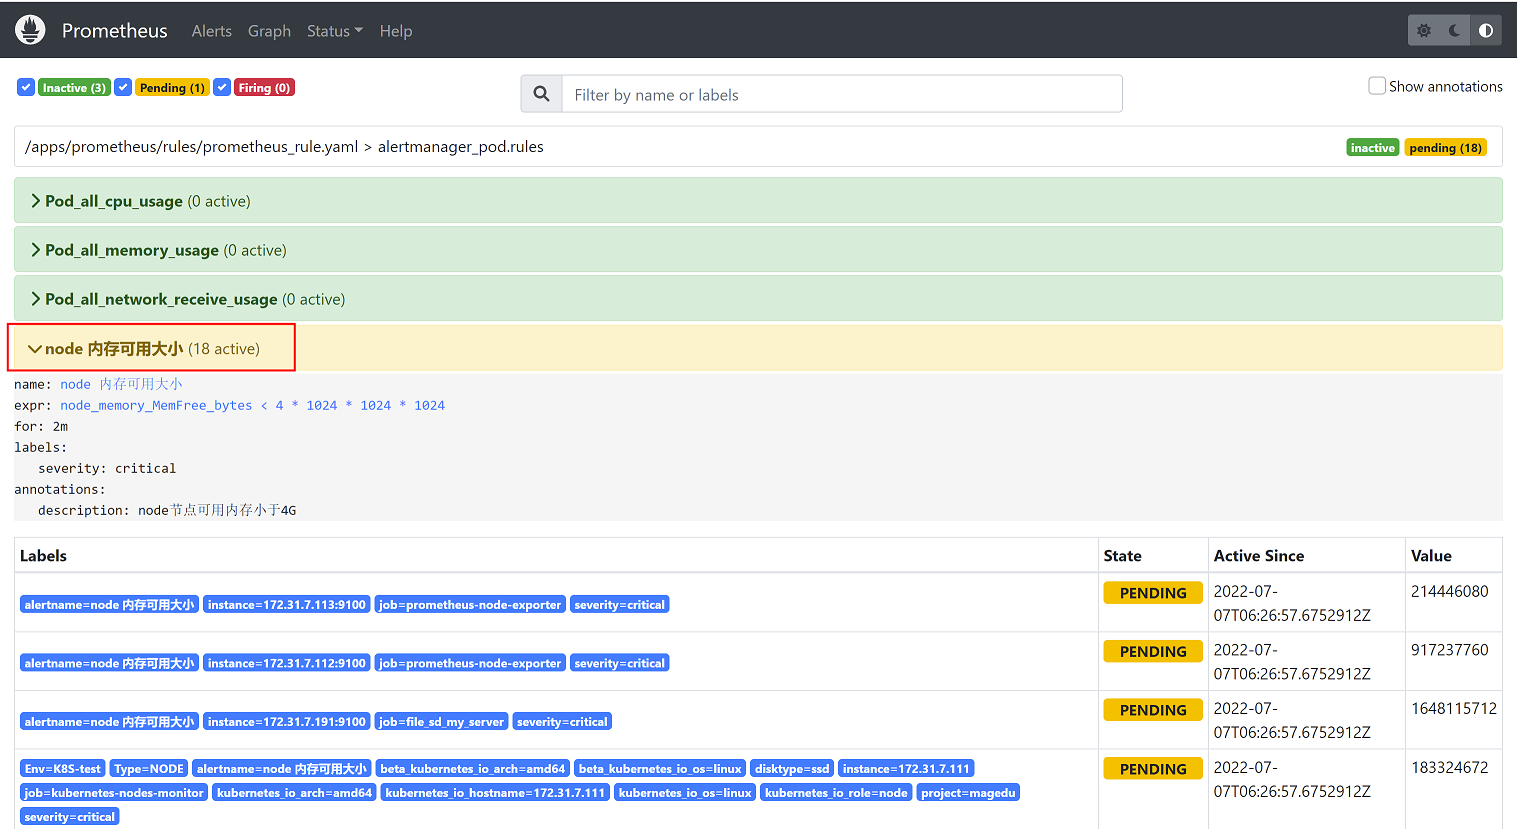
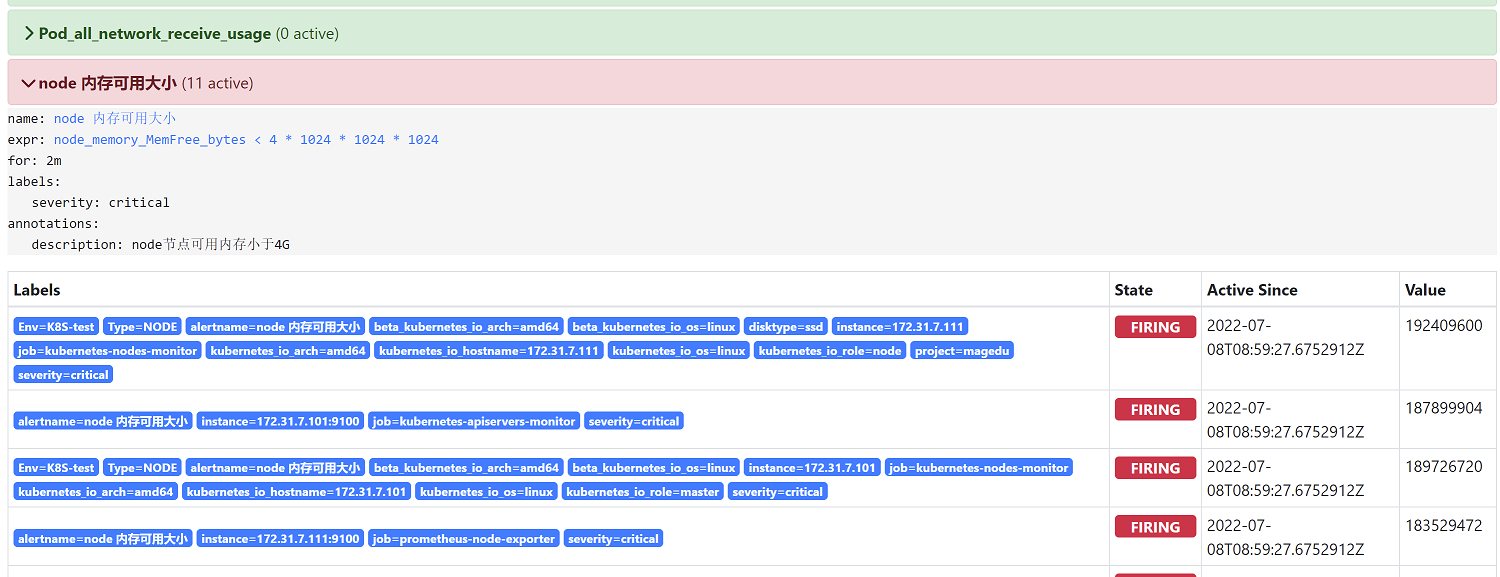
- alert: node内存可用大小
expr: node_memory_MemFree_bytes < 4*1024*1024*1024 #node可用内存大小,这里为了便于演示告警效果,设置为当可用内存小于4G就会告警(做实验时,每个主机的最大内存为4G,一定会触发告警)
for: 2m #每两分钟发送一次告警
labels:
severity: critical
annotations:
description: node节点可用内存小于4G8.2.4 加载报警规则
修改prometheus的配置文件,引用报警规则文件
vim /apps/prometheus/prometheus.yml #这里只贴出修改部分内容
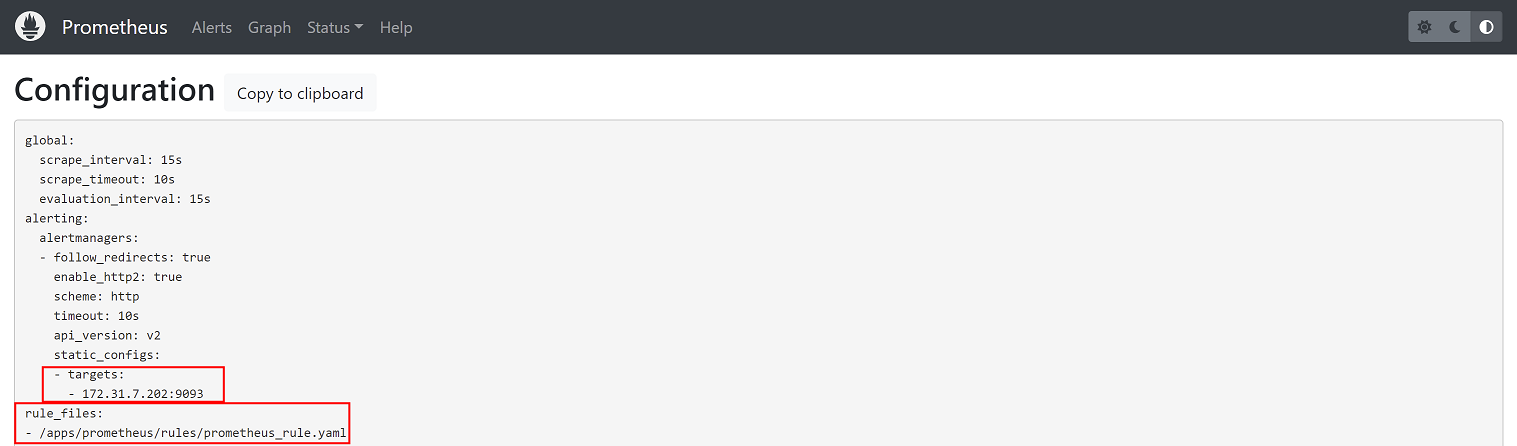
# Alertmanager configuration
alerting:
  alertmanagers:
    - static_configs:
        - targets:
           - 172.31.7.202:9093          #指定alertmanager服务器地址和端口

# Load rules once and periodically evaluate them according to the global 'evaluation_interval'.
rule_files:
  - "/apps/prometheus/rules/prometheus_rule.yaml"          #指定告警规则文件路径
  # - "first_rules.yml"
  # - "second_rules.yml"
4、重启prometheus
systemctl restart Prometheus
8.2.5 验证
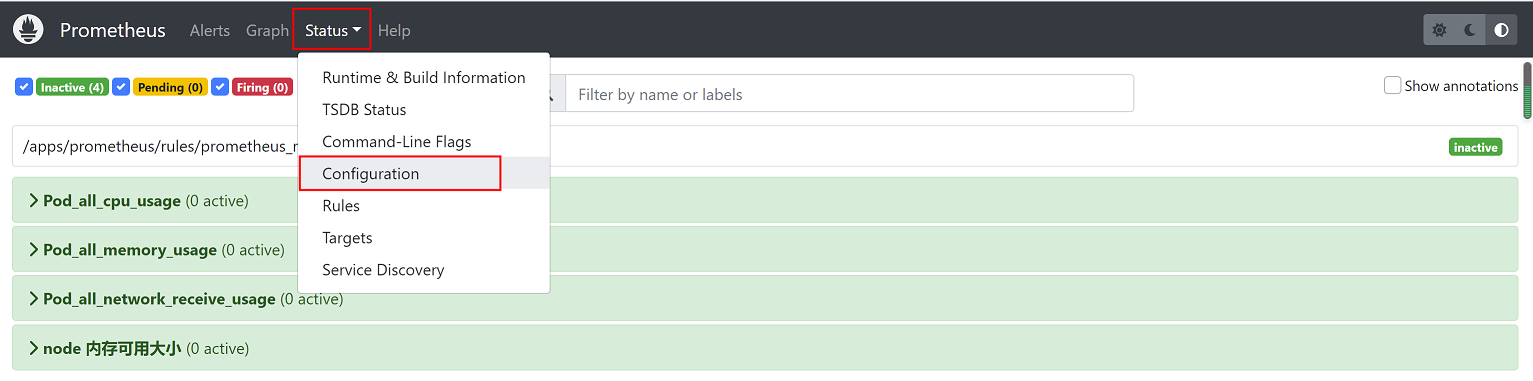
8.2.5.1 查看prometheus告警内容
1、查看prometheus控制台页面--status--configuration页面
2、查看alerts页面,存在告警

查看告警内容
8.2.5.2 查看alertmanager告警内容

8.2.5.3 查看QQ邮箱告警内容
查看邮件告警内容,发件人和收件人邮箱均符合alertmanager的配置

查看告警邮件发送间隔为15s发送一次,符合alertmanager配置
8.3 钉钉告警
我们可以通过脚本直接调用钉钉的api接口发送告警消息,但是prometheus目前还不能直接调用api接口发送告警信息给接收者,因此需要部署dingtalk插件,prometheus将告警发送给dingtalk,由dingtalk把告警信息转发给钉钉,再由钉钉把告警发送给告警接收者。
告警转发流程:

dingtalk在部署时,可以与prometheus不在同一台机器,因此我们将dingtalk部署在172.31.7.203节点上
8.3.1钉钉告警通知-通过关键字认证实现告警
通过钉钉实现告警通知
准备:
1、下载钉钉并注册钉钉账号
2、建立钉钉群(注意:建钉钉群时最少三个人才可以建群)
8.3.1.1 钉钉群组创建告警机器人
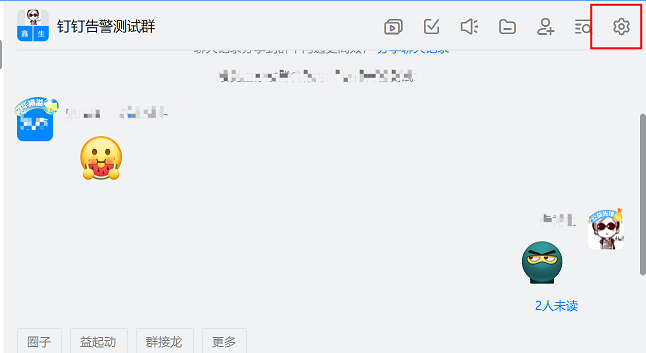
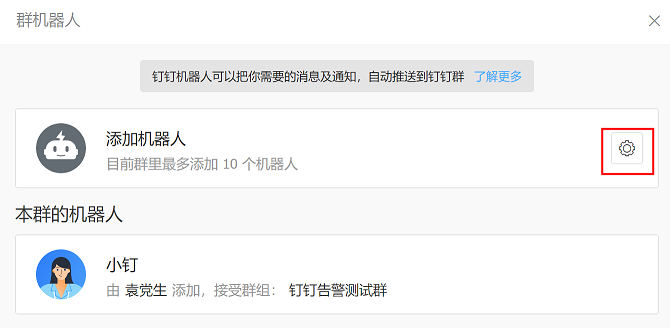
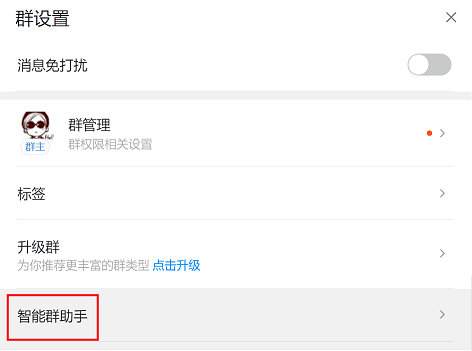
1、点击右上角群设置按钮
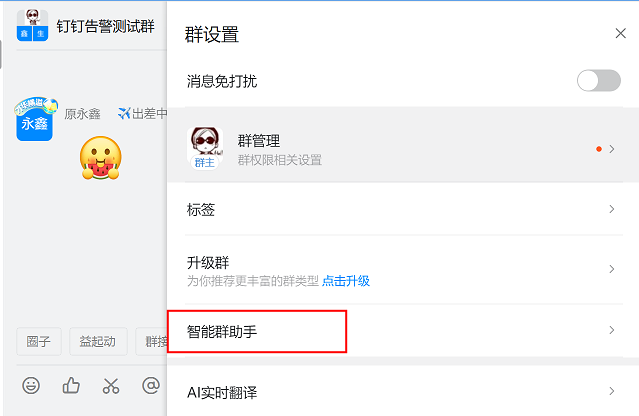
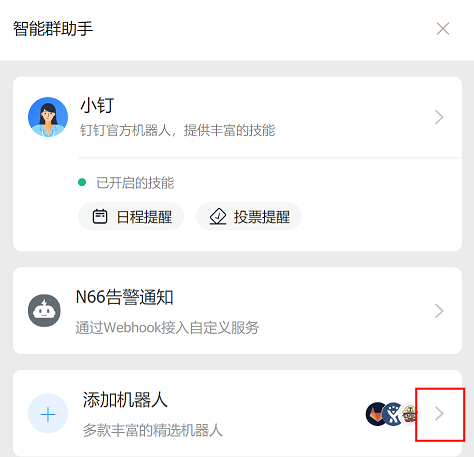
2、选择智能群助手
3、添加机器人
(1)选择添加机器人

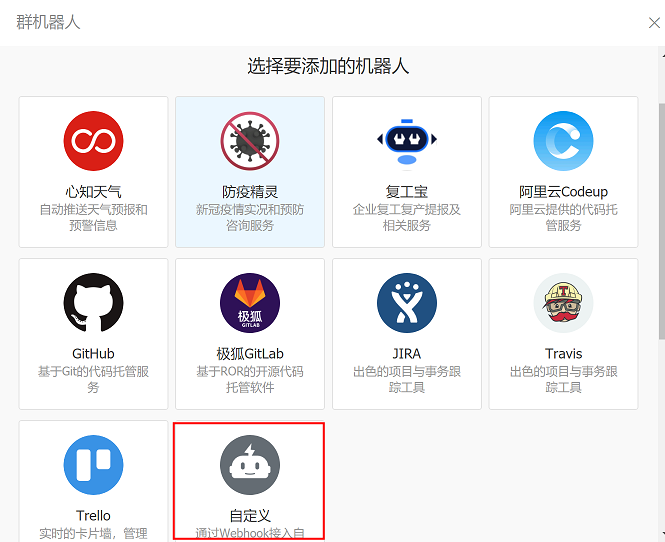
(2)选择添加的机器人类型
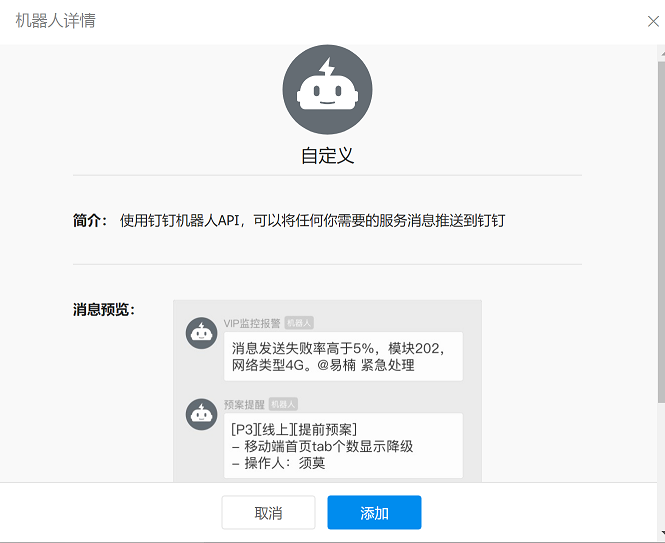
(3)选择自定义-通过webhook介入自定义服务,然后选择添加
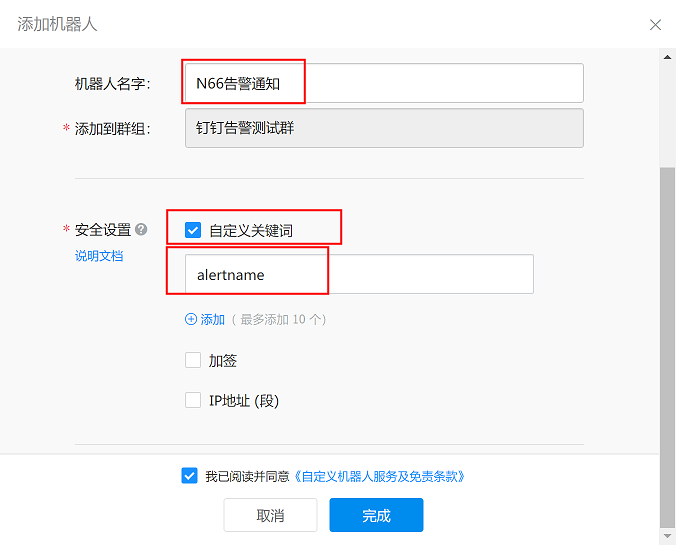
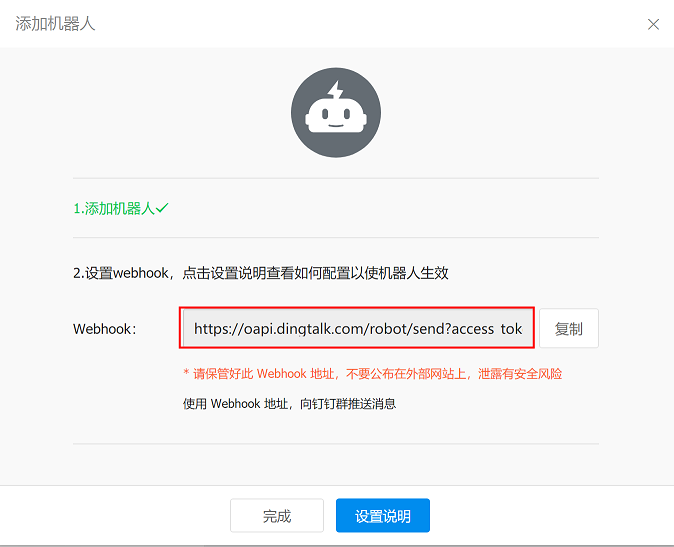
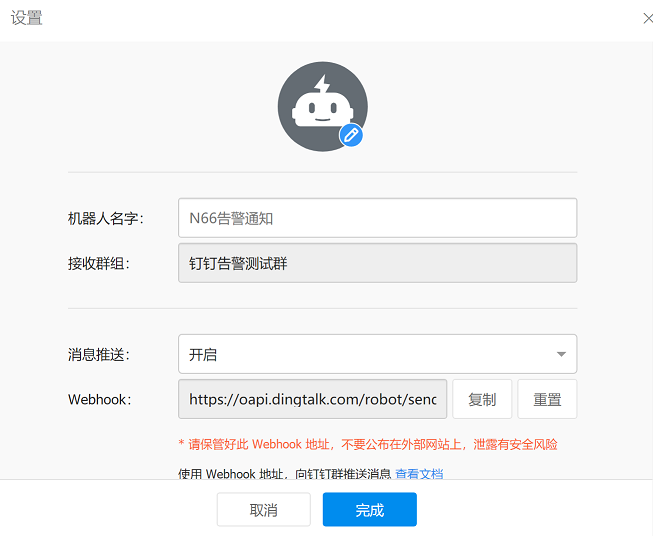
(4)对告警机器人进行配置
机器人名字:N66告警通知
安全设置:勾选自定义关键词,然后在下方写入关键词:alertname
注意:通过关键词认证实现告警,要求在告警内容中必须有alertname关键词,否则将无法通过钉钉进行告警,因此关键词要选择告警内容中通用的字段,这里在所有告警内容中都存在alertname字段,因此选择该字段作为关键词
(4)配置完成后,获取webhook的url地址,复制并保存,然后点击完成
https://oapi.dingtalk.com/robot/send?access_token=de8161d3dcecf4c8547591d1744c64ee3c894c26e66e5d5f067f4394b93dfc0c
注意:如果url忘记保存,可通过以下步骤获取url地址
1、找到钉钉群智能群助手
2、点击添加机器人右侧的三角符号
3、在下方根据机器人名称找到设置的机器人,点击设置按钮即可获取webhook url地址
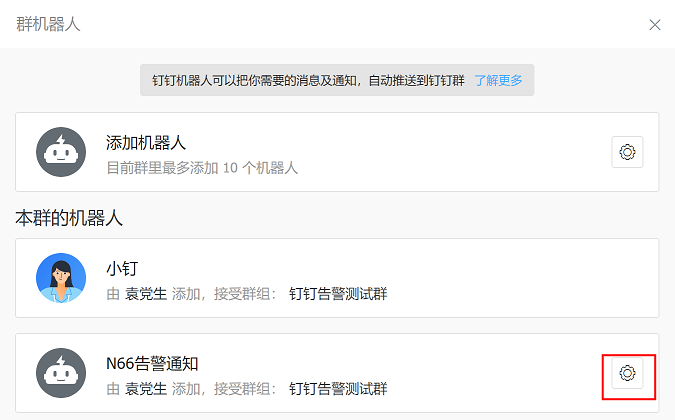
另外,如果url泄露或者不安全,可以进行重置获取新的url地址
8.3.1.2 通过脚本发送消息进行测试
8.3.1.2.1 创建脚本
在172.31.7.201上创建脚本
脚本内容如下:(注意要将脚本中红色部分内容替换为上一步设置的钉钉机器人webhook的url地址)
vim /root/scripts/dingding-keywords.sh #通过位置变量自定义发送的消息内容
#!/bin/bash
source /etc/profile
#PHONE=$1
#SUBJECT=$2
MESSAGE=$1
/usr/bin/curl -X "POST" 'https://oapi.dingtalk.com/robot/send?access_token=de8161d3dcecf4c8547591d1744c64ee3c894c26e66e5d5f067f4394b93dfc0c' \
-H 'Content-Type: application/json' \
-d '{"msgtype": "text",
    "text": {
        "content": "'${MESSAGE}'"
    }
}'
由于shell脚本不能发送空格和特殊字符,可以通过python脚本进行测试
脚本内容如下:
vim dingding-keywords.py
#!/usr/bin/python3
import sys
import requests
import json
#钉钉告警:
def info(msg):
    url = ' https://oapi.dingtalk.com/robot/send?access_token=de8161d3dcecf4c8547591d1744c64ee3c894c26e66e5d5f067f4394b93dfc0c '

    headers = {
        'Content-Type': 'application/json;charset=utf-8'
    }
    formdata = {
        "msgtype": "text",
        "text": {"content":str(msg)}
    }
    #print(formdata)
    requests.post(url=url, data=json.dumps(formdata),headers=headers)
info(sys.argv[1])
8.3.1.2.2 脚本测试
在172.31.7.201上执行命令运行shell脚本:
bash /root/scripts/dingding-keywords.sh "node1_cpu=85%,alertname=node1可用内存大小"
注意:位置变量发送的内容中必须包含关键字”alertname”,且不能包含空格和特殊字符,否则将无法成功发送消息
执行结果:

查看钉钉群,可以正常接收告警消息

8.3.1.3 通过指定参数方式部署webhook-dingtalk
8.3.1.3.1 部署webhook-dingtalk
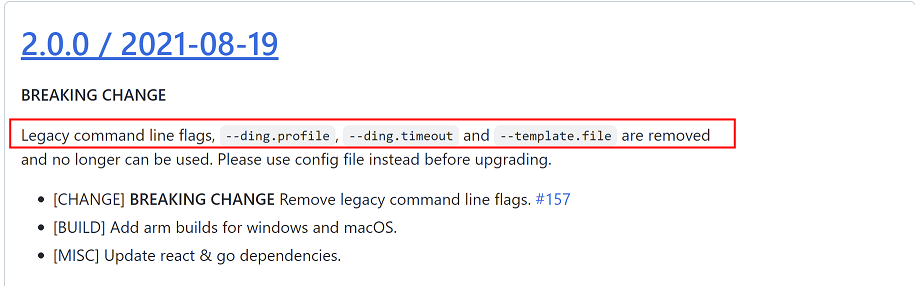
注意:dingtalk插件在2.0.0版本已经不支持通过指定--ding.profile参数方式启动dingtalk,但由于存在使用老版本dingtalk插件的情况,在这里对这种方式进行介绍,后续在8.3.1.4章节会介绍通过配置文件方式启动dingtalk
github下载网址:
https://github.com/timonwong/prometheus-webhook-dingtalk/releases
dingtalk安装包下载链接:https://github.com/timonwong/prometheus-webhook-dingtalk/releases/download/v1.4.0/prometheus-webhook-dingtalk-1.4.0.linux-amd64.tar.gz
在172.31.7.203上执行以下命令:
1、下载dingtalk,解压并作软链接
mkdir -p /apps  && cd /apps
wget https://github.com/timonwong/prometheus-webhook-dingtalk/releases/download/v1.4.0/prometheus-webhook-dingtalk-1.4.0.linux-amd64.tar.gz
tar -xvf prometheus-webhook-dingtalk-1.4.0.linux-amd64.tar.gz
ln -sv /apps/prometheus-webhook-dingtalk-1.4.0.linux-amd64  /apps/prometheus-webhook-dingtalk
2、启动dingtalk
执行以下命令启动dingtalk服务
nohup ./prometheus-webhook-dingtalk --web.listen-address="0.0.0.0:8060" --ding.profile="alertname= https://oapi.dingtalk.com/robot/send?access_token=de8161d3dcecf4c8547591d1744c64ee3c894c26e66e5d5f067f4394b93dfc0c" &
命令格式说明:
--web.listen-address  #指定监听地址和端口
--ding.profile   #指定钉钉群告警机器人的关键词和url地址(即在钉钉群创建告警机器人时指定的关键词和自动生成的webhook url链接),格式为:”关键词=webhook url地址”
(3)验证
查看8060端口是否被监听
ss -ntl |grep 8060
8.3.1.3.2 配置alertmanager
在172.31.7.202上修改alertmanager配置文件
vim /apps/alertmanager/alertmanager.yml #修改内容为以下备注部分
global:
  resolve_timeout: 1m
  smtp_smarthost: 'smtp.qq.com:465'
  smtp_from: '957464230@qq.com'
  smtp_auth_username: '957464230@qq.com'
  smtp_auth_password: 'ebahmhiwxwxobcdb'
  smtp_hello: '@qq.com'
  smtp_require_tls: false

route:
  group_by: ['alertname']
  group_wait: 1s
  group_interval: 5s
  repeat_interval: 10s
  receiver: 'dingding'   #由于使用钉钉,这里要将接收者修改为名称为dingding的接收者(修改部分)
receivers:
  - name: 'web.hook'
    #webhook_configs:
      #- url: 'http://127.0.0.1:5001/'
    email_configs:
      - to: '1509708480@qq.com'
  - name: dingding        #指定接收者名称(修改部分)
    webhook_configs:      #修改内容
    - url: 'http://172.31.7.203:8060/dingtalk/alertname/send'      #指定dingtalk地址和关键词(修改内容)
      send_resolved: true          #发送恢复通知(在告警一段时间后不再发出告警就发送恢复通知)(修改内容)
inhibit_rules:
  - source_match:
      severity: 'critical'
    target_match:
      severity: 'warning'
equal: ['alertname', 'dev', 'instance']
重启服务使配置生效
systemctl restart alertmanager
8.3.1.3.3 配置prometheus
在172.31.7.201节点上重启prometheus服务,重新根据规则文件判断是否发出告警
systemctl restart prometheus
登录prometheus控制台查看告警是否发出
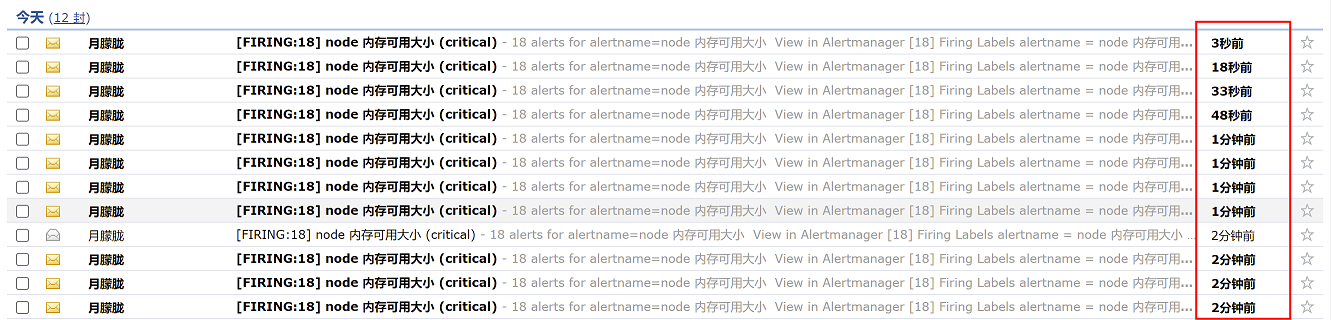
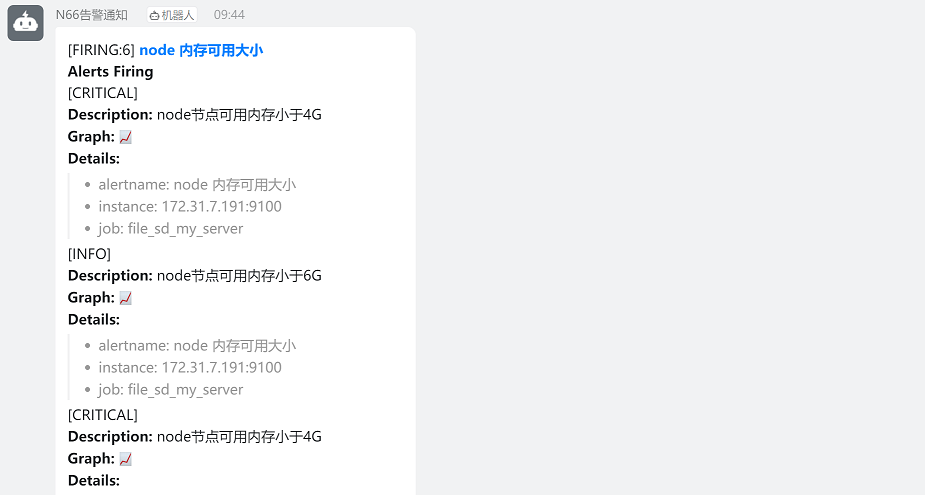
8.3.1.3.4 钉钉群查看告警消息
查看接收告警的钉钉群,是否接收到告警信息
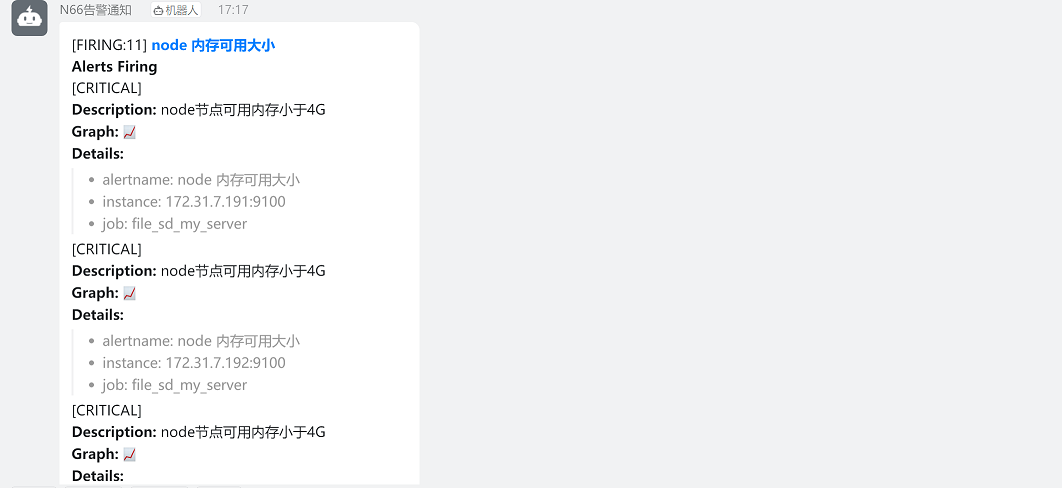
由于此时使用的是默认的告警模板,告警内容的可读性不强,需要我们对告警模板进行自定义编辑,使告警内容更容易看懂
8.3.1.4 通过配置文件方式部署webhook-dingtalk
dingtalk插件在2.0.0版本已经不支持通过指定--ding.profile参数方式启动dingtalk,但由于存在使用老版本dingtalk插件的情况,因此如果使用较新版本的dingtalk,可以使用通过配置文件方式启动dingtalk
8.3.1.4.1 修改dingtalk配置文件
dingtalk插件部署在172.31.7.203上,在该节点执行以下命令
1、kill掉之前做实验时拉起的dingtalk进程
kill -9 `ps -ef |grep dingtalk |grep -v grep |awk '{print $2}'`2、根据dingtalk自带模板文件创建dingtalk配置文件
cd /apps/prometheus-webhook-dingtalk
cp config.example.yml config.yml
3、修改dingtalk配置文件(这里以关键字认证方式进行配置)
vim config.yml #修改部分为以下添加钉钉机器人webhook url地址
## Request timeout
# timeout: 5s

## Customizable templates path
# templates:
#   - contrib/templates/legacy/template.tmpl

## You can also override default template using `default_message`
## The following example to use the 'legacy' template from v0.3.0
# default_message:
#   title: '{{ template "legacy.title" . }}'
#   text: '{{ template "legacy.content" . }}'

## Targets, previously was known as "profiles"
targets:
  webhook1:       #加签钉钉配置
    url: https://oapi.dingtalk.com/robot/send?access_token=xxxxxxxxxxxx
    # secret for signature
    secret: SEC000000000000000000000
  webhook2:        #非加签钉钉配置
    url: https://oapi.dingtalk.com/robot/send?access_token=de8161d3dcecf4c8547591d1744c64ee3c894c26e66e5d5f067f4394b93dfc0c            #添加钉钉机器人webhook url地址(此处为修改部分)
  webhook_legacy:
    url: https://oapi.dingtalk.com/robot/send?access_token=xxxxxxxxxxxx
    # Customize template content
    message:
      # Use legacy template
      title: '{{ template "legacy.title" . }}'
      text: '{{ template "legacy.content" . }}'
  webhook_mention_all:        #@所有人配置
    url: https://oapi.dingtalk.com/robot/send?access_token=xxxxxxxxxxxx
    mention:
      all: true
  webhook_mention_users:        #指定用户配置
    url: https://oapi.dingtalk.com/robot/send?access_token=xxxxxxxxxxxx
    mention:
      mobiles: ['156xxxx8827', '189xxxx8325']
配置说明:
templates:   指定自定义消息模板路径
targets:   调用的dingtalk目标
webhook1:    钉钉告警加签配置
webhook2:    钉钉告警非加签配置
webhook_mention_all:    钉钉告警@所有用户配置
webhook_mention_users:   钉钉告警指定用户配置
message:     调用自定义消息模板时需要自定义的字段,通过该字段调用对应的模板,并且该字段需要在自定义消息模板中写明,否则将无法调用模板
      title: '{{ template "legacy.title" . }}'   #需要在title参数中配置自定义字段,然后在消息模板中写明,该参数可加可不加
      text: '{{ template "legacy.content" . }}'  #需要在text参数中配置自定义字段,然后在消息模板中写明,该参数必须添加
8.3.1.4.2 创建dingtalk service文件
在172.31.7.203上执行命令
1、创建dingtalk service文件
vim etc/systemd/system/prometheus-webhook-dingtalk.service
[Unit]
Description=Node Exporter
Wants=network-online.target
After=network-online.target

[Service]
ExecStart=/apps/prometheus-webhook-dingtalk/prometheus-webhook-dingtalk  --config.file=/apps/prometheus-webhook-dingtalk/config.yml        #指定dingtalk的二进制程序路径和配置文件路径

[Install]
WantedBy=default.target
2、启动dingtalk服务
systemctl daemon-reload
systemctl restart prometheus-webhook-dingtalk
8.3.1.4.3 修改alertmanager
1、修改alertmanager配置
在172.31.7.202上执行命令:
vim /apps/alertmanager/alertmanager.yml #修改内容为webhook url地址
global:
  resolve_timeout: 1m
  smtp_smarthost: 'smtp.qq.com:465'
  smtp_from: '957464230@qq.com'
  smtp_auth_username: '957464230@qq.com'
  smtp_auth_password: 'ebahmhiwxwxobcdb'
  smtp_hello: '@qq.com'
  smtp_require_tls: false

route:
  group_by: ['alertname']
  group_wait: 1s
  group_interval: 5s
  repeat_interval: 10s
  receiver: 'dingding'       #指定告警接收者为钉钉
#添加消息路由
#  routes:
#  - receiver: dingding #critical 级别的消息发给钉钉
#    group_wait: 10s
#    match_re:
#      severity: critical
receivers:
  - name: 'web.hook'
    #webhook_configs:
      #- url: 'http://127.0.0.1:5001/'
    email_configs:
      - to: '1509708480@qq.com'
  - name: dingding      #配置钉钉告警
    webhook_configs:
    - url: 'http://172.31.7.203:8060/webhook2/webhook2/send'          #修改引用的url,url中http://172.31.7.203:8060/dingtalk/的后一级路径名必须写为webhook2,以调用dingtalk配置文件targets中webhook2非加签配置(此处为修改部分)
      send_resolved: true
  - name: 'wechat'
    wechat_configs:
    - corp_id: 'ww978ecfbc45db07aa'
      to_user: '@all'
      #to_party: '2'
      agent_id: '1000002'
      api_secret: '8w1NWxJF_jOqGa1y78ry96wgRtmi6wWqXVwFXnwh4BI'
      send_resolved: true
inhibit_rules:
  - source_match:
      severity: 'critical'
    target_match:
      severity: 'warning'
equal: ['alertname', 'dev', 'instance']
注意:在配置钉钉url路径时,url中http://172.31.7.203:8060/dingtalk/的后一级路径名必须写为webhook2,以调用dingtalk配置中webhook2的相关配置
2、重启服务
systemctl restart alertmanager
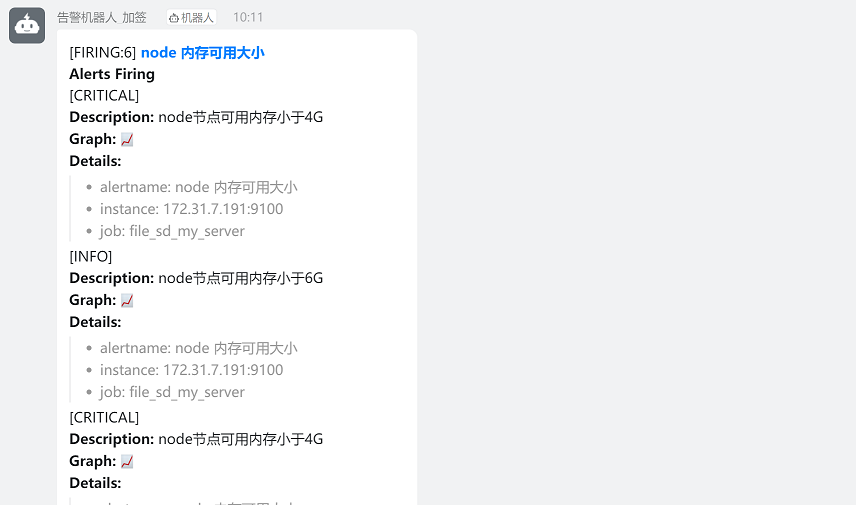
8.3.1.4.4 验证
查看钉钉群告警信息
8.3.2 钉钉告警通知-通过加签认证实现告警
这里通过加签的方式进行钉钉告警通知
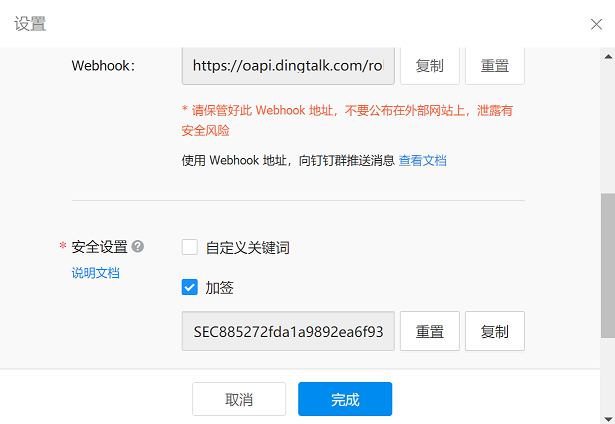
8.3.2.1 钉钉机器人配置-加签
创建一个新的钉钉机器人用户测试加签配置,注意保留webhook url地址和加签密钥
8.3.2.2 通过指定参数方式进行加签配置
8.3.2.2.1 获取时间戳和签名
通过python脚本获取认证需要的时间戳和签名
在172.31.7.203上执行:
cd /apps/prometheus-webhook-dingtalk
vim dingding-label-sign.py #注意以下备注部分为加签密钥
#!/usr/bin/python2.7
import time
import hmac
import hashlib
import base64
import urllib
timestamp = long(round(time.time() * 1000))
secret = 'SEC885272fda1a9892ea6f93db6ba4107234ed2c4365d83fc1daca63a8728fab1b6'     #此处为加签密钥
secret_enc = bytes(secret).encode('utf-8')
string_to_sign = '{}\n{}'.format(timestamp, secret)
string_to_sign_enc = bytes(string_to_sign).encode('utf-8')
hmac_code = hmac.new(secret_enc, string_to_sign_enc, digestmod=hashlib.sha256).digest()
sign = urllib.quote_plus(base64.b64encode(hmac_code))
print(timestamp)
print(sign)
执行脚本(注意:每次执行脚本,时间戳和签名都会变化)
python2.7 dingding-label-sign.py
时间戳:1657529193708
签名:U7jPK5NAUZzAuD8L0elFcom8nQ%2BPMx%2BGFWxIuimlhc8%3D

8.3.2.2.2 通过脚本发送测试消息
编辑脚本
vim dingding_secret_test.sh
#!/bin/bash
source /etc/profile
#PHONE=$1
#SUBJECT=$2
MESSAGE=$1
secret='SEC885272fda1a9892ea6f93db6ba4107234ed2c4365d83fc1daca63a8728fab1b6'
getkey=$(/usr/bin/python2.7 /apps/prometheus-webhook-dingtalk/dingding-label-sign.py)
timestamp=${getkey:0:13}
sign=$(echo "${getkey:13:100}" | tr -d '\n')
DateStamp=$(date -d @${getkey:0:10} "+%F %H:%m:%S")
/usr/bin/curl -X "POST" "https://oapi.dingtalk.com/robot/send?access_token=de8161d3dcecf4c8547591d1744c64ee3c894c26e66e5d5f067f4394b93dfc0c×tamp=${timestamp}&sign=${sign}" \
-H 'Content-Type: application/json' \
-d '{"msgtype": "text",
"text": {
"content": "'${MESSAGE}'"
}
}'执行脚本,发送测试消息,返回如下内容,说明成功
bash dingding_secret_test.sh "测试加签认证"

查看钉钉群

8.3.2.2.3 prometheus配置
Prometheus配置无需更改,保持不变
8.3.2.2.4 webhook-dingtalk启动
1、由于时间戳和签名每次执行脚本都会发生变化,因此在执行命令之前,需要先获取这两个信息
在172.31.7.203上执行命令:
#python2.7 /apps/prometheus-webhook-dingtalk/dingding-label-sign.py
输出内容如下:
1657586448115
hnocyfeJiOgAR0yw2%2FCkHkj202DFGk3bf6YgOf%2BHGPE%3D
2、基于上一个步骤获取的时间戳和认证信息启动 webhook-dingtalk(使用nohup和&命令使进程后台运行)
#nohup /apps/prometheus-webhook-dingtalk/prometheus-webhook-dingtalk --web.listen-address="0.0.0.0:8060" --ding.profile="alertname=https://oapi.dingtalk.com/robot/send?access_token=623d7caf085733ec0ce5122d856b238c1f92afe03061185fb5a8f774053a3f15×tamp=1657587269818&sign=%2BF4q9VwKGV7zGBKGOserHWwxQAqO%2FqZzyfaojBR0nNs%3D" &
8.3.2.2.5 验证
查看钉钉告警:

8.3.2.3 通过配置文件方式进行加签配置
8.3.2.3.1 修改dingtalk配置文件
1、修改dingtalk配置文件(这里以关键字认证方式进行配置)
vim config.yml #以下备注部分为修改部分
## Request timeout
# timeout: 5s

## Customizable templates path
# templates:
#   - contrib/templates/legacy/template.tmpl

## You can also override default template using `default_message`
## The following example to use the 'legacy' template from v0.3.0
# default_message:
#   title: '{{ template "legacy.title" . }}'
#   text: '{{ template "legacy.content" . }}'

## Targets, previously was known as "profiles"
targets:
  webhook1:       #加签钉钉配置
    url: https://oapi.dingtalk.com/robot/send?access_token=623d7caf085733ec0ce5122d856b238c1f92afe03061185fb5a8f774053a3f15          #配置钉钉机器人webhook(此处为修改内容)
    # secret for signature
    secret: SEC885272fda1a9892ea6f93db6ba4107234ed2c4365d83fc1daca63a8728fab1b6   #此处为修改内容
  webhook2:        #非加签钉钉配置
    url: https://oapi.dingtalk.com/robot/send?access_token=de8161d3dcecf4c8547591d1744c64ee3c894c26e66e5d5f067f4394b93dfc0c            #添加钉钉机器人webhook url地址
  webhook_legacy:
    url: https://oapi.dingtalk.com/robot/send?access_token=xxxxxxxxxxxx
    # Customize template content
    message:
      # Use legacy template
      title: '{{ template "legacy.title" . }}'
      text: '{{ template "legacy.content" . }}'
  webhook_mention_all:        #@所有人配置
    url: https://oapi.dingtalk.com/robot/send?access_token=xxxxxxxxxxxx
    mention:
      all: true
  webhook_mention_users:        #指定用户配置
    url: https://oapi.dingtalk.com/robot/send?access_token=xxxxxxxxxxxx
    mention:
      mobiles: ['156xxxx8827', '189xxxx8325']
配置说明:
templates:   指定自定义消息模板路径
targets:   调用的dingtalk目标
webhook1:    钉钉告警加签配置
webhook2:    钉钉告警非加签配置
webhook_mention_all:    钉钉告警@所有用户配置
webhook_mention_users:   钉钉告警指定用户配置
message:     调用自定义消息模板时需要自定义的字段,通过该字段调用对应的模板,并且该字段需要在自定义消息模板中写明,否则将无法调用模板
      title: '{{ template "legacy.title" . }}'   #需要在title参数中配置自定义字段,然后在消息模板中写明,该参数可加可不加
      text: '{{ template "legacy.content" . }}'  #需要在text参数中配置自定义字段,然后在消息模板中写明,该参数必须添加
2、重启dingtalk服务
systemctl daemon-reload
systemctl restart prometheus-webhook-dingtalk
8.3.2.3.2 修改alertmanager
1、修改alertmanager配置
在172.31.7.202上执行命令:
vim /apps/alertmanager/alertmanager.yml #以下备注部分为修改内容
global:
  resolve_timeout: 1m
  smtp_smarthost: 'smtp.qq.com:465'
  smtp_from: '957464230@qq.com'
  smtp_auth_username: '957464230@qq.com'
  smtp_auth_password: 'ebahmhiwxwxobcdb'
  smtp_hello: '@qq.com'
  smtp_require_tls: false

route:
  group_by: ['alertname']
  group_wait: 1s
  group_interval: 5s
  repeat_interval: 10s
  receiver: 'dingding'       #指定告警接收者为钉钉
#添加消息路由
#  routes:
#  - receiver: dingding #critical 级别的消息发给钉钉
#    group_wait: 10s
#    match_re:
#      severity: critical
receivers:
  - name: 'web.hook'
    #webhook_configs:
      #- url: 'http://127.0.0.1:5001/'
    email_configs:
      - to: '1509708480@qq.com'
  - name: dingding      #配置钉钉告警
    webhook_configs:
    - url: 'http://172.31.7.203:8060/webhook1/webhook2/send'          #修改引用的url,url中http://172.31.7.203:8060/dingtalk/的后一级路径名必须写为webhook1,以调用dingtalk配置文件targets中webhook1的加签配置(此处为修改内容)
      send_resolved: true
  - name: 'wechat'
    wechat_configs:
    - corp_id: 'ww978ecfbc45db07aa'
      to_user: '@all'
      #to_party: '2'
      agent_id: '1000002'
      api_secret: '8w1NWxJF_jOqGa1y78ry96wgRtmi6wWqXVwFXnwh4BI'
      send_resolved: true
inhibit_rules:
  - source_match:
      severity: 'critical'
    target_match:
      severity: 'warning'
equal: ['alertname', 'dev', 'instance']
注意:在配置钉钉url路径时,url中http://172.31.7.203:8060/dingtalk/的后一级路径名必须写为webhook1,以调用dingtalk配置中webhook1的相关配置
2、重启服务
systemctl restart alertmanager
8.3.1.4.4 验证
查看钉钉群告警信息
8.4 企业微信通知
打开企业微信官网注册账号,使用自己的手机号进行注册。
企业微信官网:https://work.weixin.qq.com
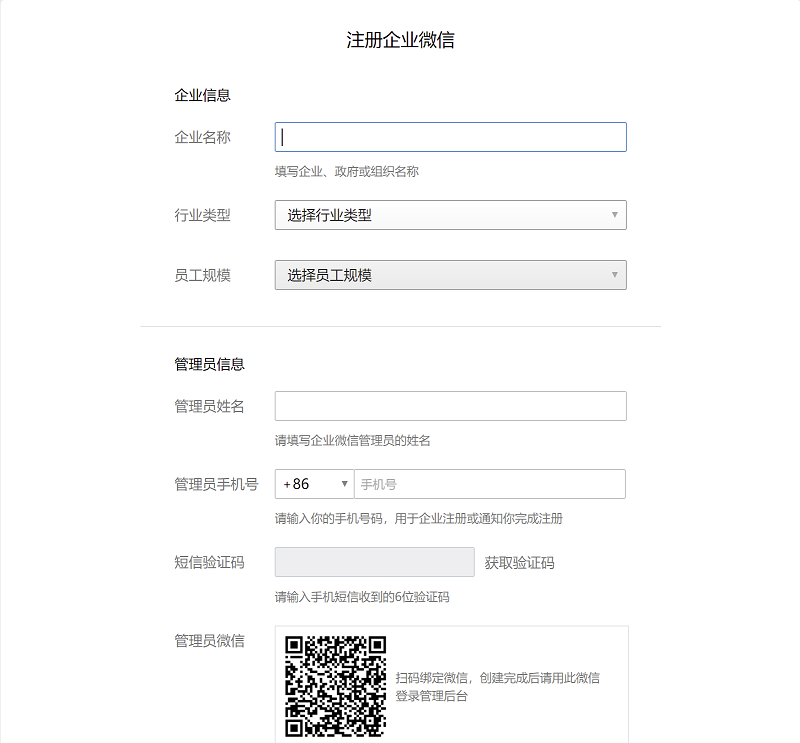
8.4.1 注册企业微信账号
注意:注册企业时不会验证企业执照,因此可自定义企业名称,但是企业名称不能与现有公司名称重名
8.4.2 登录PC版企业微信
注册完成后,登录PC版企业微信官网:https://work.weixin.qq.com
1、使用注册的微信账号扫码进行登录

8.4.3 创建部门
首页-通讯录-创建部门,然后添加部门成员
1、创建不同部门对公司员工进行区分
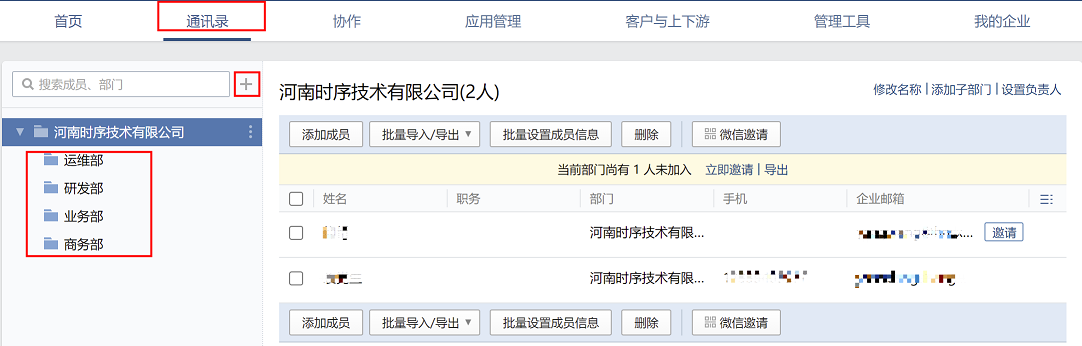
2、选中对应部门(这里以运维部为例),点击右侧添加成员按钮

3、配置成员信息
注意:用户账户名称必须唯一,在发送微信报警信息的时候会调用

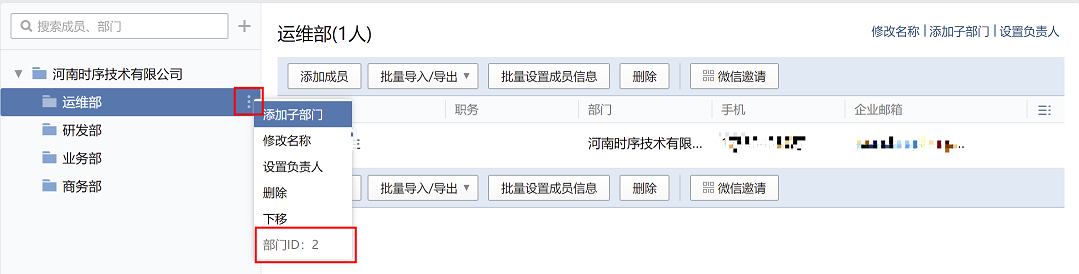
4、查看企业微信部门ID
选中部门,点击部门右侧按钮,在最下方可以看到运维部的部门ID为2
注意:在alertmanager配置告警时,我们可以通过部门ID将告警发送给指定的部门
8.4.4 创建应用
1、首页-应用管理-创建应用
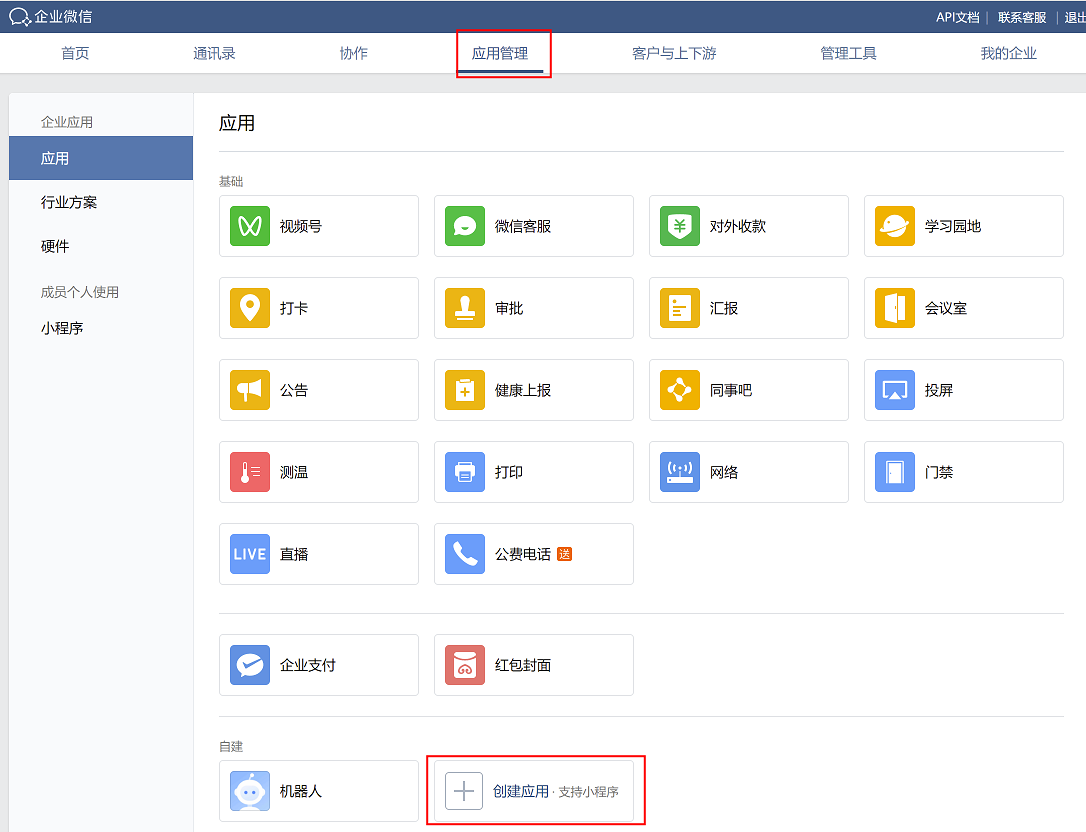
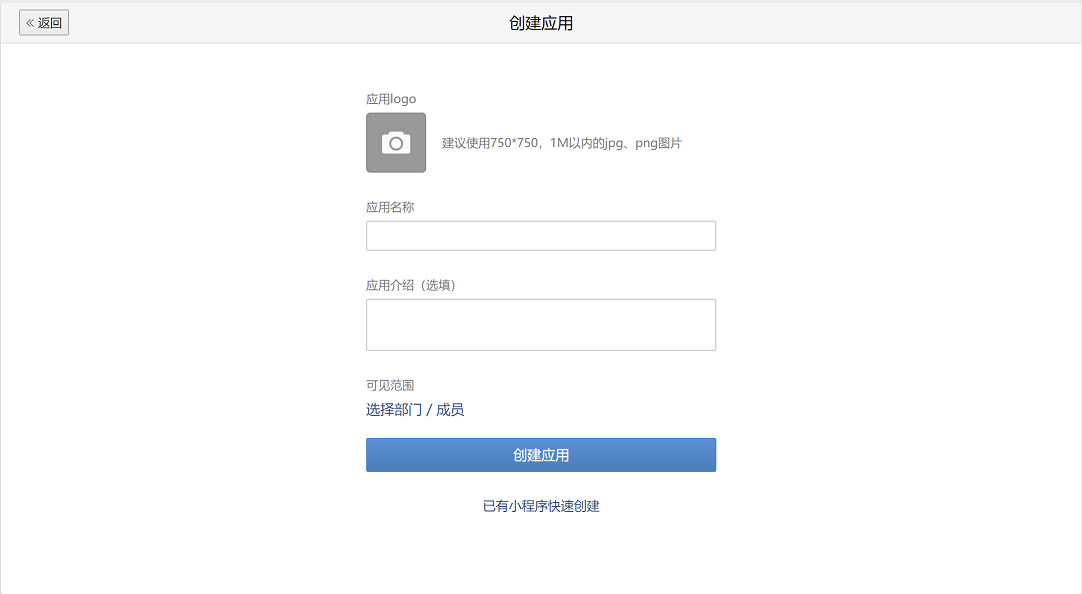
2、填写应用信息
(1)可以上传应用logo
(2)填写应用名称:告警机器人
(3)填写描述:用于发送告警
(4)选择告警可见范围:可根据需求选择可以查看告警的部门
填写完成后,点击创建应用
8.4.5 发送消息测试
使用告警机器人发送消息进行测试,看企业微信能否接收到消息
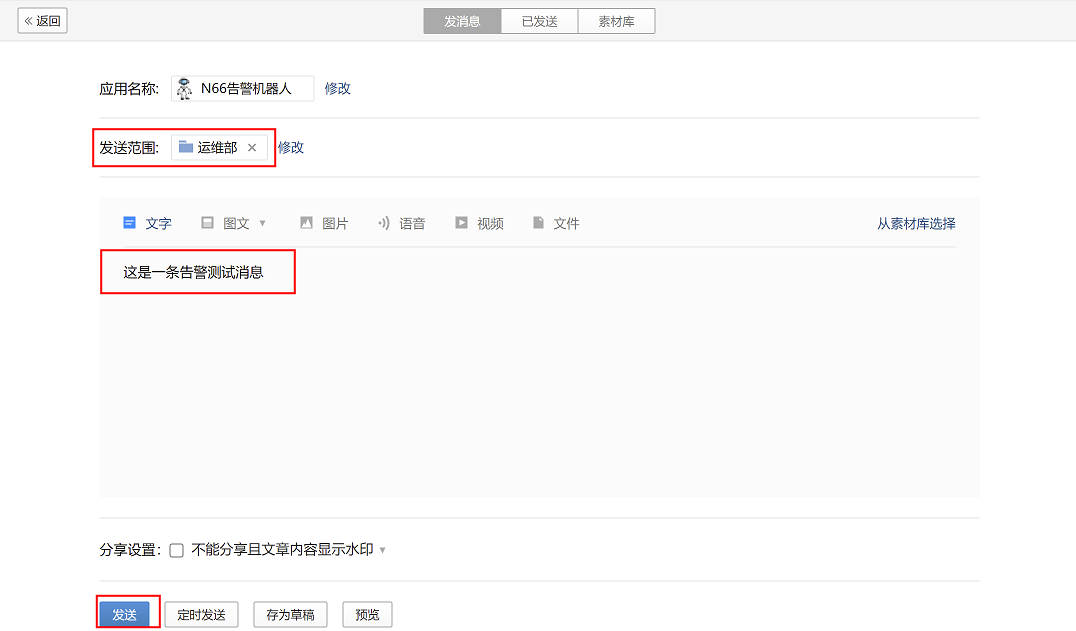
1、点击下方发送消息
2、选择告警发送范围,编辑告警内容信息,然后点击发送
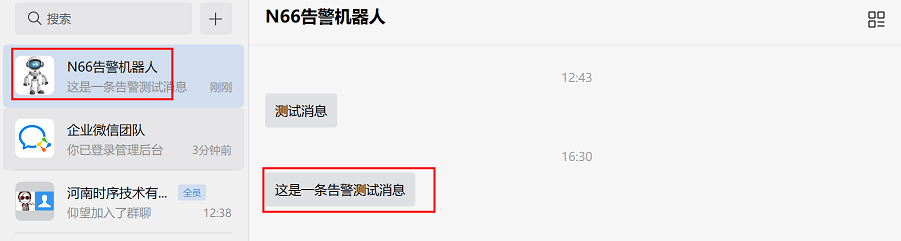
3、登录企业微信APP(手机版或PC版均可),在下方导航栏-工作台,在最下方找到告警机器人,点击进去,就可以查看到发送的告警内容
8.4.6 收集企业微信认证信息
要在prometheus配置企业微信告警,要先获取对应的认证信息:企业ID、AgentID和Secret
企业ID:用于企业认证,将告警发送给不同的企业,每个企业都有唯一的企业ID
AgentID:用于调用对用的应用(告警机器人)
Secret:用于应用(告警机器人)的认证
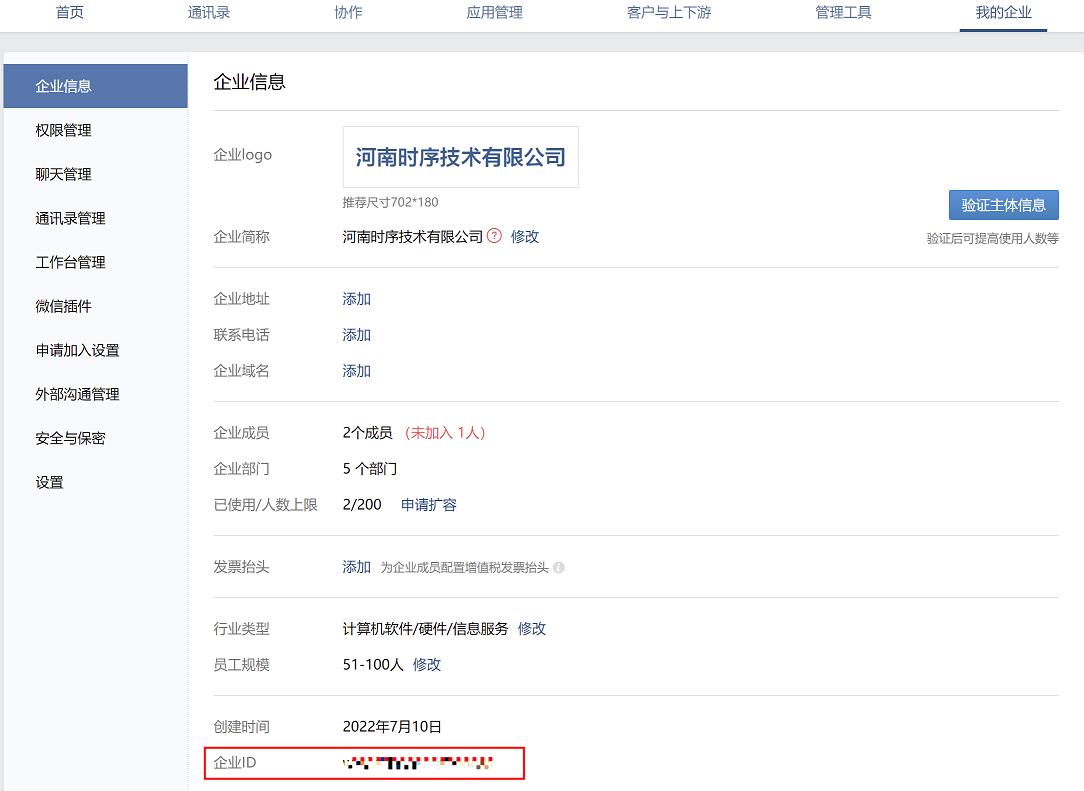
1、获取企业ID
首页-我的企业,最下方获取企业ID
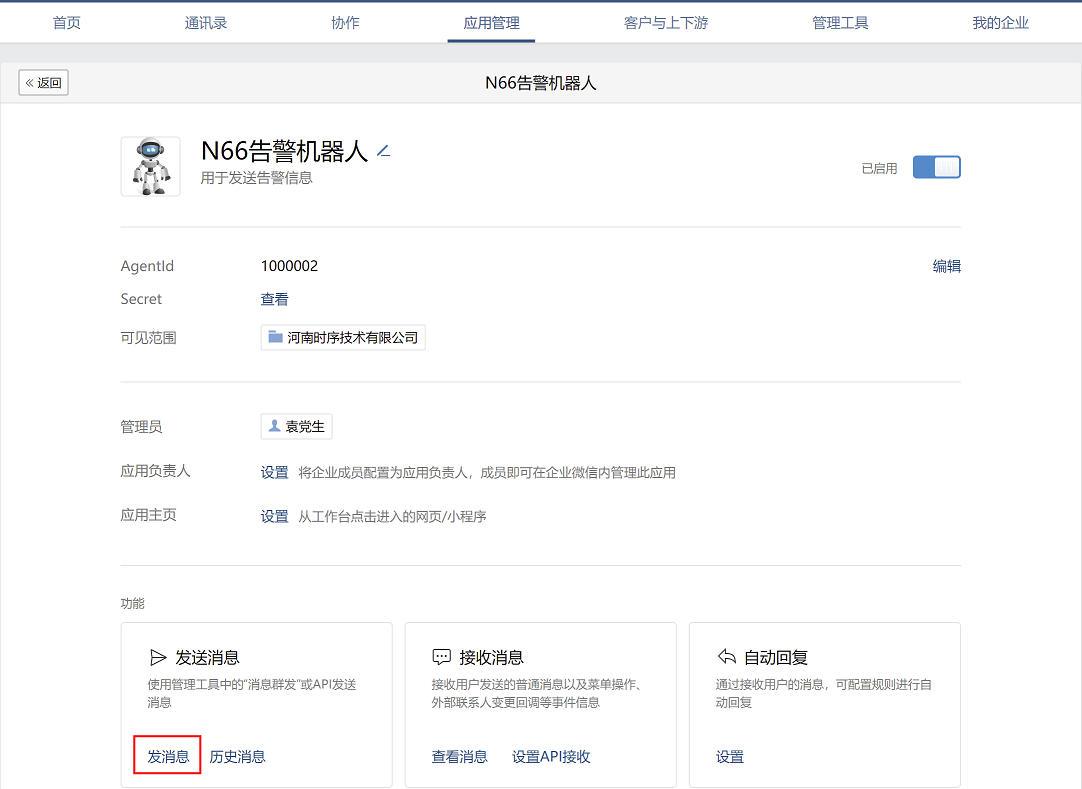
2、获取AgentID和Secret
(1)首页-应用管理-最下方自建应用,找到之前设置的告警机器人,点击进入设置页面
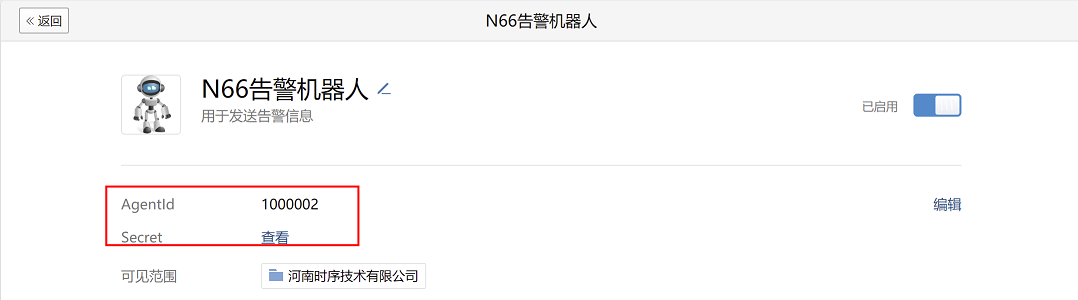
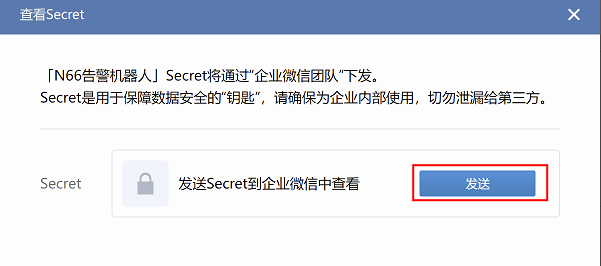
(2)点击Secret后的查看按钮,会弹出新窗口,然后点击发送按钮,需要在手机登录企业微信APP上查看对应的secret
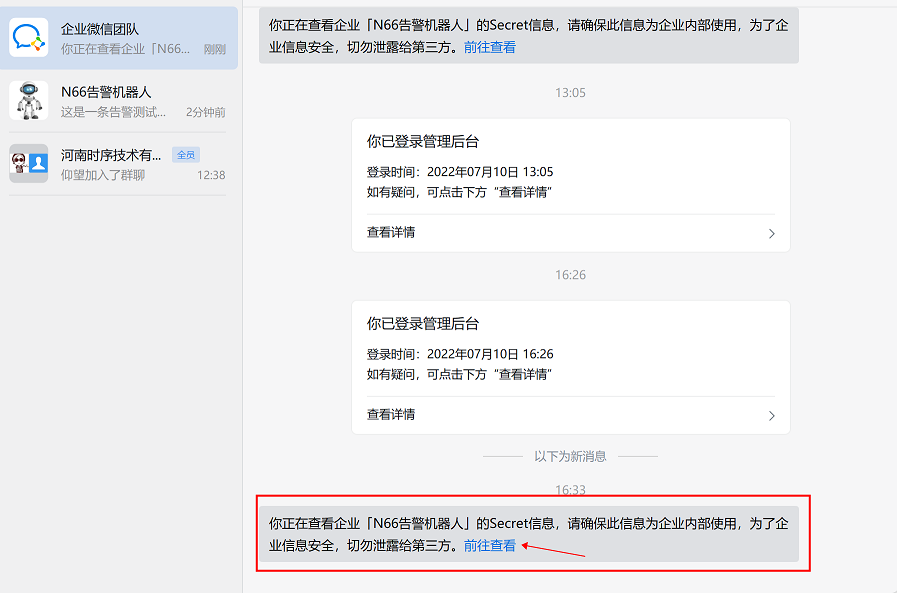
注意:企业微信官方为安全起见,会将secret发送到个人企业微信APP上
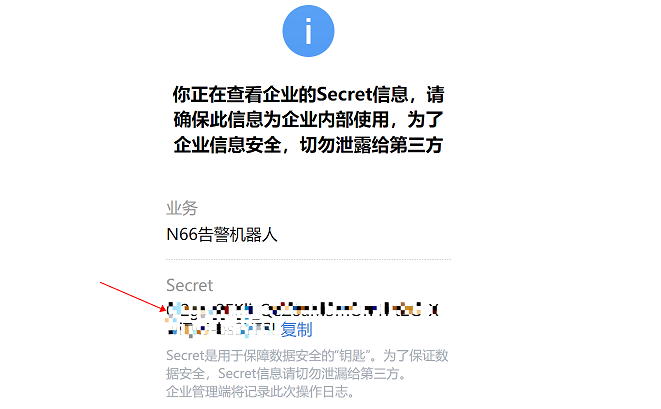
(3)登录企业微信APP(手机版或PC版均可)查看Secret
8.4.7 配置alertmanager
在172.31.7.202上
vim /apps/alertmanager/alertmanager.yml
global:
  resolve_timeout: 1m
  smtp_smarthost: 'smtp.qq.com:465'
  smtp_from: '957464230@qq.com'
  smtp_auth_username: '957464230@qq.com'
  smtp_auth_password: 'ebahmhiwxwxobcdb'
  smtp_hello: '@qq.com'
  smtp_require_tls: false

route:
  group_by: ['alertname']
  group_wait: 1s
  group_interval: 5s
  repeat_interval: 10s
  receiver: 'wechat'         #指定接收者为微信(wechat)
receivers:
  - name: 'web.hook'
    #webhook_configs:
      #- url: 'http://127.0.0.1:5001/'
    email_configs:
      - to: '1509708480@qq.com'
  - name: dingding
    webhook_configs:
    - url: 'http://172.31.7.203:8060/dingtalk/webhook1/send'
      send_resolved: true
  - name: 'wechat'
    wechat_configs:
    - corp_id: ww2f41ad944b1d8c35    #企业微信上获取的企业ID
      #to_user: '@all'       #发送给哪些用户,all是指发送给公司所有人
      to_party: 2          #发送给哪个部门,2是指部门ID,企业微信中每个部门都有唯一的部门ID,通过指定部门ID,可以将告警发送给指定的部门
      agent_id: 1000002          #企业微信上获取的AgentID
      api_secret: 0I2gsv2EKli_QeZ8aM3mOrr1Pt2G-XwiTwJ-bs3YFSI      #企业微信上获取的Secret
      send_resolved: true       #是否发送恢复告警的通知
inhibit_rules:
  - source_match:
      severity: 'critical'
    target_match:
      severity: 'warning'
    equal: ['alertname', 'dev', 'instance']
查看企业微信部门ID请参考8.4.3章节第4小步
重启alertmanager服务
systemctl restart alertmanager.service
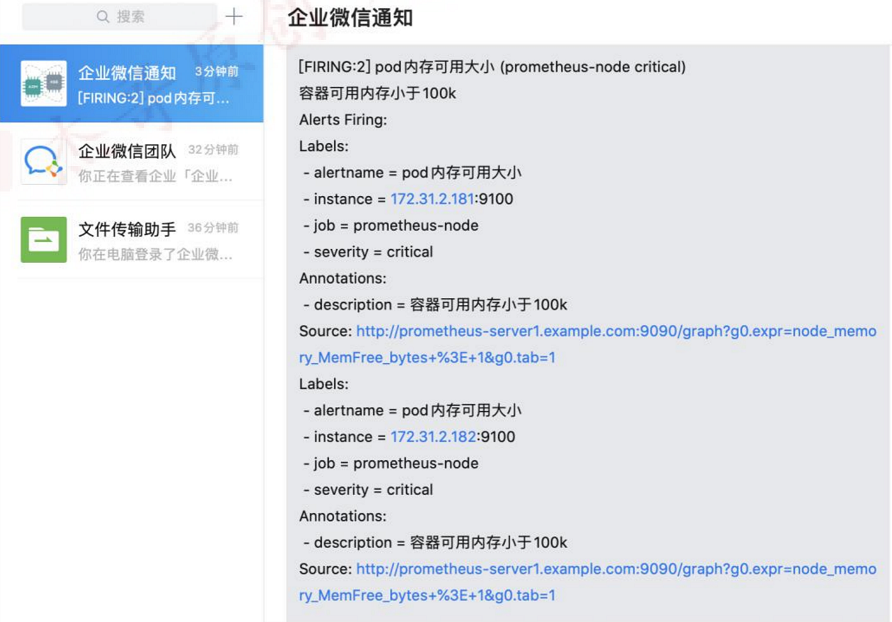
8.4.8 验证
查看企业微信是否收到告警信息
8.5 消息分类发送
可以根据prometheus的报警规则ru配置文件中的属性信息,将告警进行分类发送
如:将severity级别为critical 的通知消息发送到dingding,其它级别的告警则还按照原有配置发送给QQ邮箱,将service值为pods的告警信息发送给微信等等
查看prometheus的rules文件:
vim /apps/prometheus/rules/prometheus_rule.yaml #备注部分为修改内容,该内容为告警内容的属性标签信息,可以根据此信息对告警进行匹配和过滤,然后将告警分类发送
/apps/prometheus/rules/prometheus_rule.yaml
groups:
  - name: alertmanager_pod.rules
    rules:
    - alert: Pod_all_cpu_usage
      expr: (sum by(name)(rate(container_cpu_usage_seconds_total{image!=""}[5m]))*100) > 1
      for: 2m
      labels:
        service: pods              #修改部分
      annotations:
        description: 容器 {{ $labels.name }} CPU 资源利用率大于 10% , (current value is {{ $value }})
        summary: Dev CPU 负载告警

    - alert: Pod_all_memory_usage
      #expr: sort_desc(avg by(name)(irate(container_memory_usage_bytes{name!=""}[5m]))*100) > 10  #内存大于 10%
      expr: sort_desc(avg by(name)(irate(node_memory_MemFree_bytes {name!=""}[5m]))) > 2 #内存大于 2G
      for: 2m
      labels:
        severity: critical         #修改部分
      annotations:
        description: 容 器 {{ $labels.name }} Memory 资 源 利 用 率 大 于 2G , (current value is{{ $value }})
        summary: Dev Memory 负载告警
    - alert: Pod_all_network_receive_usage
      expr: sum by(name)(irate(container_network_receive_bytes_total{container_name="POD"}[1m])) > 1
      for: 2m
      labels:
        severity: critical             #修改部分
      annotations:
        description: 容器 {{ $labels.name }} network_receive 资源利用率大于 50M , (current value is{{ $value }})
    - alert: node 内存可用大小
      expr: node_memory_MemFree_bytes < 4*1024*1024*1024 #故意写错的,用于演示效果
      for: 2m
      labels:
        severity: critical             #修改部分
      annotations:
        description: node节点可用内存小于4G
注意:如果一个报警规则同一时间只会发送给一个报警媒介,如果一个告警规则中设置了两个标签,这两个标签分别匹配到不同的告警媒介(如第一个匹配到微信,第二个匹配到钉钉),那么告警只会发送给微信,而不会发送给钉钉,这是因为第一个标签会先匹配,覆盖掉第二个标签,因此我们只会接收到第一个标签的告警内容。
8.5.1 alertmanager配置
这里将severity级别为critical的告警发送给钉钉,其他类型的告警发送给QQ邮箱
在172.31.7.202上修改alertmanager配置:
vim /apps/alertmanager/alertmanager.yml #备注部分为修改内容
global:
  resolve_timeout: 1m
  smtp_smarthost: 'smtp.qq.com:465'
  smtp_from: '957464230@qq.com'
  smtp_auth_username: '957464230@qq.com'
  smtp_auth_password: 'ebahmhiwxwxobcdb'
  smtp_hello: '@qq.com'
  smtp_require_tls: false

route:
  group_by: ['alertname']
  group_wait: 1s
  group_interval: 5s
  repeat_interval: 10s
  receiver: 'web.hook'         #默认将其他级别的告警发送给QQ邮箱(此处为修改内容)
#添加消息路由,将critical级别的消息发给钉钉
  routes:
  - receiver: dingding    #critical级别的消息发给钉钉,列表形式,可以写多个(此处为修改内容)
    group_wait: 10s
    match_re:
      severity: critical       #此处为修改内容
receivers:
  - name: 'web.hook'
    #webhook_configs:
      #- url: 'http://127.0.0.1:5001/'
    email_configs:
      - to: '1509708480@qq.com'
  - name: dingding
    webhook_configs:
    - url: 'http://172.31.7.203:8060/dingtalk/webhook1/send'
      send_resolved: true
  - name: 'wechat'
    wechat_configs:
    - corp_id: ww2da3a874aef010ce         #此处为修改内容
      #to_user: '@all'
      to_party: 2
      agent_id: 1000002
      api_secret: 0I2gsv2EKli_QeZ8aM3mOrr1Pt2G-XwiTwJ-bs3YFSI
      send_resolved: true
inhibit_rules:
  - source_match:
      severity: 'critical'
    target_match:
      severity: 'warning'
equal: ['alertname', 'dev', 'instance']
重启alertmanager服务,使配置生效
systemctl restart alertmanager
8.5.2 修改prometheus报警规则
为了查看告警效果,修改报警规则配置:将node内存小于4G的告警severity级别定义为critical级别;将内存小于6G的告警severity级别定义为info级别
在172.31.7.201节点上,修改prometheus报警规则配置
vim /apps/prometheus/rules/prometheus_rule.yaml #备注部分为修改内容
groups:
  - name: alertmanager_pod.rules
    rules:
    - alert: Pod_all_cpu_usage
      expr: (sum by(name)(rate(container_cpu_usage_seconds_total{image!=""}[5m]))*100) > 1
      for: 2m
      labels:
        severity: critical
        service: pods
      annotations:
        description: 容器 {{ $labels.name }} CPU 资源利用率大于 10% , (current value is {{ $value }})
        summary: Dev CPU 负载告警

    - alert: Pod_all_memory_usage
      #expr: sort_desc(avg by(name)(irate(container_memory_usage_bytes{name!=""}[5m]))*100) > 10  #内存大于 10%
      expr: sort_desc(avg by(name)(irate(node_memory_MemFree_bytes {name!=""}[5m]))) > 2 #内存大于 2G
      for: 2m
      labels:
        severity: critical
      annotations:
        description: 容 器 {{ $labels.name }} Memory 资 源 利 用 率 大 于 2G , (current value is{{ $value }})
        summary: Dev Memory 负载告警

    - alert: Pod_all_network_receive_usage
      expr: sum by(name)(irate(container_network_receive_bytes_total{container_name="POD"}[1m])) > 1
      for: 2m
      labels:
        severity: critical
      annotations:
        description: 容器 {{ $labels.name }} network_receive 资源利用率大于 50M , (current value is{{ $value }})

    - alert: node 内存可用大小
      expr: node_memory_MemFree_bytes < 4*1024*1024*1024 #node可用内存小于4G就告警
      for: 2m
      labels:
        severity: critical       #定义安全级别为critical
      annotations:
        description: node节点可用内存小于4G
    - alert: node 内存可用大小
      expr: node_memory_MemFree_bytes < 6*1024*1024*1024 # node可用内存小于6G就告警
      for: 2m
      labels:
        severity: info      #定义安全级别为info
      annotations:
        description: node节点可用内存小于6G
重启prometheus服务,使配置生效
systemctl restart prometheus
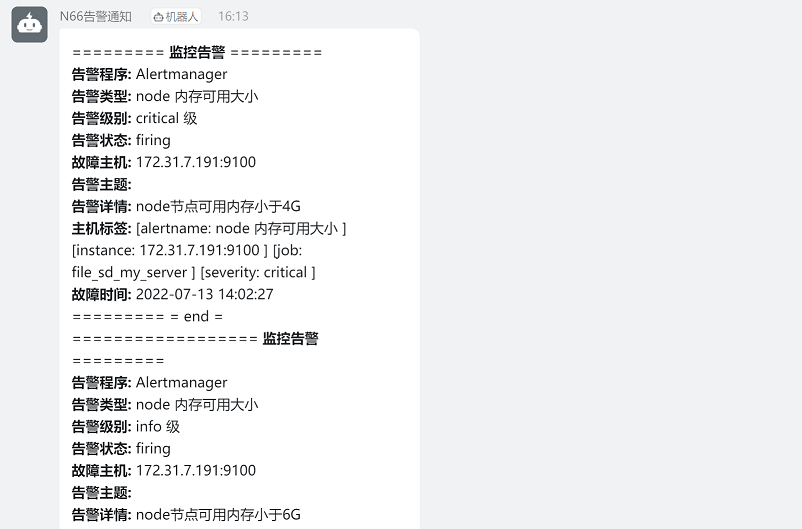
8.5.3 验证消息发送
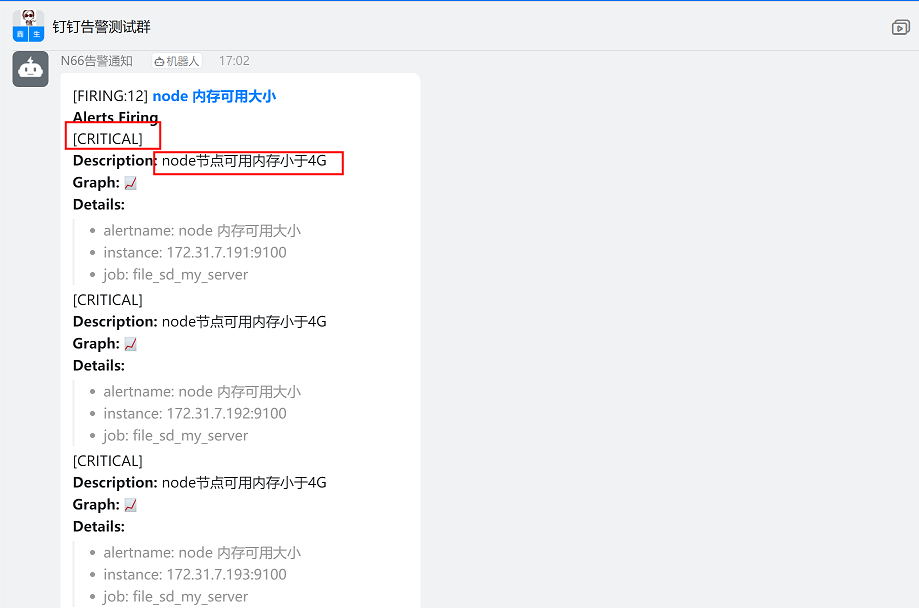
1、查看钉钉告警:
钉钉群接收到critical级别、内存小于4G的告警,和预期一致
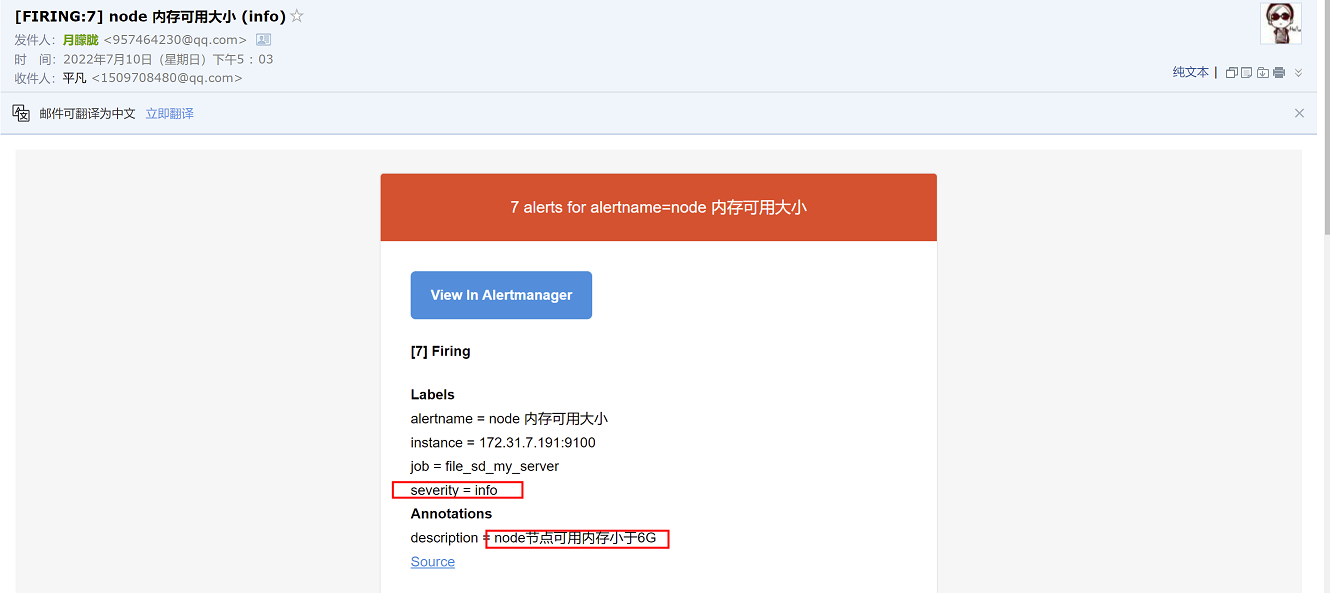
2、查看QQ邮箱
QQ邮箱接收到info级别、内存小于6G的告警,和预期一致
8.6 自定义消息模板
一般情况下,要求告警的内容精简、易懂,在以上实验中,告警内容比较多、比较杂、可读性不强,这是因为使用的默认的告警模板,要想使告警内容更加易读和精简,需要自定义消息模板,对告警信息进行调整,以想要的格式发送出去
Prometheus默认有自己的默认消息模板,这个模板我们无法更改,因此我们需要自定义一个消息模板,然后在alertmanager配置中进行调用。
配置消息模板,需要根据告警内容中的字段进行编辑,配置自己想要的告警信息
8.6.1 配置微信自定义消息模板
8.6.1.1 创建微信自定义消息模板
在172.31.7.202上执行命令:
创建存放模板的目录
mkdir -p /apps/alertmanager/template
编辑模板文件
vim /apps/alertmanager/template/message_template.templ #微信默认引用wechat.default.message模板,这里通过引用wechat.default.message,来调用自定义消息模板
{{ define " wechat.default.message " }}
{{ range $i, $alert :=.Alerts }}
===alertmanager 监控报警===
告警状态: {{ .Status }}
告警级别: {{ $alert.Labels.severity }}
告警类型: {{ $alert.Labels.alertname }}
告警应用: {{ $alert.Annotations.summary }}
故障主机: {{ $alert.Labels.instance }}
告警主题: {{ $alert.Annotations.summary }}
触发阀值: {{ $alert.Annotations.value }}
告警详情: {{ $alert.Annotations.description }}
触发时间: {{ $alert.StartsAt.Format "2006-01-02 15:04:05" }}  #以2006-01-02 15:04:05的格式显示告警时间
===========end============
{{ end }}
{{ end }}
8.6.1.2 alertmanager引用模板
在172.31.7.202上配置alertmanager
vim /apps/alertmanager/alertmanager.yml #备注部分为新增内容
global:
  resolve_timeout: 1m
  smtp_smarthost: 'smtp.qq.com:465'
  smtp_from: '957464230@qq.com'
  smtp_auth_username: '957464230@qq.com'
  smtp_auth_password: 'ebahmhiwxwxobcdb'
  smtp_hello: '@qq.com'
  smtp_require_tls: false

templates:
  - '/apps/alertmanager/template/message_template.templ'   #alertermanager引用模板(此处为新增内容)

route:
  group_by: ['alertname']
  group_wait: 1s
  group_interval: 5s
  repeat_interval: 10s
  receiver: 'web.hook'
#添加消息路由
  routes:
  - receiver: dingding   #critical 级别的消息发给钉钉
    group_wait: 10s
    match_re:
      severity: critical
receivers:
  - name: 'web.hook'
    #webhook_configs:
      #- url: 'http://127.0.0.1:5001/'
    email_configs:
      - to: '1509708480@qq.com'
  - name: dingding
    webhook_configs:
    - url: 'http://172.31.7.203:8060/dingtalk/webhook1/send'
      send_resolved: true
  - name: 'wechat'
    wechat_configs:
    - corp_id: 'ww2f41ad944b1d8c35'
      #to_user: '@all'
      to_party: '2'
      agent_id: '1000002'
      api_secret: '0I2gsv2EKli_QeZ8aM3mOrr1Pt2G-XwiTwJ-bs3YFSI'
      send_resolved: true
inhibit_rules:
  - source_match:
      severity: 'critical'
    target_match:
      severity: 'warning'
equal: ['alertname', 'dev', 'instance']
重启服务
systemctl restart alertmanager
8.6.1.3 验证
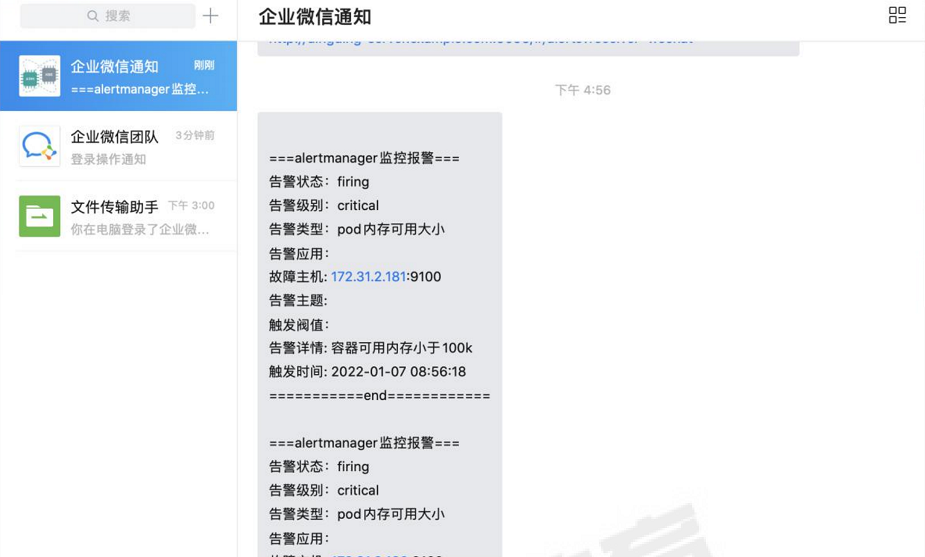
注意:如果企业微信接收不到告警消息,则可能是企业微信的接口屏蔽了某些不可信的IP
可通过开启debug,查看报错:

错误码解释:
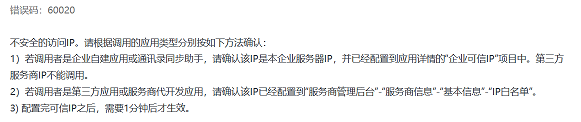
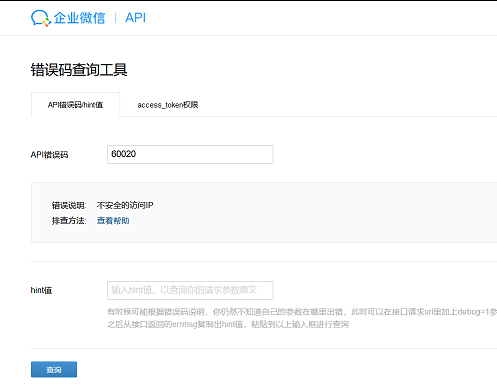
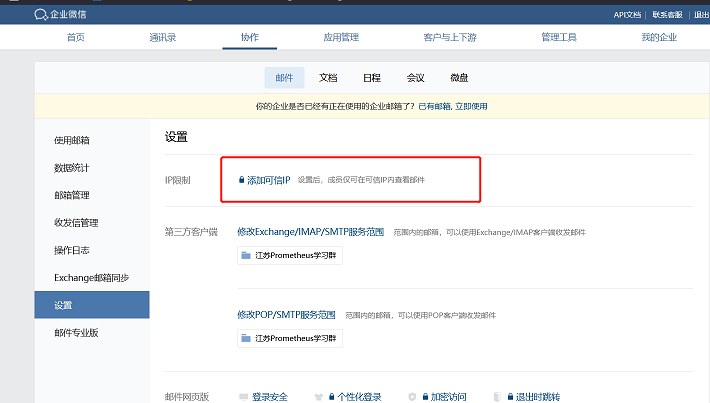
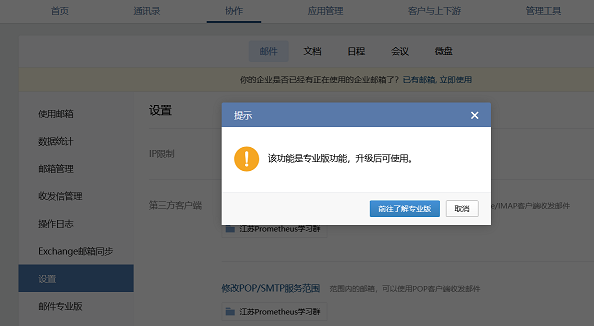
解决方法:
需要一定的费用,添加可信IP
8.6.2 配置钉钉自定义消息模板-关键字认证
上面配置钉钉告警,使用的是命令行指定参数的方式运行dingtalk服务,这样存在一个缺点:一旦服务器重启dingtalk进程不会自动重启。因此这里使用dingtalk配置文件的方式进行拉起dingtalk服务,即使服务器出现重启也不影响dingtalk服务。
另外,引用模板采用关键字认证的方式进行告警。
8.6.2.1 创建钉钉自定义消息模板
由于dingtalk部署在172.31.7.203上,消息模板要和dingtalk存放在同一台主机上
在172.31.7.203上执行命令:
1、创建存放消息模板的目录
mkdir -p /apps/prometheus-webhook-dingtalk/template
2、创建自定义消息模板
vim /apps/prometheus-webhook-dingtalk/template/alertmanager-dingtalk.tmpl
注意:配置文件中的"email.to.message"要和dingtalk配置文件config.yml文件中message的text参数的值保持一致,否则将无法调用该模板
{{ define "email.to.message" }}

{{- if gt (len .Alerts.Firing) 0 -}}
{{- range $index, $alert := .Alerts -}}

=========  **监控告警** =========

**告警程序:**     Alertmanager
**告警类型:**    {{ $alert.Labels.alertname }}
**告警级别:**    {{ $alert.Labels.severity }} 级
**告警状态:**    {{ .Status }}
**故障主机:**    {{ $alert.Labels.instance }} {{ $alert.Labels.device }}
**告警主题:**    {{ .Annotations.summary }}
**告警详情:**    {{ $alert.Annotations.message }}{{ $alert.Annotations.description}}
**主机标签:**    {{ range .Labels.SortedPairs  }}  </br> [{{ .Name }}: {{ .Value | markdown | html }} ]
{{- end }} </br>

**故障时间:**    {{ ($alert.StartsAt.Add 28800e9).Format "2006-01-02 15:04:05" }}
========= = end =  =========
{{- end }}
{{- end }}

{{- if gt (len .Alerts.Resolved) 0 -}}
{{- range $index, $alert := .Alerts -}}

========= 告警恢复 =========
**告警程序:**     Alertmanager
**告警主题:**    {{ $alert.Annotations.summary }}
**告警主机:**    {{ .Labels.instance }}
**告警类型:**    {{ .Labels.alertname }}
**告警级别:**    {{ $alert.Labels.severity }} 级
**告警状态:**    {{   .Status }}
**告警详情:**    {{ $alert.Annotations.message }}{{ $alert.Annotations.description}}
**故障时间:**    {{ ($alert.StartsAt.Add 28800e9).Format "2006-01-02 15:04:05" }}
**恢复时间:**    {{ ($alert.EndsAt.Add 28800e9).Format "2006-01-02 15:04:05" }}

========= = **end** =  =========
{{- end }}
{{- end }}
{{- end }}
注意:文件第一行中” email.to.message”要和dingtalk配置文件中message字段保持一致,在后续dingtalk配置文件中会有说明
8.6.2.2 修改dingtalk配置文件
1、修改dingtalk配置文件,调用报警模板(这里以关键字认证方式进行配置)
vim config.yml
## Request timeout
# timeout: 5s

## Customizable templates path
templates:
  - /apps/prometheus-webhook-dingtalk/template/alertmanager-dingtalk.tmpl     #引用钉钉报警模板文件

## You can also override default template using `default_message`
## The following example to use the 'legacy' template from v0.3.0
# default_message:
#   title: '{{ template "legacy.title" . }}'
#   text: '{{ template "legacy.content" . }}'

## Targets, previously was known as "profiles"
targets:
  webhook1:          #加签钉钉配置
    url: https://oapi.dingtalk.com/robot/send?access_token=xxxxxxxxxxxx
    # secret for signature
    secret: SEC000000000000000000000
  webhook2:      #修改不加签钉钉配置项
    url: https://oapi.dingtalk.com/robot/send?access_token=de8161d3dcecf4c8547591d1744c64ee3c894c26e66e5d5f067f4394b93dfc0c        #钉钉机器人的webhook地址
    message:      #手动添加message配置
      # Use legacy template
      #title: '{{ template "legacy.title" . }}'
      text: '{{ template "email.to.message" . }}'   ##通过指定字段” email.to.message”,引用钉钉自定义消息模板,这个配置必须加上,否则无法引用自定义消息模板
  webhook_legacy:
    url: https://oapi.dingtalk.com/robot/send?access_token=xxxxxxxxxxxx
    # Customize template content
    message:
      # Use legacy template
      title: '{{ template "legacy.title" . }}'
      text: '{{ template "legacy.content" . }}'
  webhook_mention_all:           #@所有人钉钉配置
    url: https://oapi.dingtalk.com/robot/send?access_token=xxxxxxxxxxxx
    mention:
      all: true
  webhook_mention_users:           #指定用户钉钉配置
    url: https://oapi.dingtalk.com/robot/send?access_token=xxxxxxxxxxxx
    mention:
      mobiles: ['156xxxx8827', '189xxxx8325']
2、重启dingtalk服务
systemctl daemon-reload
systemctl restart prometheus-webhook-dingtalk
8.6.2.3 修改alertmanager
1、修改alertmanager配置
在172.31.7.202上执行命令:
vim /apps/alertmanager/alertmanager.yml #备注部分为修改内容
global:
  resolve_timeout: 1m
  smtp_smarthost: 'smtp.qq.com:465'
  smtp_from: '957464230@qq.com'
  smtp_auth_username: '957464230@qq.com'
  smtp_auth_password: 'ebahmhiwxwxobcdb'
  smtp_hello: '@qq.com'
  smtp_require_tls: false

route:
  group_by: ['alertname']
  group_wait: 1s
  group_interval: 5s
  repeat_interval: 10s
  receiver: 'dingding'       #指定告警接收者为钉钉
#添加消息路由
#  routes:
#  - receiver: dingding #critical 级别的消息发给钉钉
#    group_wait: 10s
#    match_re:
#      severity: critical
receivers:
  - name: 'web.hook'
    #webhook_configs:
      #- url: 'http://127.0.0.1:5001/'
    email_configs:
      - to: '1509708480@qq.com'
  - name: dingding      #配置钉钉告警
    webhook_configs:
    - url: 'http://172.31.7.203:8060/dingtalk/webhook2/send'          #修改引用的url,url中http://172.31.7.203:8060/dingtalk/的后一级路径名必须写为webhook2,以调用dingtalk配置中webhook2的相关配置(此处为修改内容)
      send_resolved: true
  - name: 'wechat'
    wechat_configs:
    - corp_id: 'ww978ecfbc45db07aa'
      to_user: '@all'
      #to_party: '2'
      agent_id: '1000002'
      api_secret: '8w1NWxJF_jOqGa1y78ry96wgRtmi6wWqXVwFXnwh4BI'
      send_resolved: true
inhibit_rules:
  - source_match:
      severity: 'critical'
    target_match:
      severity: 'warning'
equal: ['alertname', 'dev', 'instance']
注意:在配置钉钉url路径时,url中http://172.31.7.203:8060/dingtalk/的后一级路径名必须写为webhook2,以调用dingtalk配置中webhook2的相关配置
2、重启服务
systemctl restart alertmanager
8.6.2.4 验证
查看钉钉群告警信息
8.7 告警抑制和静默
8.7.1 告警抑制
基于告警规则,当阈值超过80%就不再发60%的告警,即由60%的表达式触发的告警被抑制了。
8.7.1.1 修改prometheus报警规则
设置node可用内存小于4G,为critical级别告警;可用内存小于6G,为warning级别告警
设置node磁盘使用率大于80%,为critical级别告警;磁盘使用率大于60%,为warning级别告警
vim prometheus_rule.yaml
groups:
    - alert: node 内存可用大小
      expr: node_memory_MemFree_bytes < 4*1024*1024*1024 #node内存小于4G
      for: 2m
      labels:
        severity: critical     #设置级别为critical级别
      annotations:
        description: node节点可用内存小于4G
    - alert: node 内存可用大小
      expr: node_memory_MemFree_bytes < 6*1024*1024*1024 #node内存小于6G
      for: 2m
      labels:
        severity: warning     #设置级别为warning级别
      annotations:
        description: node节点可用内存小于6G
    - alert: 磁盘容量
      expr: 100-(node_filesystem_free_bytes{fstype=~"ext4|xfs"}/node_filesystem_size_bytes{fstype=~"ext4|xfs"}*100) > 80 #磁盘容量利用率大于 80%
      for: 2s
      labels:
        severity: critical
      annotations:
        summary: "{{$labels.mountpoint}} 磁盘分区使用率过高!"
        description: "{{$labels.mountpoint }} 磁盘分区使用大于 80%(目前使用:{{$value}}%)"
    - alert: 磁盘容量
      expr: 100-(node_filesystem_free_bytes{fstype=~"ext4|xfs"}/node_filesystem_size_bytes{fstype=~"ext4|xfs"}*100) > 60 #磁盘容量利用率大于 60%
      for: 2s
      labels:
        severity: warning
      annotations:
        summary: "{{$labels.mountpoint}} 磁盘分区使用率过高!"
        description: "{{$labels.mountpoint }} 磁盘分区使用大于 80%(目前使用:{{$value}}%)"
重启prometheus
systemctl restart prometheus
8.7.1.2 修改alertmanager配置
配置内容如下:
vim alertmanager.yml
global:
  resolve_timeout: 1m
  smtp_smarthost: 'smtp.qq.com:465'
  smtp_from: '957464230@qq.com'
  smtp_auth_username: '957464230@qq.com'
  smtp_auth_password: 'ebahmhiwxwxobcdb'
  smtp_hello: '@qq.com'
  smtp_require_tls: false

#templates:
#  - '/apps/alertmanager/template/alertmanager-dingtalk.tmpl'   #alertermanager引用模板

route:
  group_by: ['alertname']
  group_wait: 1s
  group_interval: 5s
  repeat_interval: 10s
  receiver: 'dingding'
#添加消息路由
#  routes:
#  - receiver: dingding #critical 级别的消息发给钉钉
#    group_wait: 10s
#    match_re:
#      severity: critical
receivers:
  - name: 'web.hook'
    #webhook_configs:
      #- url: 'http://127.0.0.1:5001/'
    email_configs:
      - to: '1509708480@qq.com'
  - name: dingding
    webhook_configs:
    - url: 'http://172.31.7.203:8060/dingtalk/webhook1/send'
      send_resolved: true
  - name: 'wechat'
    wechat_configs:
    - corp_id: 'ww978ecfbc45db07aa'
      to_user: '@all'
      #to_party: '2'
      agent_id: '1000002'
      api_secret: '8w1NWxJF_jOqGa1y78ry96wgRtmi6wWqXVwFXnwh4BI'
      send_resolved: true
inhibit_rules:             #抑制规则配置
  - source_match:
      severity: 'critical'      #匹配源目标为critical级别的告警
    target_match:
      severity: 'warning'     #匹配目标为warning级别的告警
equal: ['alertname', 'dev', 'instance']
重启alertmanager
systemctl restart alertmanager
8.7.1.3 验证
查看钉钉告警,node可用内存告警只存在超过4G(critical级别)的告警,说明warning级别的告警被抑制
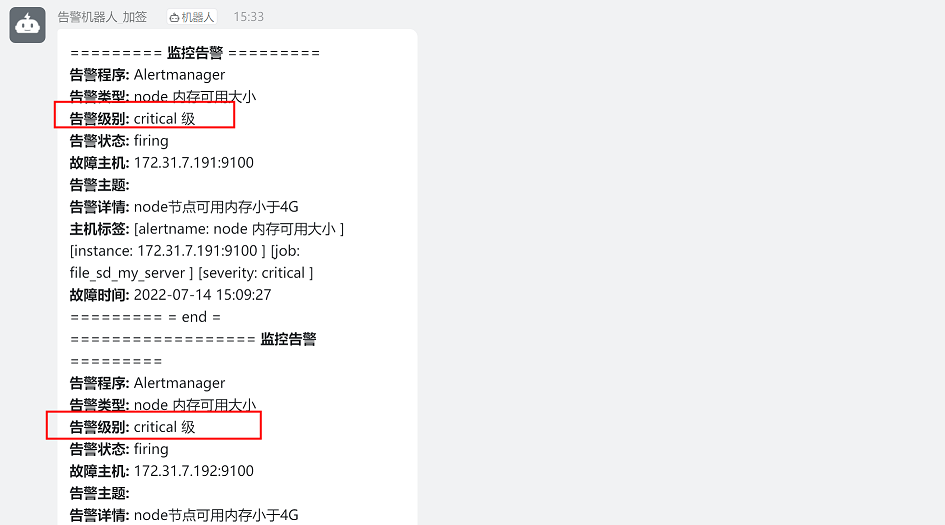
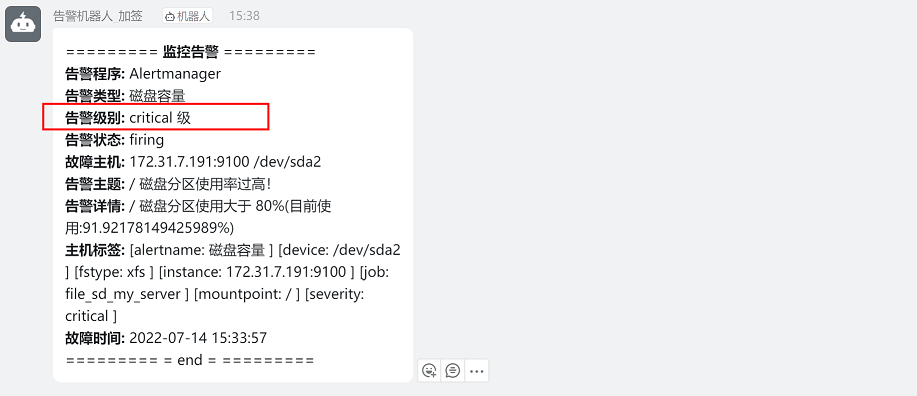
node磁盘使用率告警只存在超过80%(critical级别)的告警,说明warning级别的告警被抑制
8.7.2 告警静默
8.7.2.1 手动静默
先找到要静默的告警事件,然后手动静默指定的事件
使用场景:
在做代码上线或者版本升级时,可以预知告警会发生,为了不让告警发出,可将此告警项在上线或升级期间不发出告警,上线或升级完成后再接触静默
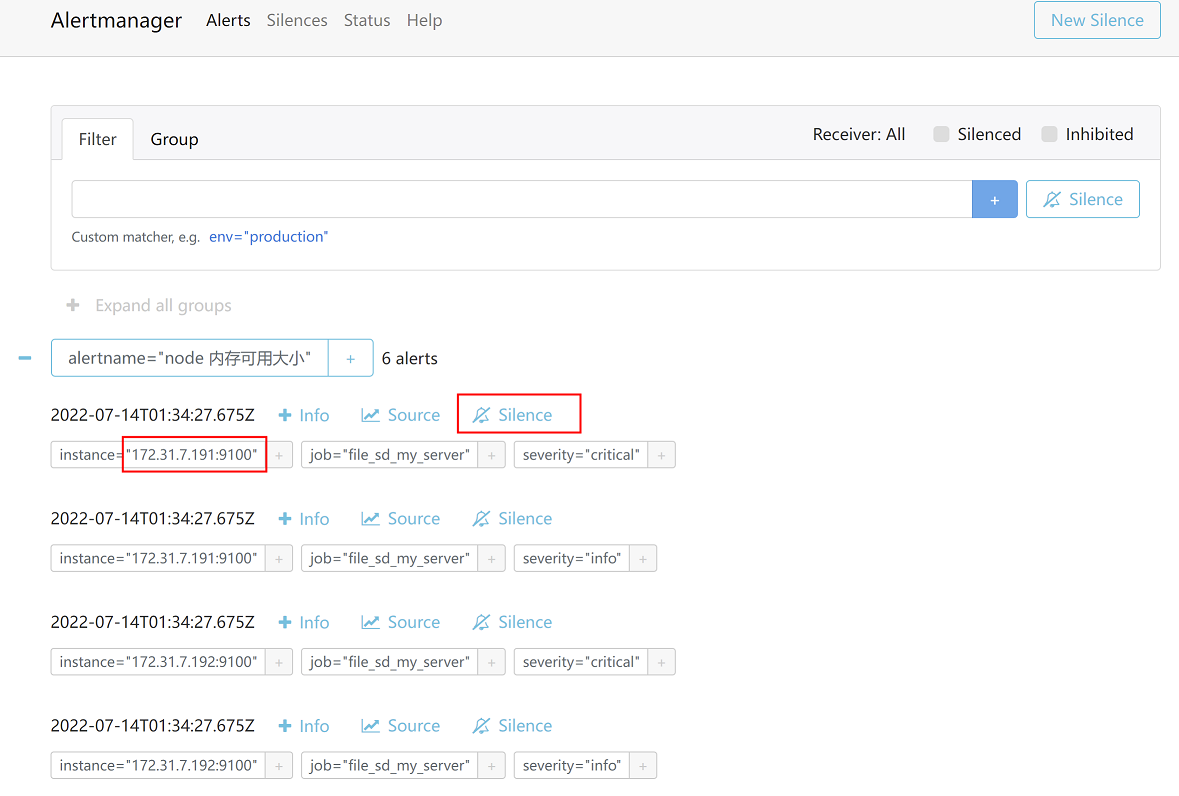
这里以静默172.31.7.191节点critical级别的告警为例(172.31.7.191存在critical和info两个级别的告警)
1、在alertmanager控制台,选择Alerts,找到172.31.7.191节点,点击后方的Slience按钮
2、填写静默规则创建者和说明,然后点击create按钮
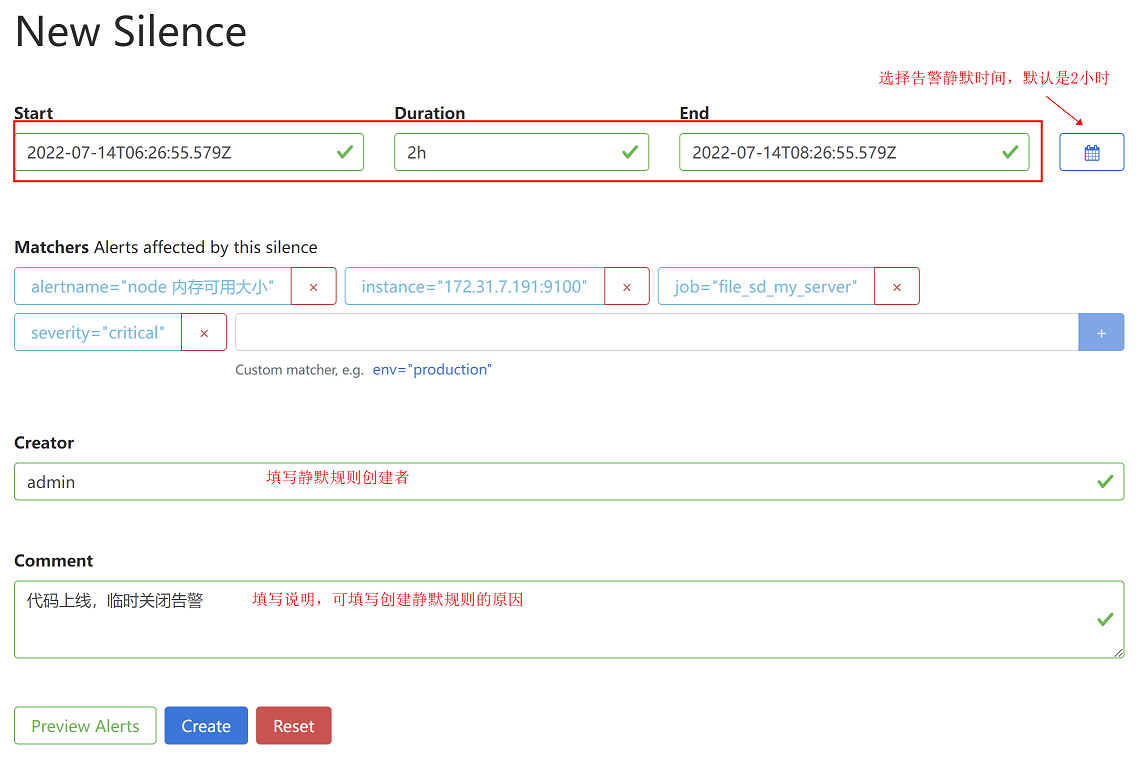
3、查看静默规则
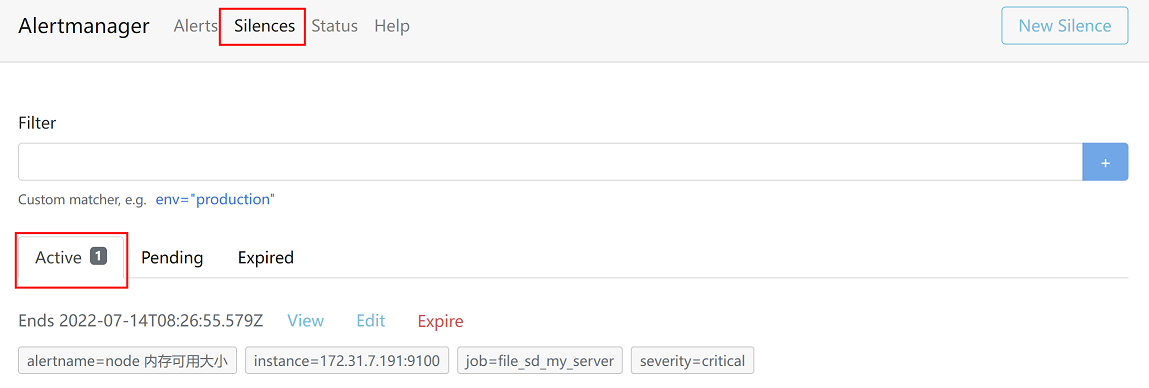
4、验证
查看钉钉告警中只有172.31.7.191节点info级别的的告警,critical级别的告警不再发出,说明静默规则已经生效

8.8 alertmanager高可用
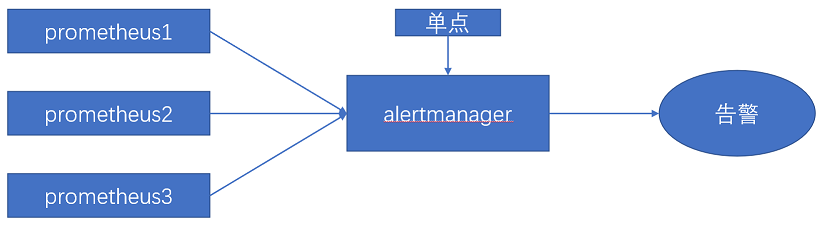
8.8.1 单机部署alertmanager
大部分使用alertmanager组件的时候,都是用的单点架构,一旦alertmanager出现问题,prometheus发送的告警将无法发送给用户。
架构图如下所示:
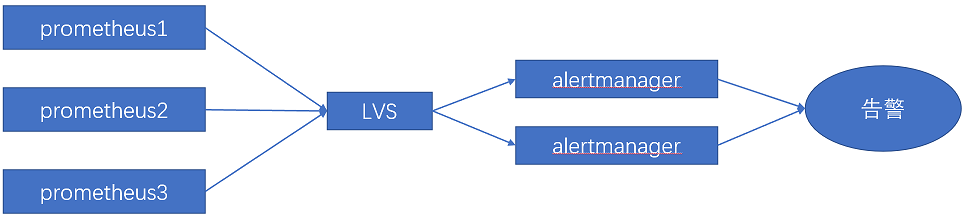
8.8.2 基于负载均衡的alertmanager
通过在alertmanager前端设置一个负载均衡(lvs或者haproxy)将prometheus的请求转发给负载均衡,由负载均衡转发给后端的多台alertmanager,实现alertmanager的高可用。
架构图如下所示:
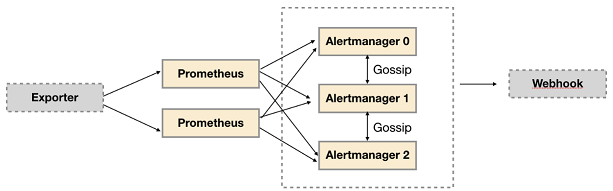
8.8.3 基于Gossip机制的alertmanager
Gossip介绍链接:https://yunlzheng.gitbook.io/prometheus-book/part-ii-prometheus-jin-jie/readmd/alertmanager-high-availability
Alertmanager 引入了 Gossip 机制。Gossip 机制为多个 Alertmanager 之间提供了信息传递的机制。确保及时在多个 Alertmanager 分别接收到相同告警信息的情况下,并且只有一个告警通知被发送给 Receiver。
集群环境搭建:
为了能够让 Alertmanager 节点之间进行通讯,需要在 Alertmanager 启动时设置相应的参数。其中主要的参数包括:
--cluster.listen-address string: 当前实例集群服务监听地址
--cluster.peer value: 初始化时关联的其它实例的集群服务地址
架构图如下所示:
8.9 PrometheusAlert
PrometheusAlert 是开源的运维告警中心消息转发系统,支持主流的监控系统 Prometheus、Zabbix,日志系统 Graylog2,Graylog3、数据可视化系统 Grafana、SonarQube,阿里云-云监控,以及所有支持 WebHook接口的系统发出的预警消息,支持将收到的这些消息发送到钉钉,微信,email,飞书,腾讯短信,腾讯电话,阿里云短信,阿里云电话,华为短信,百度云短信,容联云电话,七陌短信,七陌语音,TeleGram,百度 Hi(如流)等。
github链接:https://github.com/feiyu563/PrometheusAlert

文章评论